Application of Viscosity Cup in Printing ink viscosity measurement
How to measure the viscosity of printing ink?
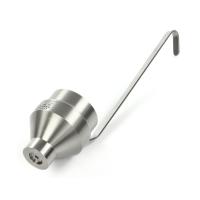
The viscosity of printing inks is usually tested using a measuring cup, also known as a Viscosity Cup. Among them, the common Viscosity Cups are: Ford Cup, DIN Cup, Zahn Cup, etc.

Which Viscosity Cup to choose?
Which Viscosity Cup to choose needs to be determined according to the type of ink and printing process. In actual operation, you can refer to the suggestions and requirements of the ink manufacturer to select a suitable Viscosity Cup to test the ink viscosity.
Which size Viscosity Cup to use depends on the type and viscosity range of the ink. Both Zahn cups and DIN cups have different numbers, corresponding to different viscosity ranges. In general, use smaller cups for lower viscosity inks and larger cups for higher viscosity inks.
For example, Zahn cups come in sizes 1 to 5, where:
Zahn No. 1 cup is suitable for low-viscosity liquids, such as water-based ink;
Zahn No. 2 and No. 3 cups are suitable for medium viscosity inks, such as screen printing inks;
Zahn No. 4 and No. 5 cups are suitable for high viscosity inks, such as flexographic printing inks.
There are similar classifications for DIN cups, such as DIN No. 1 to DIN No. 4 cups, with increasing viscosity ranges.

How to measure it?
When using a Viscosity Cup to measure ink viscosity, you can follow the steps below:
Prepare the ink to be tested, choose the appropriate Viscosity Cup (such as Zahn cup or DIN cup), and make sure the temperature of the Viscosity Cup and ink are the same to obtain accurate measurement results.
Make sure the Viscosity Cup is clean and free of ink or solvent residue. If necessary, the Viscosity Cup can be cleaned with an appropriate solvent.
Stir the ink well to ensure its uniformity.
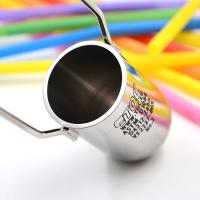
Pour the ink into the Viscosity Cup until it reaches the rim. Make sure the ink covers all surfaces inside the Viscosity Cup.
Lift the Viscosity Cup quickly and steadily to open the bottom outlet. At this time, the ink will flow out from the liquid outlet.
When the ink starts to come out, start the timer immediately. Stop timing when the liquid column from which the ink flows out breaks. The unit of time is usually seconds.
According to the type and number of the Viscosity Cup used, compare the measured time with the corresponding standard table to obtain the viscosity of the ink.
After the test is complete, clean the Viscosity Cup with the appropriate solvent and prepare it for the next test.
In the field of printing inks, Zahn Cup and DIN Cup are commonly used. When using, fill the Viscosity Cup with ink, then open the liquid outlet at the bottom, and observe the time when the ink flows out. Through this time and the corresponding standard table, the viscosity of the ink can be obtained. When choosing a Viscosity Cup, the first thing to know is the type of ink and the expected viscosity range. In actual operation, you can refer to the suggestions and requirements of the ink manufacturer to select a suitable Viscosity Cup to test the ink viscosity. During the measurement process, a certain speed and operation specification should be maintained to obtain accurate measurement results. If possible, perform multiple measurements to ensure reliability of the viscosity value. In actual operation, please follow the suggestions and requirements of the ink manufacturer.
- 1Coating viscosity determination - viscosity cup Yiwen
- 2Measuring method of coating viscosity
- 3Zahn Cup Method for Determination of Coating Viscosity
- 4Analysis of DIN ISO 12040 Printing ink xenon arc aging test colour fastness method
- 5How to measure the viscosity of paints with Ford Viscosity Cup?
- 6The difference between different viscosity cup viscosity
- 7Method for Determination of Coating Viscosity by Zain Cup
- 8Common Methods for Determination of Coating Viscosity
- 9Tu-4 Viscosity Cup Determination of Resin Viscosity