Test method for surface strength of paperboard printing
This article describes the method for determining the surface strength of paper and cardboard printing, including the definition of brushing, the principle of determination, and the experimental procedure. The ability of the paper to resist stretching is evaluated by using the pendulum acceleration method or the spring acceleration method, gradually increasing the printing speed until the surface of the paper begins to stretch. Instruments include an ink distributIon Meter and a print Tester that controls ink viscosity, printing pressure, and sample handling. The results are expressed in terms of printing speed and the maximum and minimum values are reported.
definition
Hair pulling——In the printing process, when the ink is applied to the surface of paper or cardboard, if the outward pulling force is greater than the cohesive force on the surface of the paper or cardboard, it will cause surface peeling. This phenomenon manifests as surface fluffing or tearing for uncoated paper or cardboard, while coated paper or cardboard may manifest as surface dusting, blistering and delamination, and even paper layer tearing. Brushing is an important index to evaluate the surface strength of paper.
Printed surface strength- refers to the minimum printing speed at which pressure is applied to the paper surface at a continuously increasing speed until the paper surface begins to appear fluffing. This velocity is usually expressed in meters per second (m/s). It reflects the resistance of the paper in the actual printing process, that is, at what speed the surface of the paper will begin to appear brushing, indicating the anti-stretching performance of the paper.
principle
When testing the printed surface strength of the paper, experiments are carried out using standard brushing oils. In the experiment, the printing speed was gradually increased at a constant speed until the paper surface began to be brushed. The printing speed at this time is the printing surface strength of the paper. This speed reflects the resistance of the paper during the printing process, and the higher the speed, the better the strength of the printed surface of the paper. In this way, it is possible to evaluate the resistance of the paper to the ink in the actual printing.
Instruments and materials
Instrument structure
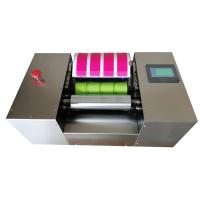
Ink distributIon Meter - including ink straws, polyurethane resin rollers, chrome rollers and other key components. The ink straw has a capacity of 2ml and a scale accuracy of 0.01ml. The polyurethane resin roller has a diameter of 60 mm and a length of 141 mm. The active chromium roller has a diameter of 94mm, a length of 144mm, and a rotational speed of 50r/min. The corresponding driven chrome roller has a diameter of 107 mm and a length of 155 mm. The small distribution drive roller has a diameter of 48 mm and a length of 35 mm. There are four ink discs with a diameter of 65mm and a width of 10mm.
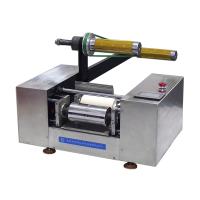
Printing Tester - mainly including printing fan, pendulum, spring accelerator and printing pressure device. The width of the printed sector is 22mm and the radius is 85mm. The pendulum has an elevation angle of 165° and a swing speed range from 0 to 116 cm/s. The spring accelerator has three speeds: 0 to 250 cm/s A, 0 to 300 cm/s B, and 0 to 350 cm/s. The pressure range of the printing pressure unit is 0 to 750 N, which is equivalent to 0 to 75 kg.
Other materials
Standard liners – available in both paper and rubber pads. Paper pads are used for letterpress printed specimens, and rubber pads are used for offset and gravure printed specimens, both of which are 1.5±0.1mm thick.
Standard brushing oils – There are two types of brushing oils, low viscosity and medium viscosity, which are used to test the surface strength of paperboard.
Standard brushing observation lamp - the angle of incidence of the light source is 75°, and the angle of the observation hole is 30°, which is used to detect the brushing of the paper surface.
Cleaning materials – including petroleum ether or solvent gasoline, petri dishes, soft brushes, and soft, lint-proof gauze for cleaning ink disparators and printing discs.
Preparation before the experiment
Paper samples are collected according to standard methods, and temperature and humidity treatment are carried out under standard environmental conditions to ensure the uniformity of the sample and the accuracy of the test results.
Cut the sample with a width of 22mm and a length of 250~270mm from the paper sample, and cut no less than 5 strips on the front and back sides to ensure the representativeness and reliability of the measurement.
Place the liner flat on the printed fan, secure the front end using a clip, and insert the other end of the liner into the tension shaft. Adjust the tension shaft to make the liner taut and make sure it is flat to avoid errors during testing.
Select the appropriate spring accelerator speed (A, B, or C) and clamp the specimen to the clamp and make sure it fits flat on the liner. The rotary handle adjusts the printing pressure to ensure that the pressure reaches the required standard value, such as 215N or 343W (190N), to ensure the accuracy and repeatability of the test.
Experimental Procedure
Ensure that all instruments and materials are balanced under standard atmospheric conditions, and laboratory temperatures should be kept within the range of (23±0.5) °C to ensure accuracy and consistency of testing.
Clamp the specimen onto the clamp, making sure that the paper strip is parallel to the liner. Rotate the printed fan to the starting position for testing.
Use an ink pipette to evenly inject the standard brushing oil into the printing disc. Wash the printing equipment to remove residual ink and ensure that the ink is evenly distributed. Use a soft-bristled brush and petroleum ether or solvent gasoline to clean the device.
The printing disc containing ink is loaded into the printing Tester, and the printing speed and pressure are adjusted to print the specimen. Pay attention to observe and record the brushing phenomenon on the specimen to determine the speed at which the paper surface begins to pull. If the specimen does not show fluffing at the expected speed, the viscosity of the ink can be adjusted or the printing speed can be increased to retest.
Result calculation
According to the brushing phenomenon observed during the printing process of the specimen, the minimum printing speed when the paper surface starts to be brushed is calculated. This velocity indicates the printed surface strength of the specimen and is measured in meters per second (m/s).
An arithmetic mean of the surface strength of the front and back sides of the specimen is provided and the maximum and minimum values are reported. To ensure that the result is accurate, take three significant figures.
The viscosity of the ink used, the printing pressure, the instrument model and the range of its printing speed are indicated in the report to facilitate the verification and comparison of results.
summary
Printing surface strength testing of paper and cardboard is an important method to evaluate the resistance of paper during the printing process. By increasing the printing speed until the brushing phenomenon occurs, the anti-brushing ability of the paper can be accurately determined. Ink viscosity and printing pressure need to be precisely controlled to ensure the accuracy and repeatability of the test results. The end result provides valid data on the surface strength that the paper may encounter in the actual print.