HANNA HI96821 Digital refractometer operation guide
1. Product introduction
The HANNA HI96821 digital refractometer is a high-precision instrument for measuring the concentration, specific gravity and other parameters of sodium chloride solutions. This guide introduces in detail how to use the instrument, calibration steps, measurement operations, and common problem handling, helping users quickly master the use of the device.
2. Unpacking and preliminary inspection
Check the packaging: After receiving the instrument, check that the packaging is in good condition and contact the supplier or the HANNA service center immediately if there is any shipping damage.
Accessories list:
HI96821 host ×1
9V battery ×1
Plastic straws ×1
Instruction Manual & Certificate of Quality ×1
Notes:
Retain the packing material until it is confirmed that the instrument is working properly.
In case of failure, all accessories need to be returned to their original packaging and sent back for repair.
3. Introduction to the function of the instrument
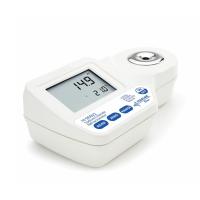
1. Appearance and button description
LCD screen: displays measurement data, error codes, and more.
Main display: Displays the measured values (e.g. NaCl concentration, specific gravity, etc.).
Secondary display: Displays the temperature value (flashes if out of range).
Key Functions:
READ: Measure the sample.
ZERO: Calibrate the instrument.
RANGE: Toggles the unit of measurement.
ON/OFF: Powered on or off.
2. Display a description
battery level (flashes when low).
Measurement progress label (displays measurement status).
CAL (Calibration Mode).
ATC (automatic temperature compensation, flashes when 10.0-40.0°C is exceeded).
Temperature unit (°C or °F).
Fourth, the measurement guide
1. Prepare before measuring
Make sure the instrument is calibrated (see below for calibration methods).
Use a plastic pipette to aspirate the sample and avoid scratching the prism with a metal tool.
The sample temperature should be close to the instrument temperature, otherwise wait for 1 min for thermal equilibration.
2. Measurement steps
Clean the prism and make sure it is dry.
Add the sample dropwise to the sample well, completely covering the prism.
Press the READ button to measure, and the result will be displayed on the home screen.
Once the measurement is complete, blot the sample with a soft cloth and rinse the prism with distilled water.
3. Precautions
Avoid direct sunlight and cover with hands or plastic wrap.
Do not immerse the instrument in water.
Only apply to sodium chloride solutions and avoid contact with organic solvents or liquids at extreme temperatures.
5. Calibration procedures
1. Calibration procedure
After powering on, the instrument self-tests and displays the battery level.
Fill the sample wells with distilled or deionized water.
Press the ZERO button to calibrate, if there is no error message, the calibration will be successful.
Blot the water with a soft cloth and the instrument is ready for measurement.
2. Calibration timing
Daily before first use.
After replacing the battery.
When the ambient temperature changes greatly.
6. Change the unit of measurement
1. Concentration unit switching
Press the RANGE key to cycle through:
G-G(g/100g)
G-L(g/100mL)
S.G (specific gravity)
BAU (weight)
2. Temperature unit switching
Press and hold the ON/OFF button for 8 seconds to enter the setting mode.
Continue to press and hold the ON/OFF key while pressing the ZERO key to toggle °C/°F.
7. Prepare standard NaCl solution
Weigh high-purity dried NaCl (CAS#7647-14-5) using an analytical balance.
Add distilled water to make the total weight 100 g (if preparing a 5% NaCl solution, weigh 5 g NaCl + 95 g water).
8. Battery replacement
After powering off, invert the instrument and rotate the battery cover counterclockwise.
Take out the old battery and insert the new 9V battery (pay attention to the positive and negative poles).
Replace the battery cover and screw it clockwise.