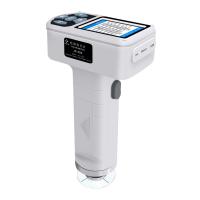
3NH Spectrophotometer Instruction Manual (NS800, NS810)

Click to view price and details
This instrument is a domestic Spectrophotometer independently developed by Sannchi with completely independent intellectual property rights. It is a Spectrophotometer developed according to CIE (International Commission on Illumination) standards and national standards. Color meter with screen display; equipped with high-end color quality management software. It has the characteristics of convenient use, stable performance and accurate measurement. The instrument is powered by a lithium battery, or it can be powered by a DC external power supply.
The 3nh Spectrophotometer Instruction Manual is applicable to models: NS800 Spectrophotometer, NS810 Spectrophotometer.
This instrument has the following advantages
1) 3.5-inch ultra-large capacitive touch screen, high-resolution (320*480) full-view display, full-featured touch operation;
2) 45/0 geometric optical structure, in line with CIE, ISO, ASTM, DIN standards;
3) 15° screen tilt angle, good combination of aesthetic design and ergonomic structure;
4) Super large integrating sphere, more effective homogenization of light, more accurate measurement;
5) Two standard observer angles, multiple light source modes, and multiple color systems;
6) The repeatability △E*ab is within 0.04, and the inter-stage difference E*ab is within 0.2;
7) Provide a complete reflectance curve display;
8) PC-side quality management software has powerful function expansion;
9) The standard sample data can be manually input, which is convenient for customers to operate;
10) High hardware configuration, incorporating a number of innovative technologies.
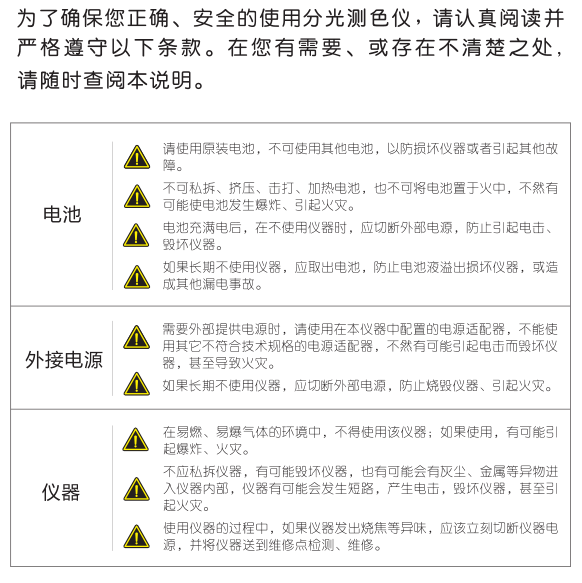
Precautions
●This instrument is a precision measuring instrument. During measurement, drastic changes in the external environment of the instrument should be avoided, such as flickering of ambient light and rapid changes in temperature, etc. should be avoided during measurement.
●When measuring, keep the instrument stable and the measuring port close to the object to be measured, and avoid shaking and shifting; the instrument is not waterproof, and cannot be used in a high-humidity environment or in water mist.
●Keep the instrument clean, avoid water, dust and other liquid, powder or solid foreign matter from entering the measuring aperture and inside the instrument, and avoid impacting and colliding with the instrument.
●After using the instrument, put the color measuring instrument and calibration tube into the instrument case and keep them properly.
●If the instrument will not be used for a long time, the battery should be removed.
●The instrument should be stored in a dry and cool environment.
●Users are not allowed to make any unauthorized changes to the instrument. Any unauthorized changes may affect the accuracy of the color measuring instrument, or even irreversibly damage the instrument.
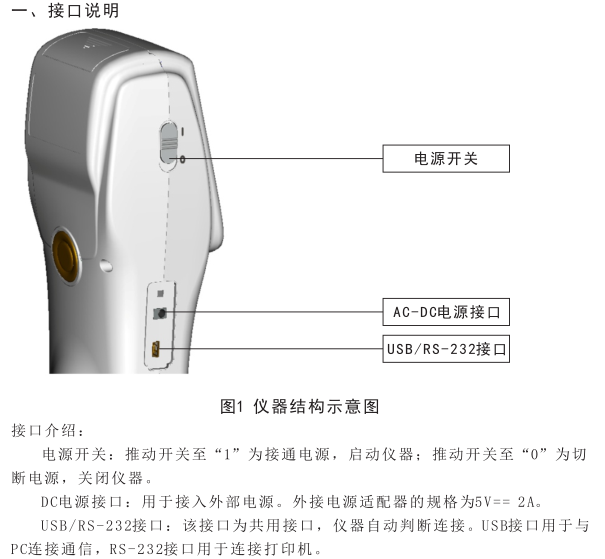
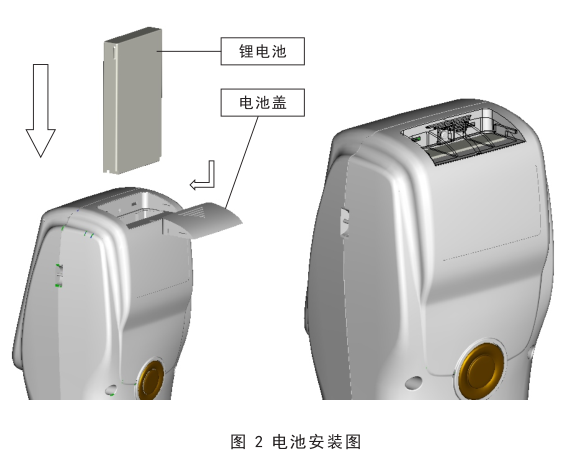
2. Battery instruction and installation
Battery Instructions:
1) Lithium battery specification is Li-ion 3.7V==0.5A, capacity is 3200mAh;
2) Please use the original lithium battery, do not use other batteries, otherwise the instrument may be damaged;
3)长期不使用本仪器,须从测色仪中取出锂电池;
4)对电池进行充电时,本仪器需要外接电源或USB接口连接上PC端,且推动开关至“1”接通电源,才会对锂电池充电。若不对锂电池充电,取出锂电池,接上外部电源,本仪器仍可正常工作;
5)在对电池进行充电时,在测量页面的右上角有动态电池图标进行充电提示。
电池安装说明
1)先检查电源开关是否为切断状态(开关至“0”位置),然后取下电池盖;
2)将锂电池放入电池仓并轻轻推入,注意电池的正反面及触点方向;
3)将电池盖扣上,如图2所示。
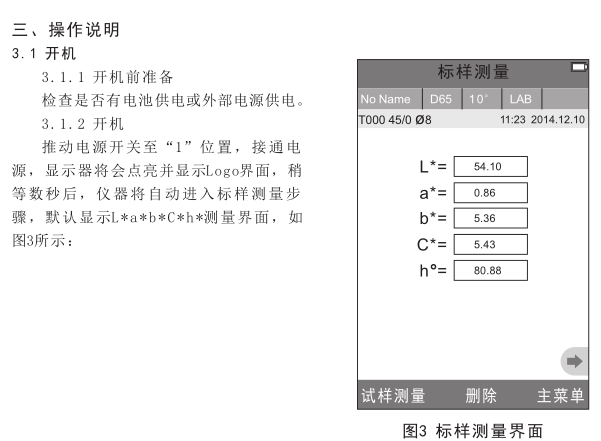
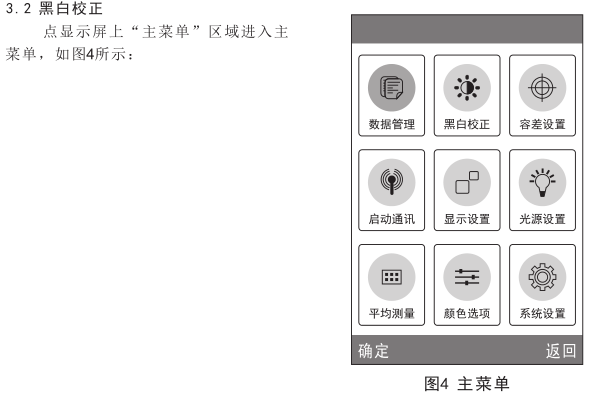
3.3 测量
3.3.1 测量定位
本仪器可通过测量口的十字架目测进行定位, 通过观察十字架与被测样品位置的对准程度,同时移动测量口径调整位置,可实现对准。
3.3.2标样测量
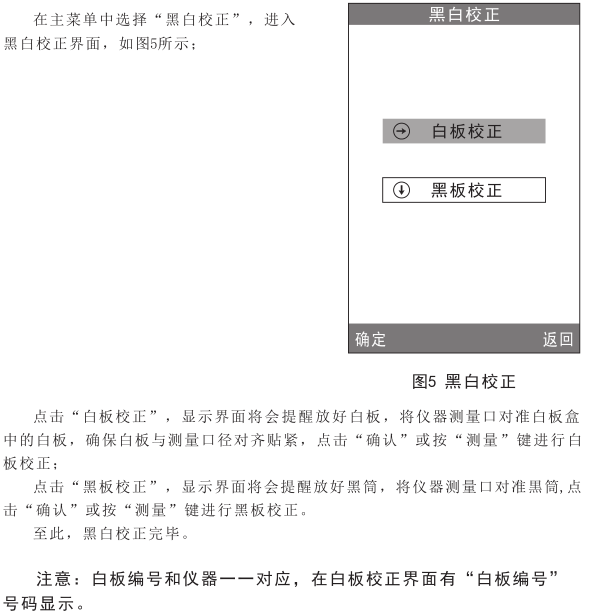
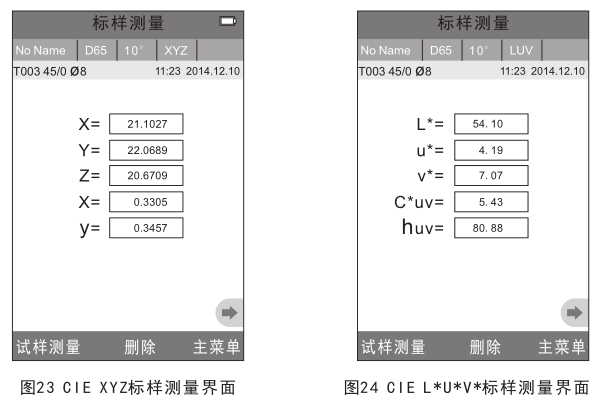
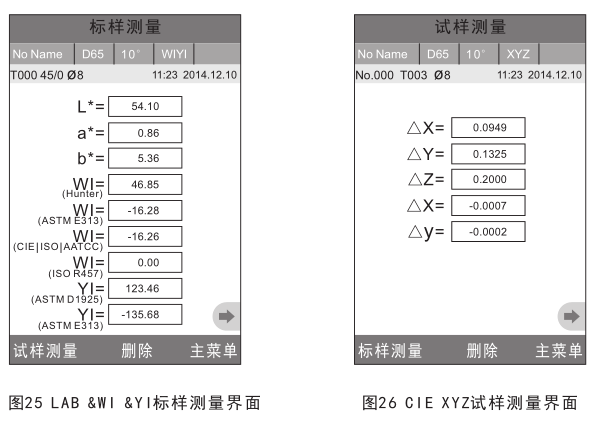
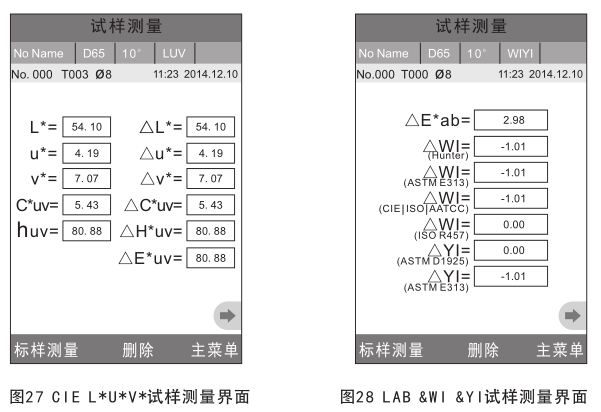
标样测量在测色仪进入“标样测量”界面才能测量,如图6所示,此时,将测色仪对准标样样品,按下“测量”键,测色仪获得标样样品的颜色数据。

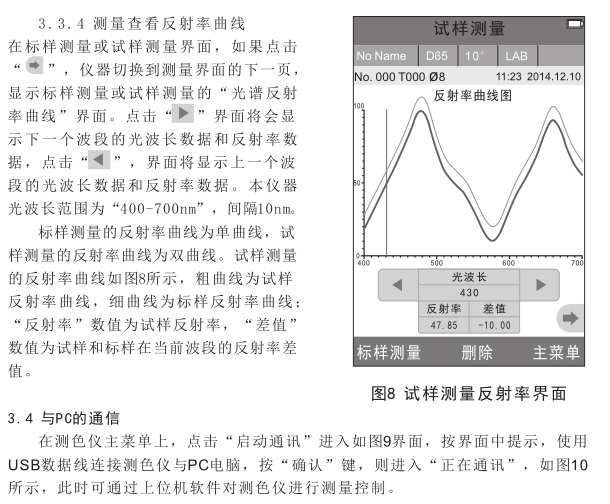
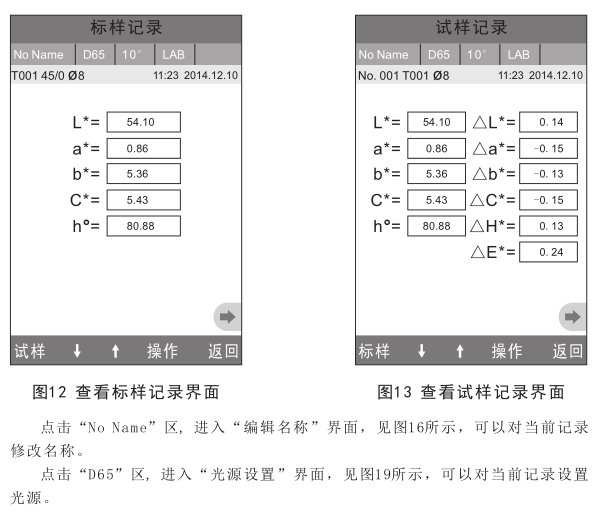
点击“No Name”区, 进入“编辑名称”界面,见图16所示,可以对当前试样修改名称。
点击“D65”区, 进入“光源设置”界面,见图19所示,可以对当前试样设置光源。
点击“10°”区, 可以切换观察者角度,在2°、10°角度之间切换。
点击“LAB”区, 进入“颜色空间”界面,见图22所示,可以改变当前试样颜色空间。
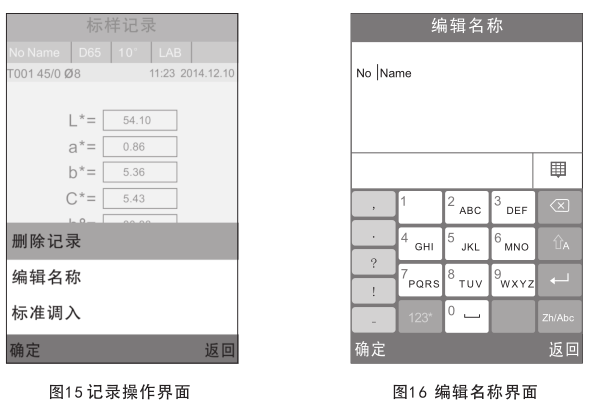
4.1.1 查看记录
1) 查看标样记录:
在数据管理界面选择“查看记录”将进入“标样记录”界面,如图12所示,为记录的标样数据。 通过点击屏幕底部的“↑”、“↓”箭头,可查看不同的标样数据,图中“T001”为标样序号, “no name”表示标样的默认名称。
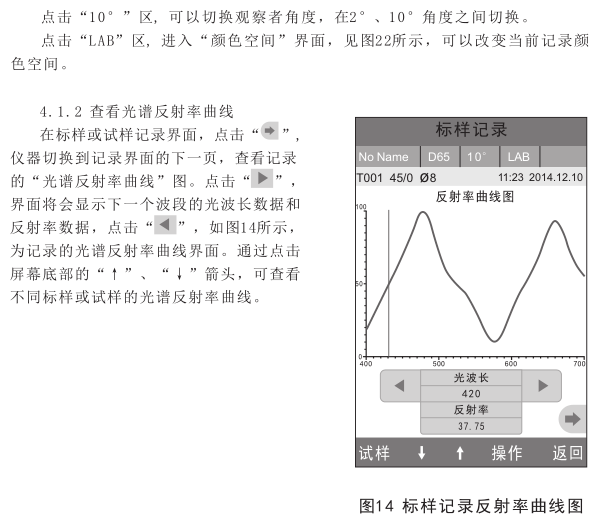
2)查看试样记录:
在标样记录界面中点击“试样”,进入查看该标样下的试样数据以及试样与标样间的色差,如图13所示,通过点击屏幕底部的“↑”、“↓”箭头,可查看不同的试样数据,图中No.001为试样记录的序号,图中T001为当前标样记录的序号。
3) 切换标样、试样记录:
在标样记录界面中点击“试样”,进入查看试样记录界面;在试样记录界面中点击“标样”,进入查看标样记录界面。
4.1.3 记录名称编辑
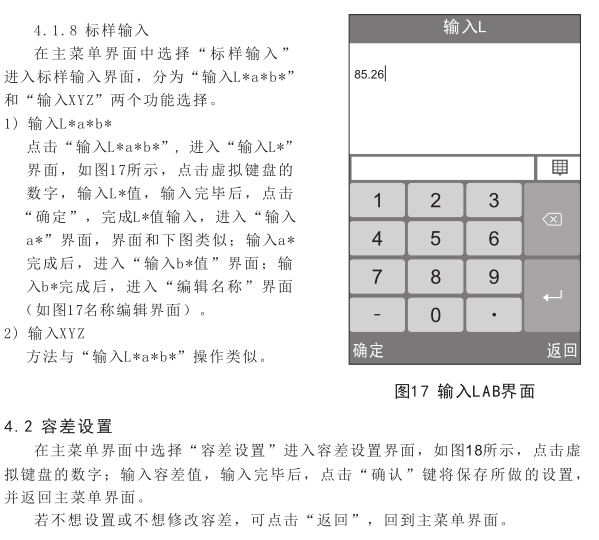
在记录界面点击“操作”,弹出操作小菜单,如图15所示,点击“编辑名称”,进入当前记录名称编辑界面,如图16所示,点击屏幕上虚拟键盘的字符或数字,编辑当前记录的名称。
4.1.4 单条记录删除
在标样记录的“记录操作界面”弹出菜单中,点击“删除记录”,将弹出删除警告界面,点击“确定”,将删除本条标样和此标样下的所有试样记录。如果是在试样界面删除记录,仅删除本条试样记录。
4.1.5 标样记录调入为测量标样
如需要在某个已保存的标样下测量色差,可以在此条标样记录的“记录操作界面”弹出菜单中,点击“标样调入”,此时,该标样记录被调入测量界面,点击“试样测量”,则可以开始进行在该标样下的试样测量。
4.1.6 试样记录调入为测量标样
有时需要将某个已保存的试样作为标样,可以在此条试样记录的“记录操作界面”弹出菜单中,点击“标样调入”,此时,该试样记录被调入测量界面作为标样(同时也自动保存为新的标样记录),点击“试样测量”,则可以开始进行在该标样下的试样测量。
4.1.7 全部记录删除
在主菜单界面中选择“记录删除”进入记录删除界面,分为“全部试样删除和“全部记录删除”两个功能选择。
1)全部试样删除
点击“全部试样删除”时,仪器弹出警告界面,点击“确认”,将删除仪器中的全部试样记录,而标样记录仍然存在。
2)全部记录删除
点击“全部记录删除”时,将删除仪器中的全部记录,包括标样记录和试样记录;此时,仪器弹出警告界面,点击“确认”后,将删除仪器中的全部记录。
注意:记录删除请慎重操作,以防误删需要的历史记录。”
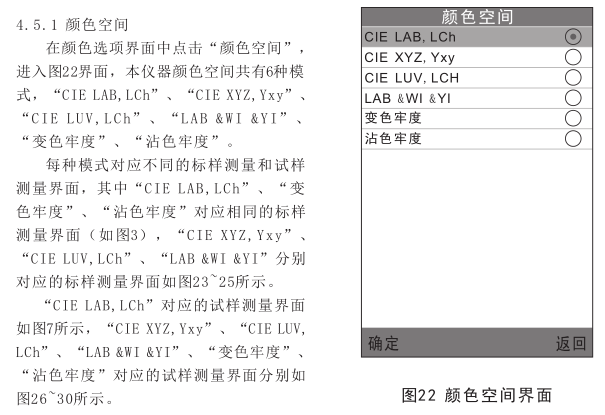
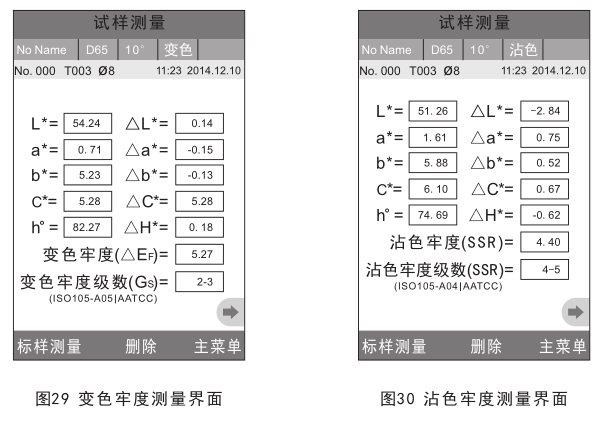
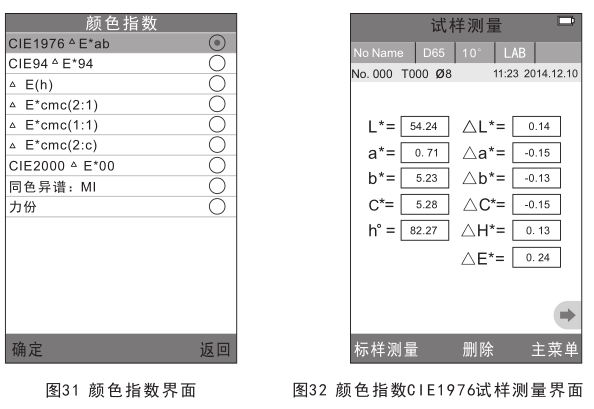
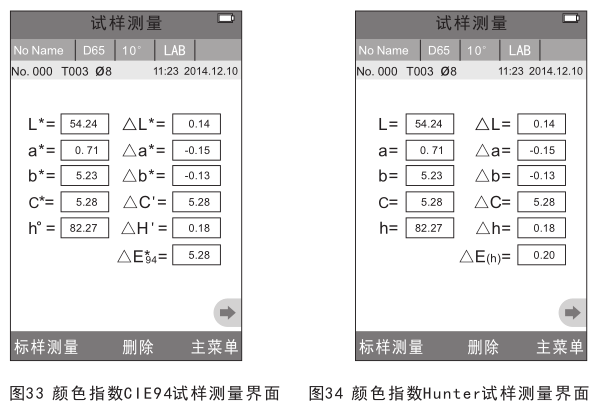
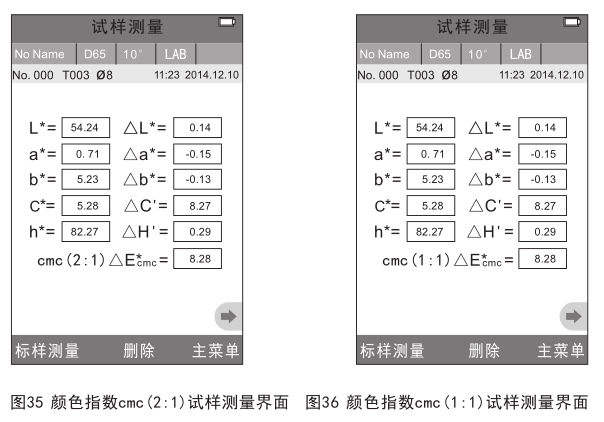
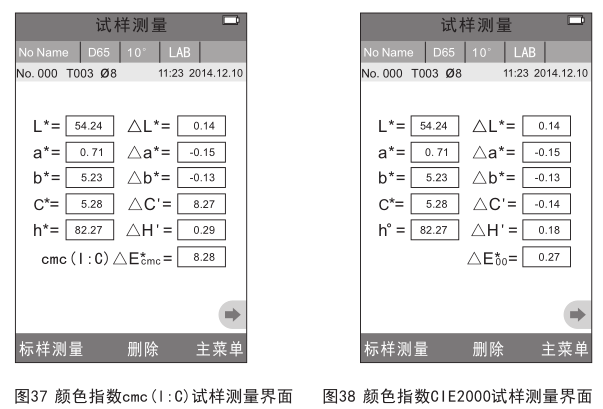
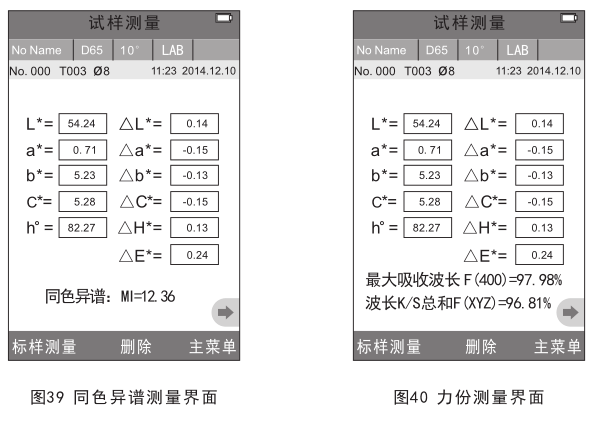
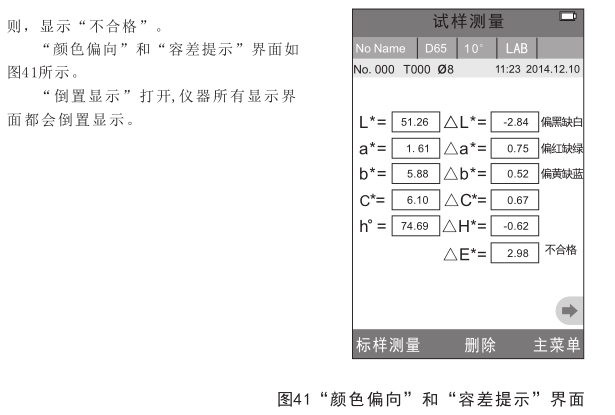
4.5.2 颜色指数
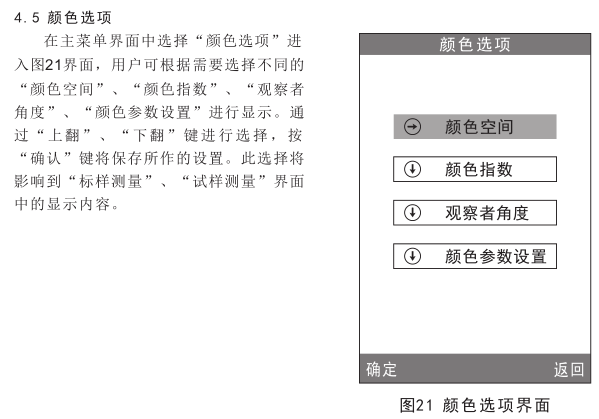
在颜色选项界面中点击“颜色指数”,进入图31界面,本仪器颜色指数共有9种 模 式 , “CIE1976 △E*ab” 、 “CIE94 △E*94” “△E(Hunter)”、“△E*cmc(2:1)”、“△E*cmc(1:1)”、“△E*cmc(l:c)”、“CIE2000 △E*00”、“同色异谱:MI”、“力份”。颜色指数是针对颜色空间为“CIE LAB,LCh”模式时才有效,颜色指数下不同的模式对应特定的色差计算公式,每种模式在试样测量界面有不同的显示,分别对应的试样测量界面如图32~40所示。
4.5.3 观察者角度
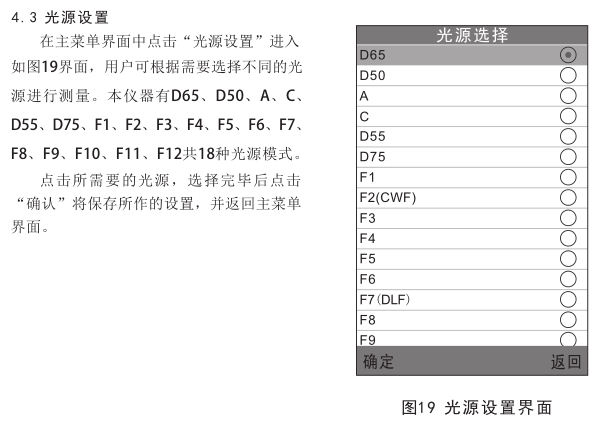
按照CIE标准,本仪器观察者角度分2°、10°两种,在颜色选项界面中点击“观察者角度”,进入“观察者角度”界面,可以在“观察者角度”界面进行选择。
4.5.4颜色参数设置
颜色参数设置包括“同色异谱”的测量条件设置、颜色指数“CIE94 △E*94”、“△E*cmc(l:c)”、“CIE2000 △E*00”系数的设置。
同色异谱设置2种测量条件下的光源和观察者角度,颜色指数“CIE94 △E*94”、“△E*cmc(l:c)”、“CIE2000 △E*00”设置分别设置其色差公式的系数因子。
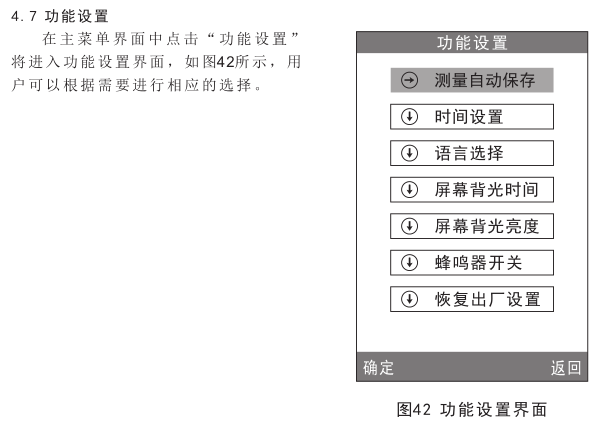
4.6 显示设置
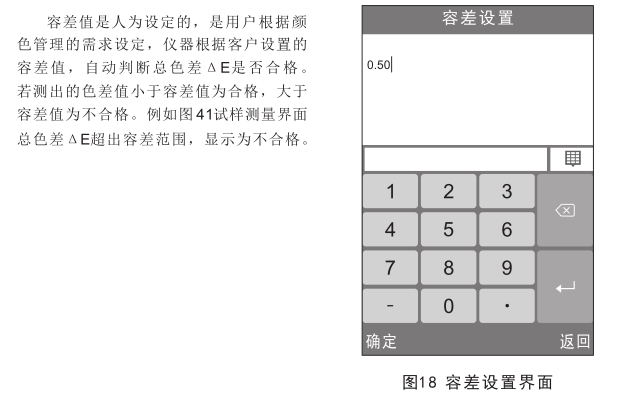
显示设置包括“颜色偏向”、“容差提示”、“倒置显示”的打开和关闭设置。“颜色偏向”打开,会在试样测量界面△L、△a*、△b*数值框右边显示色彩偏向提示;“颜色提示”打开,会在试样测量界面△E数值框右边显示“合格”或“不合格”,当△E数值小于容差范围(在容差设置中设置容差范围),显示“合格”;否
4.7.1 测量自动保存
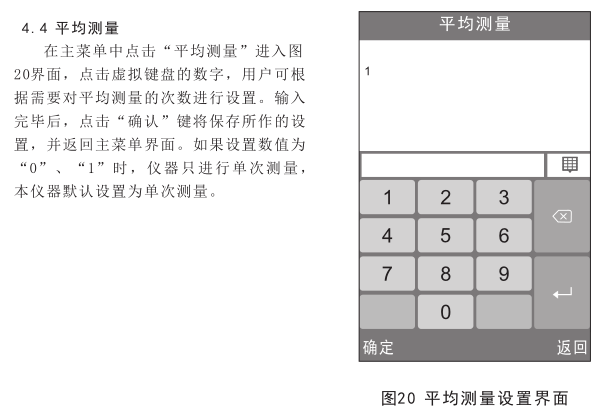
在“功能设置”界面中点击“测量自动保存”,将进入“测量自动保存”界面,分为两个选项:“关闭”、“打开”,选中“关闭”,点击“确定”,仪器每次测量后需要手动保存测量数据;选中“打开”,点击“确定”,仪器每次测量后自动保存测量数据,提高了测量的效率。
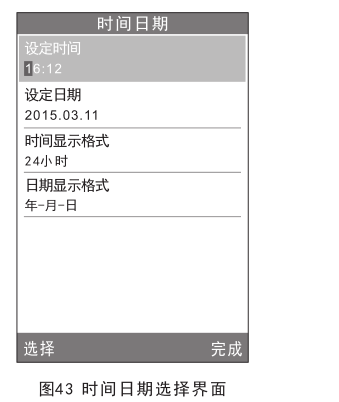
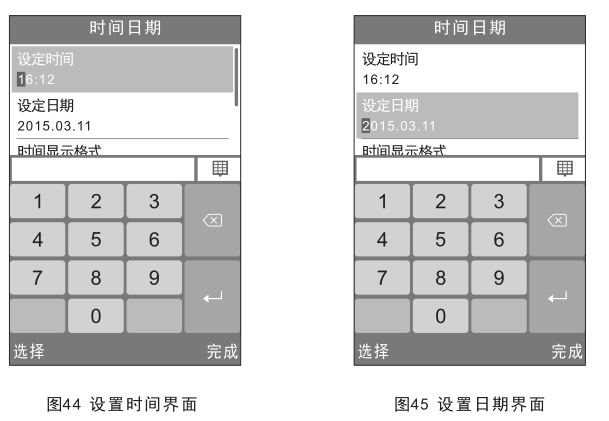
4.7.2 时间日期设置
在“功能设置”界面中点击“时间设置”将进入时间、日期和格式选择界面,如图43所示,点击“设定时间”区域,显示界面切换到如图44所示, 点击虚拟键盘上的“数字”键,设置当前时间,点击“完成”完成当前时间设置。点击“设定日期”区域,显示界面切换到如图45所示, 点击虚拟键盘上的“数字”键,设置当前日期,点击“完成”完成当前日期设置。
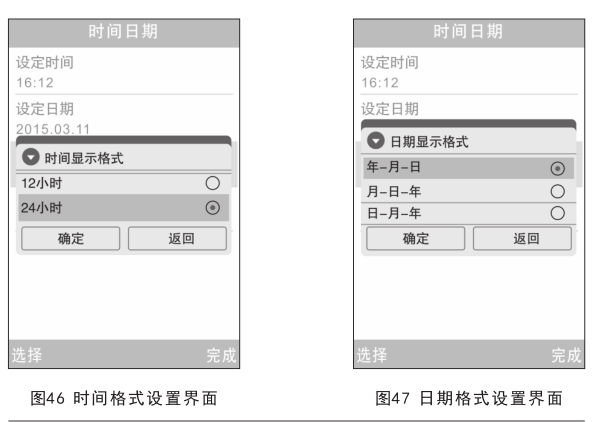
点击“时间显示格式”区域,弹出界面到如图46所示, 可以点击“12小时”、“24小时”其中一项,设置时间显示格式,点击“确定”完成当前时间显示格式设置。
点击“日期显示格式”区域,弹出界面到如图47所示,可以点击“年-月-日”、“月-日-年”、“日-月-年”其中一项,设置日期显示格式,点击“确定”完成当前日期显示格式设置。
4.7.3 语言选择
在“功能设置”界面中点击“语言选择”,将进入“语言选择”界面,分为两个选项:“English”、“简体中文”,选中“English”,仪器每个界面将以英文显示;选中“简体中文”,仪器每个界面将以简体中文显示。
4.7.4 屏幕背光时间
在“功能设置”界面中点击“屏幕背光时间”,将进入“屏幕背光时间”界面,背光时间分为:“常开”、“5分钟”、“60秒”、“30秒”、“15秒”,此时间为不对仪器进行操作的息屏时间。
4.7.5 屏幕背光亮度
Click "Screen Backlight Brightness" in the "Function Settings" interface to enter the "Screen Backlight Brightness" interface click "+" on the screen to increase the screen brightness, and click "-" on the screen to decrease the screen brightness.
4.7.6 Buzzer switch
Click "Buzzer Switch" in the "Function Settings" interface to enter the "Buzzer Switch" interface, which is divided into two options: "Close" and "Open". Select "Close" and click "OK". There is no button sound during measurement; select "Open" and click "OK", and the instrument will make a button sound during measurement.
4.7.7 Restore factory settings
Click "Restore Factory Settings" in the "Function Settings" interface to enter the interface shown in Figure 48. Press the " OK " button to restore the instrument to the factory default state and clear all measurement records.
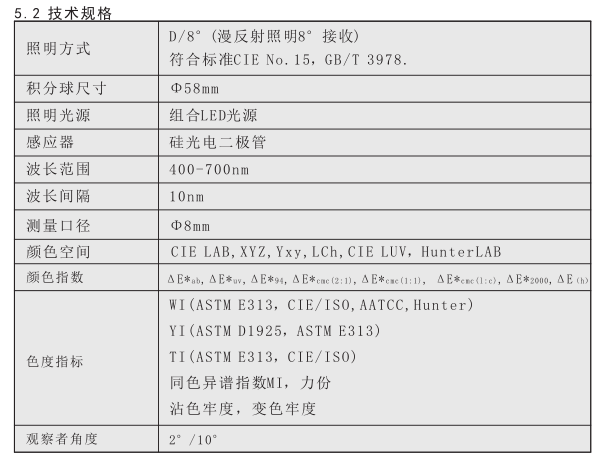
5. Technical parameters
5.1 Product Features
1) This instrument fully considers the user's experience, with full touch screen operation and easy operation.
2) Super large screen (3.5 inches) high resolution (320*480) full viewing angle display, clear interface image.
3) The beautiful appearance is well combined with the structural design in line with human mechanics.
4) The 15° screen tilt angle is more in line with the observation habits of human eyes.
5) High hardware configuration, incorporating a number of innovative technologies.
6) Super large integrating sphere, more effective homogenization of light.
7) 45/0 geometric optical structure, in line with CIE, ISO, ASTM, DIN standards, the accuracy is very good.
8) The visible spectrum 400-700nm band reflectance curve display.
9) Two standard observer angles, multiple light source modes, and multiple color systems.
10) The repetition angle △E*ab is within 0.04, and the difference between stations is within 0.2.
11) Large-capacity storage space, which can store more than 15,000 pieces of test data.
12) Manually input standard sample data, which is convenient for customers to operate.
Technical Parameters
NS800 Spectrophotometer technical parameters
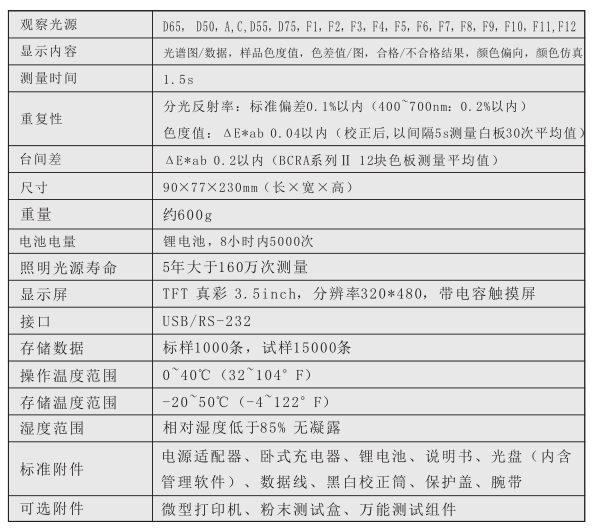
NS810 Spectrophotometer technical parameters
safety instructions
- 1Colorimeter Selection Guide [NBchao Brief Version]
- 2What is the difference between tristimulus Colorimeter and Colorimeter?
- 3How does Colorimeter detect particulate matter (PM) color differences?
- 4Application of Colorimeters in paint&Coating color difference detection
- 5Several selection points about food Colorimeters
- 6Selection points of portable Spectrophotometer
- 7Non-contact Colorimeter selection considerations
- 8Color Measurement Challenges Faced by Manufacturers in the Metals Industry
- 9CS-810 Desktop Spectrophotometer Application Case Cleaner Color Detection
-
![KINGWELL JZ-350 Colorimeter 8mm caliber, suitable for plastic, lame plating, design, printing, clothing, printing and dyeing, etc]()
-
![IWAVE WF28 Colorimeter 8mm caliber, suitable for Spinning & weaving, Chemical, Plastic, Food, Hardware, Printing and Dyeing, etc]()
-
![KINGWELL JZ-300 general Colorimeter 8mm diameter, plastic, lame plating, Eletroplating, printing industry special]()
-
![CHINA LS176 Colorimeter Colorimeter]() CHINA LS176 Colorimeter Colorimeter$ 632.00
CHINA LS176 Colorimeter Colorimeter$ 632.00 -
![CHNSPEC CRX-50 Online Colorimeter, Non-Contact Colorimeter]()
-
![CHNSPEC CRX-51 Non-Contact Colorimeter]() CHNSPEC CRX-51 Non-Contact Colorimeter$ 11243.00
CHNSPEC CRX-51 Non-Contact Colorimeter$ 11243.00