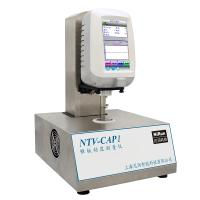
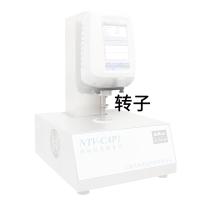
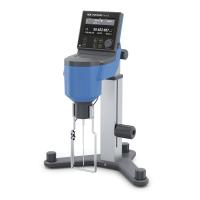
Instruction Manual for a Cone and Plate Viscometer
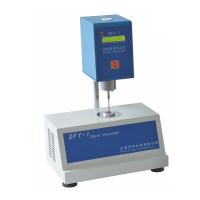
Instruction manual for a cone plate viscometer
3.5 Operation
As soon as the manual switch is turned on, its software number is displayed, followed by the type of manual operation. There will be a mark when the manual operation is completed. The notation, the number of compensation voltages, and the results of the clock battery are displayed in several memories.
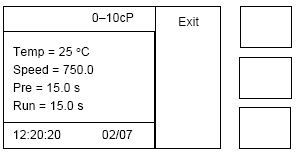
The manual operation is displayed on the screen (shown below). You can see the current manual settings on the screen.
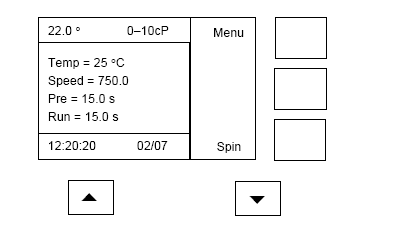
Here is the delay that will change after a short period of time. The temperature (shown on the top left side of the LCD) is flashing until the metal plate reaches the set temperature.
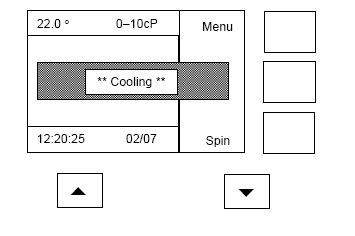
After about 20 seconds (after the temperature of the metal plate has stabilized sufficiently) the next change will be displayed (the operating handle is up)
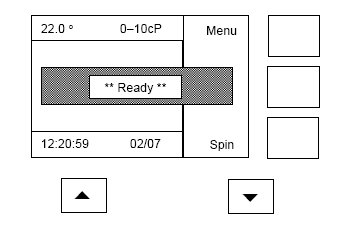
The bottom right-hand button indicates that the cone can be turned to clean (when the handle is up).
Alternatively, if the controller is dropped, the display will see the change from Spin to Start, as opposed to the right-hand button at the bottom. As follows-

The MENU button (top right) is used to access and set a wide variety of usage parameters - for example, operating temperature.
The menu key (top-notch) is used to access and set a variety of different actions. For example, operating temperature. Once the machine is set to the desired operating state, the menu will be inaccessible.
Pressing the menu key will bring up the following display. The arrow υ starts at the position of the Batch. Theta is a prompt on the display that illustrates the current action.
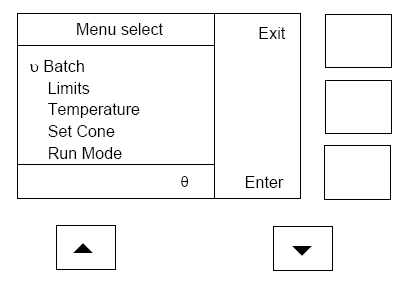
Press the θ key to move the selection arrow (υ) to the next row, a prompt π will appear in the bottom row of the screen, and the π button will appear to move the selection arrow back. This makes it possible to select the menu system back and forth from start to finish using the π and theta keys. There are more than 5 options to choose from, and when you get to the bottom of the screen, you can continue to select them. The available items are -Batch, Limits, Temperature, Set cone, Run mode, Preheat time, Run time,
Settings、Contrast、Speed、Preferences、Calibration、Time/Date、Diagnostics。
Pressing the Exit key (right at the top) will return to the regular display without any changes. Press Enter (bottom right) to select the highlighted item. For example, if the theta key is pressed once, Temperature will light up and press the enter button will appear
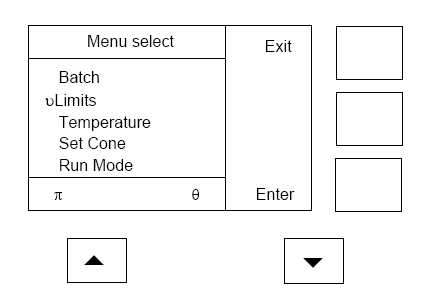
Each row can be selected by π and theta.
Press the θ button 4 times and the Other will light up.Press the Enter key and the following display will appear.
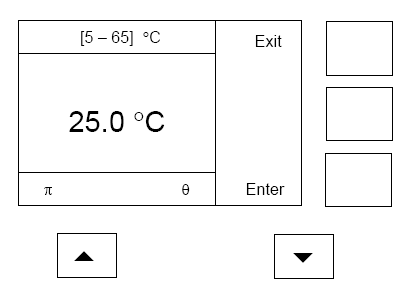
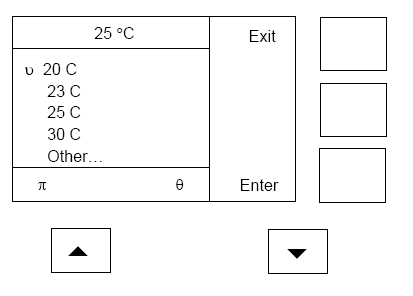
The π and theta keys can change the set temperature instantly. The π key is to increase the value, and the theta bond is to decrease the value. The top row shows that the temperature can be selected in the range from 5 °C to 65 °C. It is also by π and θ to increase or decrease the value. When the value reaches 65 °C, it will return to 5 °C if it continues to increase. In turn, 5 °C is followed by 65 °C. Pressing Enter will select a new value, and pressing Exit will not change the current value.
All action menus are the same method. Each menu will have a more detailed menu menu below.
3.51 Batch menu
Here's how Batch is selected

3.5.1.1 View result
This directory option can see all the results of the run. I can record 100 results. When the memory is full, the old record is automatically overwritten.
Select this option to see the results displayed for the following data examples.
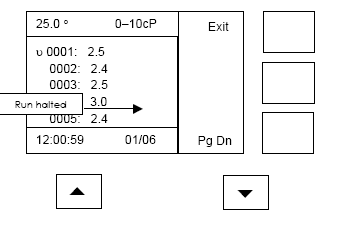
Note: The centipoise displayed on the screen is displayed
In this example, the temperature, cone, date, and time are looked up by the bright line, so when the selected arrow moves down, you will see the results recorded after the run. The 'X' operation shown in the fourth row stops earlier than expected, and when the run reaches the limit, all results that exceed the pre-set limit are displayed.
π and θ highlight the display of 5 values. The Pg DN key is used to display the next 5 results (when there are more than 5 results). When Pg DN is used, Pg Up will appear in the middle. Exit returns to normal working state.
3.5.1.2 Print last
This option is to output the result to the connected computer. Its format can be selected on the menu.
3.5.1.3 Print all
This option is to output all the results of the previous run to the connected computer. Its format is also optional.
3.5.1.4 Sample id
This option allows the sample id to be selected in a range from 0 to 999 (316 is set here). Before it is incremented, the sample id is automatically added to the current result.
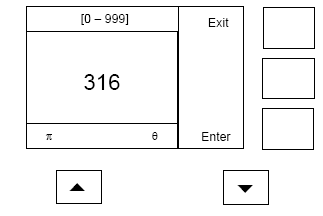
π and θ are used to select new values. Enter is used to set the new value. Exit is used to return the normal state of operation without changing any value.
The Clear all option is used to set it to 0.
3.5.1.5 Clear all
This option allows you to save the result and set the sample id to 0.
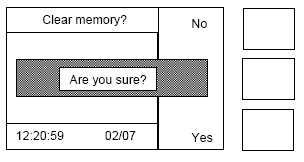
Select Yes to clear all stored results and sample id to 0. Select No to exit the result and do not change the sample id.
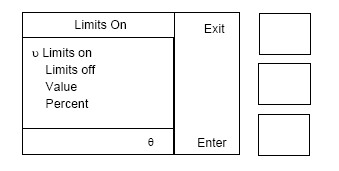
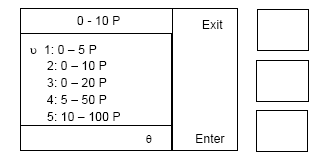
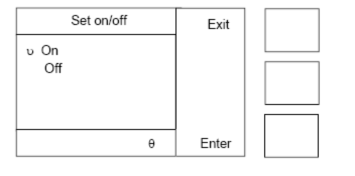
3.5.2 Limits menu
Once you have selected Limits, the following display will appear. At the top, it will show that Limits is launched.
This function is to limit a large number of test samples to no more than a preset limit during the test.
The first two options, Limits on and Limite off, are used to turn restrictions on or off. The limit value is the 'idea' value and a ± % error. When the limit is exceeded, the result is displayed on the screen (limits are turned on). The current settings are displayed at the top. The value of the center is set by Value, and the limit range is set by Percent.
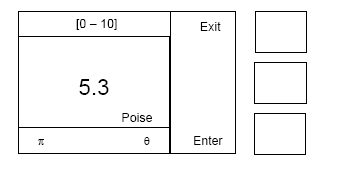
3.5.2.1 Value
This option allows you to set an intermediate value; Work with the value of 'ideal'
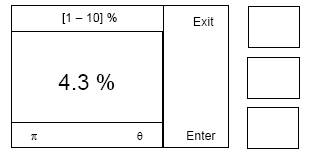
3.5.2.2 Percent
This option sets the margin of error for the median value, which is between 1% and 10%.
3.5.3 Temperature menu
Once you have selected Temperature, the following display will appear. At the top, you can see the temperature set, and you can also see the current setting.
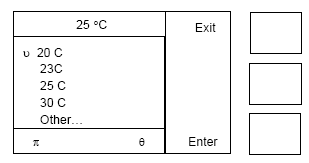
Use the keys to select one of the 4 preset values. In addition, when Other (as you can see in the next paragraph) is selected, the temperature can be increased by 0.1 °C from 5 °C to 65 °C. Select Enter to display the desired temperature immediately. Set the number of points, and after 20 seconds, the surface temperature of the metal plate will reach the set point accurately.
3.5.3.1Other
This option allows you to set the temperature from 5 °C to 65 °C in an increase of 0.1 °C.
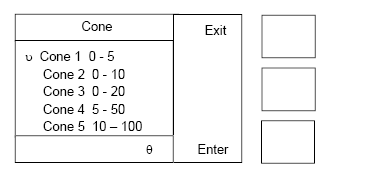
3.5.4 Set cone menu
Below is the display of the Set cone options. At the top, you can see that the current selection is cone. Please note that this machine does not detect whether the CONE is suitable or not, and you need to use this option when you want to change the CONE. The main display can see that CONE is selected.
Use the keys to select 5 suitable cones.
3.5.5 Run mode menu
Below is the display for selecting Run mode. This option can be set while the machine is running. The top shows the current settings.
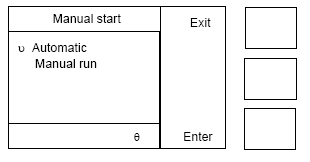
3.5.5.1 Automatic
When Automatic is selected, this machine will run a handle sensor. This sensor will operate automatically when it detects when the CONE falls on the bottom metal plate. As soon as you want to terminate a measurement in progress, the handle is raised. Raising and lowering the handle again will start another run. Note that the Start key terminates the current run before all is complete. This mode is convenient for testing a large number of samples and preventing paint or solvents from spilling on the machine in front. In this mode, the results can be transferred to the computer interface.
3.5.5.2 Manual run
When manual mode is selected, the machine can be started from the Start button on the LCD screen or by the mechanical key next to the bottom right side of the machine. Note that before using this option, the CONE needs to land on the metal plate. When the button is pressed, it starts running. Press the key once before the run is complete
3.5.6 Preheat time menu
Below is the display of the Preheat time. The warm-up time is shown at the top. The warm-up time should be set to be equal to the time before the CONE run. That is, the heat of both the CONE and the sample reach equilibrium before the run. The equilibration time will depend on the CONE and sample temperatures, as well as the difference between this temperature and the metal plate. The minimum amount of time required for operation, e.g. the temperature of the sheet metal is 5 °C
Note: A minimum warm-up time of 15 seconds is highly recommended. If the temperature difference is too large, the time can be more.
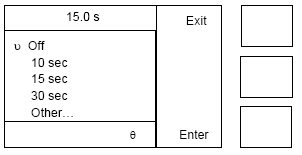
The current settings are displayed at the top. You can choose one of the 5 items. Other can be selected on a scale from 1 to 59 (in increments of 1 second).
3.5.7 Run time menu
Here's how the Run time menu looks. The top shows the current running time. This time is the time when the cone rotation is set. The current settings are displayed at the top.
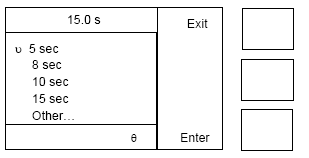
You can choose one of the 5 options you need. Other can be set from 5 to 59 seconds (with a variation of 1). This time should be set to a minimum of 15 seconds.
3.5.8 Settings menu
When the Setting is selected, a display similar to the one below will appear. The display shows the current setting status of the machine.
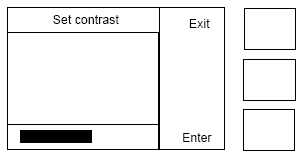
3.5.9 Contrast menu
The following is the display with Contrast selected. Use π and θ to change the ratio. The fixed rod displays the current scale value.
3.5.10Speed menu
The following is the display of the selected Speed menu. At the top, you can see the currently selected speed. 750rpm (ISO and BS standards) in Europe and 900rpm in the United States (ASTM standard). Select the tachobook you need.

3.5.11 Preferences menu
The following is the display that appears when the selected preferences appear. This option allows you to set various operating parameters. There are more than 5 options to choose from, use the scroll key to see the others.
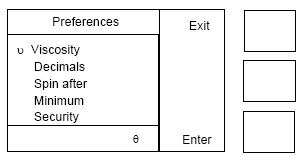
The following shows the options in addition to the first 5 options.

3.5.11
3.5.11.1 Viscosity
After selecting the year interface, the following image appears:
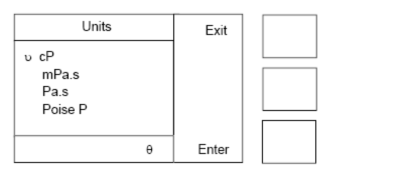
You can set the display method of the units
3.5.11.2 decimal places
After selecting the decimal interface, the following figure appears:
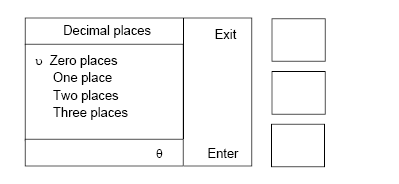
You can set the display method. Pay attention to rounding.
3.5.11.3 Spin after
In the following interface, after selecting Rotate: When selected, the lamina rotates automatically after running (after 2 seconds of lifting the handle). If no weights are added, rotate for 5 seconds and then stop. If there are weights, the lamina automatically stops within a few seconds of removing the weights.
3.5.11.4 Minimum mimum
After selecting the minimum value interface, the following screen appears. In an experiment, the screen displays the results for the minimum value.

3.5.11.5 Security
There are 2 safe modes to choose from in the security interface
Intermediate security
Enter 99 to activate the intermediate security mode (set on)
In Intermediate mode, the selection that can be used in the menu isbatch, temperature and safetyAvoid any inadvertent changes.
Only the temperature can be changed, and the lot number and sample code can be set and cleared.
Advanced security
Enter 47 to activate advanced security settings (set on)
In this mode, the selections available in the menu are
Batch and security
Select the main interface to belong to the Zhiyi interface. Avoid any inadvertent changes.
Once the instrument is in safe mode, run or terminate the other modes by selecting the two codes of security and entering 99 or 47.
3.5.11.6 Date output
Select the data output interface to set the data output mode
On result: Data is automatically output every time a test result is available (default mode)
On key press: The data output can be individually or completely
Result only: Only the results of the experiment are output (default mode)
Full data: outputs the experiment results and test results
3.5.12 Calibration
After selecting calibration, the following screen appears

Select the items to be calibrated according to the interface.
3.5.12.1 Temperature calibration
The instrument is pre-calibrated at the factory, and there is usually no longer a need for calibration outside of scheduled service.
After selecting the temperature interface, the following figure appears.
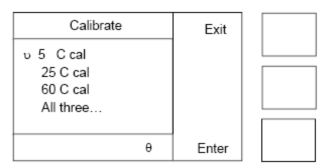
If you are working at one temperature or closer than the above, you only need to calibrate that temperature. The temperature of calibration should be the same as the actual operating temperature. Calibration may be rejected by the system at the end of the process. Each temperature is calibrated individually. The calibration can be done individually for 1 temperature or for all temperatures sequentially.
3.5.12.2 Viscosity calibration
The instrument is pre-calibrated at the factory, and there is usually no longer a need for calibration outside of scheduled service.
After selecting the viscosity interface, the following image appears. Choose from 5 options to choose the lamina you want to calibrate.
Each lamina is calibrated at 25C with 5 calibration oils alone. Follow the on-screen prompts to complete the calibration. Calibration may be rejected by the system at the end of the process.
Either calibration oil can be omitted from the calibration process, but the lamina will be recorded as no calibration until all of the calibration oil is complete.
3.5.12.3 Correction Selection
The correction time is generally about 20 seconds. Other calibration times can be selected by yourself.
On the selection screen, enter the security number of 291 to adjust the correction time. After entering the security number, the instrument displays

After the calibration time is entered, the instrument calibration will alarm when the calibration mode is running
3.5.13 Time/Date
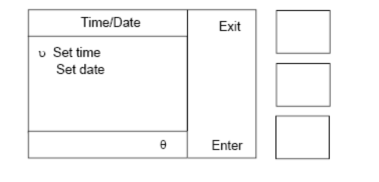
Used to set the time and date


- 1Analysis of the difference between cone-plate viscometer and Rotational Viscometer
- 2Test Principle of Cone Plate Viscometer
- 3In addition to Bollefei CAP cone plate viscometer, which domestic cone plate viscometer brand is there?
- 4American brookfield CAP2000 + Cone and Plate Viscometer Instruction Manual
- 5Several methods for determination of gel time of epoxy resin matrix
马亚峰;张凤翻 - 《高科技纤维与应用》
- 6Determination of Gel Time of Resin and Its Prepreg by Cone and Plate Viscometer Method
马亚峰;张凤翻 - 《高科技纤维与应用》
- 7Structural Principles of Cone and Plate Viscometers
刘立国 - 《化工管理》
- 8Determination of Viscosity of Methyl Vulcanized Silicone Rubber at Room Temperature by Cone and Plate Viscometer
刘立国 - 《化工管理》
- 9Determination of viscosity of liquid Coatings - Rotational Viscometer method