Spectrophotometer Operation Application Notes
1. Model 721 Spectrophotometer
(1) Internal structure and use
The Model 72l Spectrophotometer is a single-beam photometer with a fixed slit. Its internal structure is assembled by light source, monochromator, light adjuster, cuvette holder, photocell cassette (electronic amplifier), microammeter, voltage stabilizer and other components. Its structural diagram is shown in Figure II_12.
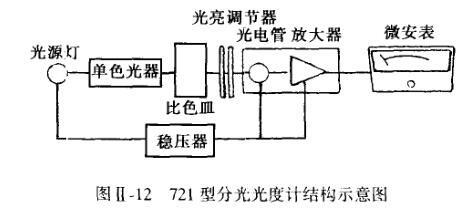
The light source adopts 12V25W y-controlled filament lamp. It is installed on an adjustable light stand, and the light can be correctly injected into the monochromator. The instrument uses a multi-turn potentiometer to adjust the lamp current to change the light source intensity to achieve the purpose of light adjustment.
The monochromator of the instrument includes slits, prisms, collimating mirrors, cams and wavelength disks, and adopts a Littrow optical path structure. The entire monochromator is sealed in a cassette and dried with silica gel.
The instrument uses a GD-7 type photoelectric tube, which is installed together with the micro-current amplifier circuit board in the dark box behind the liquid tank frame. The photocurrent generated by the photoelectric tube after receiving light flows through a group of high-value resistors to form a voltage drop. Make the instrument have higher sensitivity.
A set of transistor stabilized power supply with auxiliary voltage stabilizing device is installed inside the instrument, using mains power supply, the output stable voltage is 11.5V, and its stability is within 0.1%, supplying light source lamp and DC amplifier to work.
72l Spectrophotometer is mainly used for light absorption measurement in the wavelength range of 360~800nm, and is suitable for differential analysis of high absorbance.
(2) Appearance structure and usage method
The outline structure of the 721-type Spectrophotometer is shown in Figure II_l3.
The operation steps are as follows:
(l) Check whether the pointer of the ammeter 2 points to "0", if it does not point to the "0'' position, adjust the correction screw on the ammeter.
(2) Turn on the power switch 9, the indicator light will be on, open the liquid tank cassette cover 3, adjust the zero adjustment knob 5, and make the pointer of the electric meter be at the position where the light transmittance is 0 (after preheating for 20 minutes, use the wavelength adjustment knob 4 Select the wavelength of monochromatic light to be used, its
The wavelength can be displayed by the display window 1 . Use knob 8 to select the appropriate sensitivity gear, and then use the zero adjustment knob to recalibrate the position where the light transmittance of the meter is 0.
(3) Pour the reference solution and the solution to be tested into the selected cuvettes respectively, and place the cuvette holding the reference solution in the first cell on the liquid tank stand.

(4) Close the cover of the cassette (handle with care!), at this time the shutter linked with the cover is pushed open, the reference solution located in the first cell is just aligned with the light path, and the light passes through the reference solution and then shoots on the photocell , adjust the brightness adjustment knob 6, so that the meter pointer is at the light transmittance of "100".
(5) Adjust "0" and "100" several times according to the above method until they remain unchanged, and then the measurement can be carried out.
(6) Move the pull rod 7 of the liquid tank rack so that the solution to be measured is aligned with the optical path, and the absorbance of the solution is indicated by the pointer of the electric meter. Use the same method to measure the absorbance of other solutions to be tested in turn.
(7) After the experiment, take out the cuvette, turn off the power switch, and close the lid of the cassette. The cuvette should be rinsed clean, blotted dry with absorbent paper and placed in the cuvette box.
(3) Matters needing attention
(l) When using the reference solution to adjust the light transmittance to 100%, first adjust the brightness adjustment knob to the minimum, then close the liquid tank cassette cover (that is, turn on the light l to take), and then slowly turn on the light.
(2) If the continuous measurement time is too long, the photoelectric cell will be fatigued, causing the absorbance reading to shift. At this time, the power should be cut off, and the instrument should be turned on after a short rest.
(3) When not measuring, the lid of the liquid light cassette must be opened to protect and prolong the life of the photocell.
(4) The principle of instrument sensitivity block selection. When the reference solution enters the light path, it should be able to adjust the light transmittance to 100% with the light adjustment knob 6; otherwise, it needs to change gears. The sensitivity range of each gear is: 1st gear x1 times; 2nd gear x10 times; 3rd gear x100 times; 4th gear x2.00 times; 5th gear x400 times. Generally choose the x1 block.
(5) When using a cuvette, you can only pinch the frosted surface on both sides with your fingers, and do not touch the light-transmitting surface, so as not to be stained and affect the light transmittance. Before pouring the solution into the cuvette, wash the inner wall of the cuvette with the solution for 2-3 times. The height of the liquid level in the cuvette shall not exceed 2/3 of the height of the cuvette. The liquid stained on the outside of the cuvette should be gently blotted dry with absorbent paper, and then lightly wipe the light-transmitting surface with standard lens paper before putting it into the liquid tank rack.
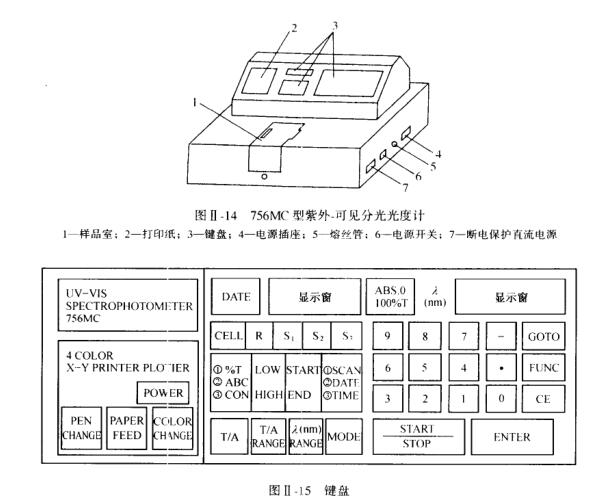
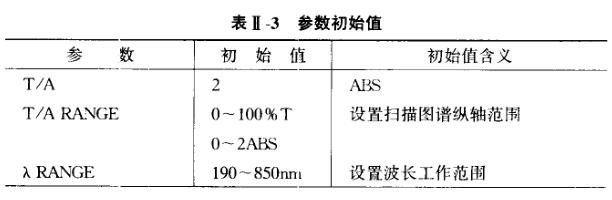
2. Model 756MC UV-Vis Spectrophotometer
Model 756MC UV-Vis Spectrophotometer is an intelligent instrument that integrates the functions of automatic wavelength scanning, automatic switching of light sources, automatic recording of absorption curves, screen display, data processing and printout. Its shape and keyboard are shown in Figure Il-l4 and Figure II-l5.
Operation method:
(l) Turn on the power switch (the tritium and tungsten lamps have been turned on at the same time), and the instrument will automatically enter initialization, which takes about 10 minutes. The contents of initialization include:
①Look for zero-order light.
② Establish a baseline. When the wavelength position and baseline in RAM are well preserved, the initialization process can be terminated by the following operations: press the START/STOP key once after turning on the instrument, the instrument will stop searching for zero-order light, and the display will display 220nm after the baseline is directly established; display 220nm.
Press the START/STOP key twice after power on, the instrument stops searching for zero-order light and establishes a baseline, and the display measurement will be performed under the baseline stored in RAM.
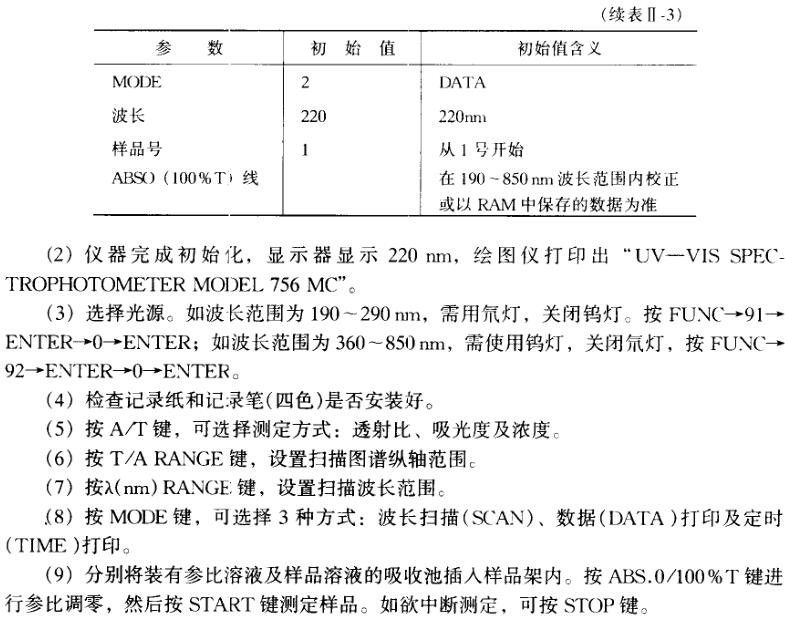
③When the display shows 220nm, the internal parameters listed in Table II-3 will be automatically set.
- 1Application of Flame Atomic Absorption Spectrophotometry in Detection of Food Talc Powder
- 2Talking about the performance test of epoxy resin film coated on PET
- 3Spectrophotometer principle, structure and application do you know geometry?
- 4Principle, characteristics and application of ultraviolet Spectrophotometer
- 5Spectrophotometer Color Measurement Fundamentals
- 6Differences between visible, ultraviolet-visible, infrared, fluorescent and atomic absorption Spectrophotometer s
- 7Detection of nicotine content by Spectrophotometer
- 8How to detect the color difference of fluorescent color-changing materials?
- 9Liquid color difference detection solution
-
![YueFeng 752N Ultraviolet-visible Spectrophotometer]()
-
![YueFeng 721 Single beam of light Visible Spectrophotometer Test Transmittance/Absorbance]()
-
![JINGHUA H300 Dual beam of light Spectrophotometer Wavelength range 190nm-1100nm]()
-
![HUXI Nano-900 UV-Visible, ultra-micro Spectrophotometer Light spectrum instrument]()
-
![JINGHUA JH752 Benchtop UV-Visible Spectrophotometer Bandwidth 4nm]()
-
![YUEFENG FP6428 Flame photometer Na/Ca]() YUEFENG FP6428 Flame photometer Na/Ca$ 1450.00
YUEFENG FP6428 Flame photometer Na/Ca$ 1450.00