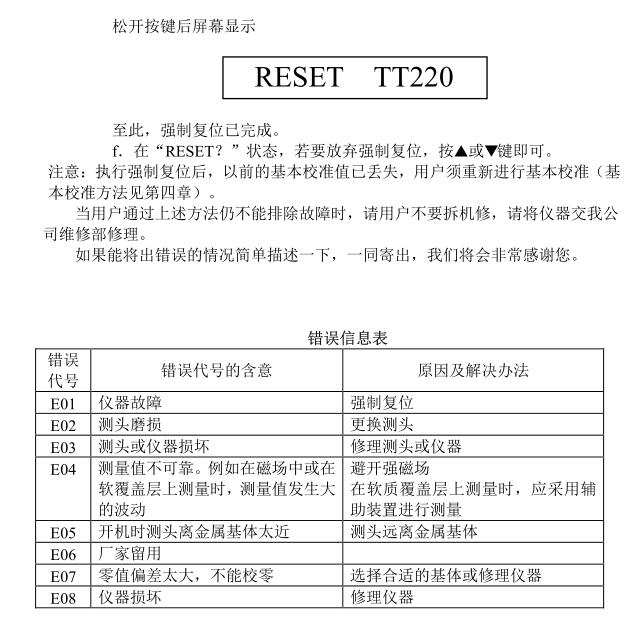
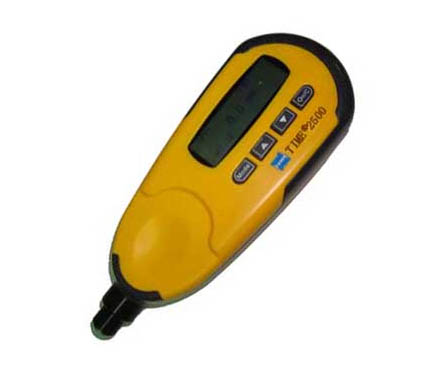
Times TT220 Digital Cladding Thickness Gauge Operating Instructions
1. Scope of application
This instrument is an ultra-compact measuring instrument that can measure the thickness of non-magnetic overlays on magnetic metal substrates quickly, without damage, and with precision. It can be widely used in manufacturing, metal processing industry, chemical industry, commodity inspection and other testing fields. Due to the small size of the instrument and the integration of the probe and the instrument, it is particularly suitable for on-site measurements.
Second, the basic principle
This instrument uses a magnetic thickness measurement method to measure the thickness of non-magnetic overlays on magnetic metal substrates (such as aluminum, chromium, copper, enamel, rubber, paint coating on steel, iron, and non-austenitic stainless steel substrates) without damage. The basic working principle is: when the probe is in contact with the overlay, the probe and the magnetic metal matrix form a closed magnetic circuit, due to the existence of the non-magnetic overlay, the magnetic circuit reluctance changes, and the thickness of the overlay can be calculated by measuring its change.
3. Basic configuration and instrument structure
1. Basic configuration
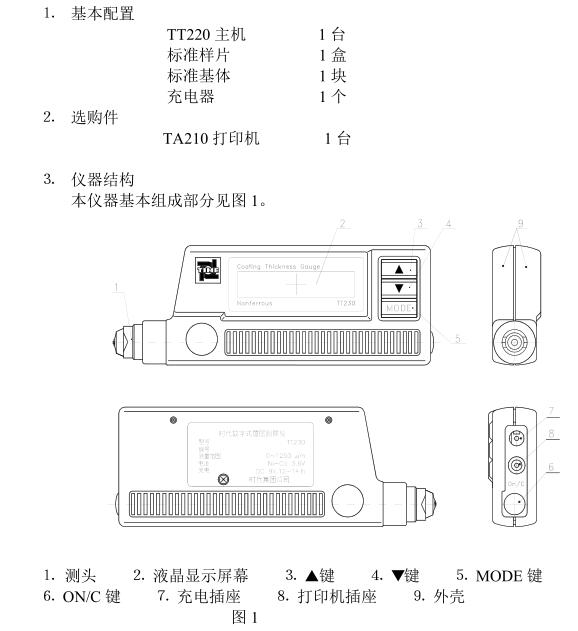
1. Performance indicators
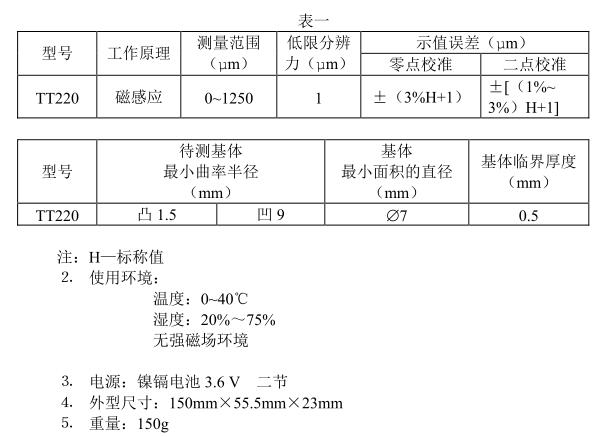
1. Measurement range and measurement error (see Table 1)
2. Main functions
●Zero-point calibration and two-point calibration can be carried out, and the systematic error of the probe can be corrected by the basic calibration method;
●There are two measurement methods: continuous measurement method (CONTINUE) and single measurement method(SINGLE);
●It has two working modes: direct mode and group mode;
●With deletion function: delete a single suspicious data that appears in the measurement, and also delete the storage areaall the data in order to make new measurements;
●There are five statistics: MEAN, MAX, MIN,NUMBER OF TESTS (NO.), STANDARD DEVIATION (S.DEV);
●With printing function, it can print measured values and statistical values;
●It has the function of under-voltage indication;
●There is a beep prompt during operation;
●It has the function of error prompt;
●It has an automatic shutdown function.
3. Basic measurement steps
1. Prepare the test piece (see Chapter 5).
2. Place the probe in an open space and press the "ON/C" button to power on.
3. Check the power supply
● No "╪" display, indicating that the battery voltage is normal;
● "╪" appears, indicating that the battery voltage has dropped and should be charged;
● After powering on, "╪" appears and automatically shuts down, indicating that the battery voltage has been low to the limit and should be charged immediately.
4. Under normal circumstances, the measured value before the last shutdown is displayed after powering on.

5. Whether the instrument needs to be calibrated and, if so, the appropriate calibration method is selected (see Chapter 4).
6. Measurement
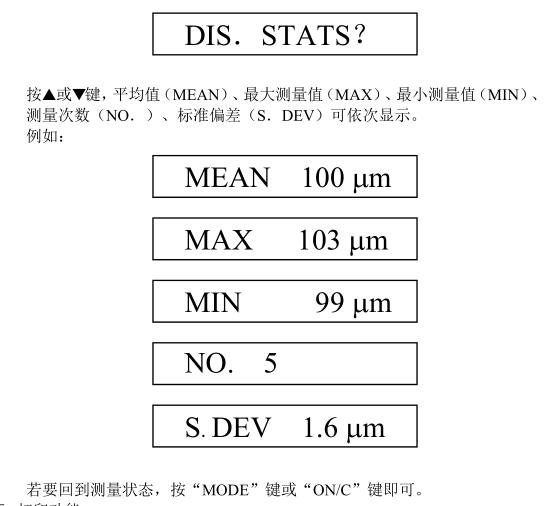
Quickly make perpendicular contact with the test surface and gently press down, and with a chime, the screen displays the testMeasure value, lift the probe for the next measurement;If the probe is unstable during the measurement, showing an obviously suspicious value, it can be found in the "DELONE? ”state to delete the value;Repeat the measurement more than three times in the "DISSTATS? status, five statistics can be displayed in turnVALUES, I.E., MEAN, MAX, MIN, MEASURENUMBER OF QUANTITIES (NO.), STANDARD DEVIATION (S.DEV).
7. Shut down
In the case of no operation, the instrument will automatically shut down after about 2~3min.
Second, the functions and operation methods
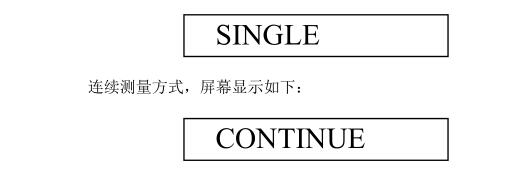
1. Measurement method (single measurement ⇔ continuous measurement)
●Single measurement method - every time the probe touches the test piece once, with a beep, the measurement is displayedOutcome. If you want to re-measure, lift the probe away from the test piece and then press down on the probe.
●Continuous measurement method - no lifting of the probe measurement, no sound during the measurement, the display screen is connectedThe measurement results are displayed.
●The conversion method between the two ways is to press and hold the "MODE" button in the shutdown state, and then press again"ON/C" button, with a beep, the conversion is complete.For a single measurement, the screen is displayed as follows:
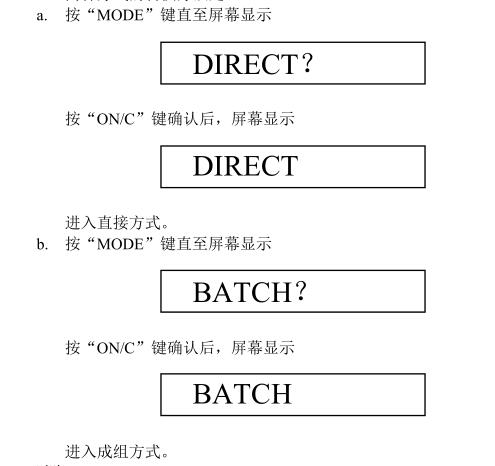
2. Working method (direct ⇔ group method)
●DIRECT method – This method is used for random measurements, and the measured value is temporarily stored in memoryUnits (15 storage units in total). When the storage is full of 15 storage units, new measurements will beThe values that replace the old measurements, and participate in the statistical calculation, are always the new 15 data;
●BATCH method (BATCH) - This method is convenient for users to record the tested data in batchesThe group has a maximum of 15 values, and the screen will be displayed whenever a set (15) of data is stored

At this point, you can use "PRINTALL? prints out the group of values and their statistically calculated values. With "DELALL? "Delete the set of data, otherwise no new measurements can be made. The grouping method avoids the arbitrariness of replacing the old value with the new value in the direct mode.
●The conversion method of the two ways is:
3. Delete
●Delete the current value: If there is a large error in the current measurement result and you do not want this result to enter the statistical calculation, you can press the "MODE" key until the screen prompts

At this time, press the "ON/C" key to delete this data (if you don't want to delete it, in the "DELONE? In this state, press the ▲ or ▼ button).
● Delete all data: If you want to delete all the data in memory for a new round of measurements,You can press the "MODE" key until the screen prompts

In this case, press the "ON/C" key to delete all the data in the memory (if you don't want to delete it, go to the "DELALL? In this state, press the ▲ or ▼ button).
4. Statistical calculations
As long as there are 3 measured values, statistical calculations can be performed. The method of operation is: repeat the measurement more than 3 times,Press the "MODE" key until the screen displays

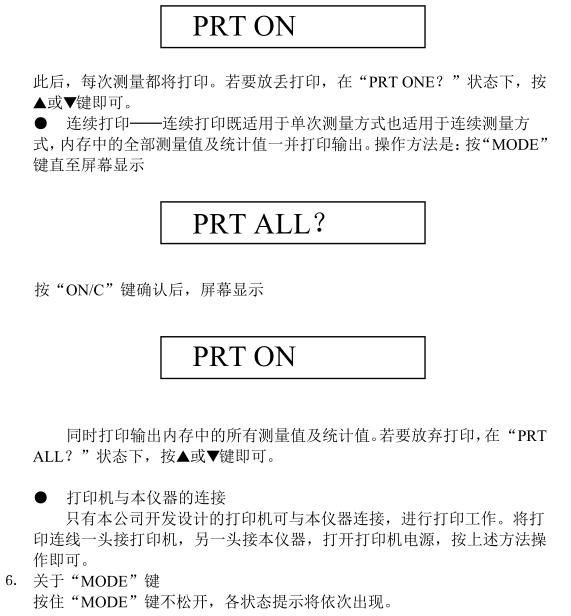
5. Printing function
●Single Printing – Corresponding to the single measurement method, one measurement is printed for each measurement.The operation mode is as follows: In the single measurement mode, press the "MODE" button until the screen displays

Fourth, the calibration of the instrument
In order for the measurement to be accurate, the instrument should be calibrated at the measuring site.
1. Calibration standard (including foil and substrate)
A foil of a known thickness or a specimen of a known overlay thickness can be used as calibration standards. Abbreviated as standard film.
1. Calibration foil
For this instrument, "foil" means a non-magnetic metal or non-metal foil or gasket. The "foil" facilitates calibration on surfaces.
2. Standard sheet with overlay
A covering layer of known thickness, homogeneous, and firmly bonded to the substrate is used as the standard sheet. For this instrument, the overlay should be non-magnetic.
Second, the matrix
1. The magnetic and surface roughness of the standard base metal of this instrument should be similar to that of the base metal of the test piece.
In order to confirm the suitability of the standard piece, the standard substrate and the substrate of the test piece can be measuredReadings are compared.
2. If the thickness of the base metal of the test piece does not exceed the critical thickness specified in the parameter table, it can be adopted
Calibration is performed in the following two ways:
1) Calibrate on a metal standard with the same thickness as the base metal of the test piece;
2) Use a metal gasket standard sheet or specimen of sufficient thickness, similar electrical or magnetic properties, but requiredThere is no gap between the base metal and the gasket metal. For specimens with covering layers on both sides, the liner method cannot be used.
3. If the curvature of the overlay to be measured has reached a point where it cannot be calibrated on a flat surface, there is a standard piece of the overlayThe curvature, or the curvature of the base metal placed under the calibration foil, should be the same as the curvature of the specimen.
3. Calibration method
There are two calibration methods used in this instrument, zero point calibration; Two-point calibration; There is also a specific testBasic calibration of the head.
1. Zero point calibration
a. A measurement is taken on the substrate and the instrument shows <×.× μm >.
b. Press the "ON/C" button once, and the screen display <0.00μm> to complete the zero point calibration.
c. To accurately calibrate the zero point, the above a, b must be repeated to obtain a matrix measurement of less than 1 μm, whichThis is beneficial to improve the measurement accuracy. Once the zero calibration is complete, the measurement can be taken.
2. Two-point calibration
a. Proofread zero (see above).
b. Perform a measurement on a standard sheet with a thickness roughly equal to the expected thickness of the covering layer to be measured, screenThe screen shows <××× μm >.
c. Correct the reading with the ▲ or ▼ key so that it reaches the nominal value on the standard sheet. Calibration is complete, yesI started to measure.
Note: Even if the displayed result matches the standard film value, pressing the ▲, ▼ keys is required, for examplePress the ▲ button once and the ▼ button once.
If you want to perform two-point calibration more accurately, you can repeat the B and C processes to improve the accuracy of the calibration.Reduce accidental errors.
3. Calibrate on the blasted surface
The nature of the blasted surface causes the measurements to deviate significantly from the true value, and its cover thickness is roughly usable belowmethod of determination
a. The instrument should be calibrated on a smooth surface with the same radius of curvature and substrate as the three, 1. or three, 2. methodAccurate.
b. Measure about 10 times on the uncoated surface with the same sandblasting treatment to obtain the average Mo.
c. Then, 10 measurements were taken on the coated surface to obtain the average Mm.
d. (Mm-Mo)±S is the thickness of the overlay. S (standard deviation) is the larger of SMm and SMo.
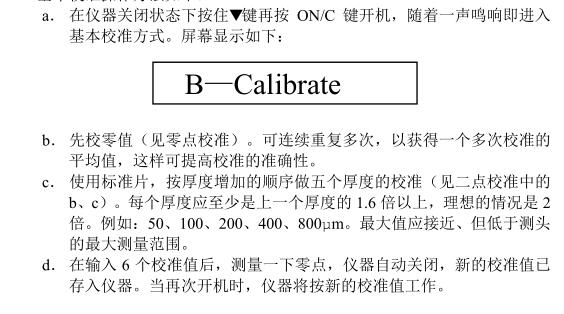
4. Basic calibration of the instrument
A change in the basic calibration is necessary in the following cases:
-- The tip of the head is worn
- After the probe is repaired
- Special applications
In the measurement, if the error is significantly outside the given range, the characteristics of the probe should be recalibratedQuasi, known as basic calibration. The probe can be recalibrated by entering 6 calibration values (1 zero and 5 thickness values).
The basic calibration operation method is as follows:
5. Precautions related to the use of the instrument
The main factors affecting the measurement accuracy of this instrument are: matrix metal magnetism, matrix thickness, edge effect, curvature, surface roughness, external magnetic field, adherent substance, probe pressure, probe position, sample deformation, etc.
Factors affecting measurement accuracy and related explanations
1. Substrate metal magnetism
The magnetic method is affected by the change in the magnetic properties of the base metal (in practical applications, the change in the magnetic properties of mild steelIn order to avoid the influence of heat treatment and cold working factors, the specimen should be usedThe instrument is calibrated with a standard piece of the same properties as the base metal. It can also be calibrated with the specimen to be coated.
2. Base metal thickness
Each instrument has a critical thickness of the base metal. Larger than this thickness, the measurement is not subject to the baseThe effect of the thickness of the bulk metal. The critical thickness value of this instrument is shown in Chapter 2 "Technical Parameters".
3. Edge effects
This instrument is sensitive to steep changes in the surface shape of the specimen. Therefore, it is performed close to the edge of the specimen or at the inner cornerMeasurements are unreliable.
4. Curvature
The curvature of the specimen has an effect on the measurement. This effect always increases significantly with the decrease in the radius of curvature.
5. Surface roughness
The surface roughness of the base metal and overlay has an impact on the measurement. The roughness increases, the impact increasesBig. Rough surfaces can cause systematic and accidental errors, which should be increased at different locations each time you measureThe number of measurements to overcome this accidental error.If the base metal is rough, it is also necessary to take it on the uncoated base metal specimen with similar roughnessCalibrate the zero point of the instrument in several positions; or after removing the covering layer by dissolving it with a solvent that does not corrode the base metal,Then calibrate the zero point of the instrument.
6. Magnetic field
7. Adhesion substances
This instrument is sensitive to adherent substances that prevent the probe from coming into close contact with the surface of the overlayThe attached material must be removed to ensure direct contact between the instrument probe and the surface of the test piece.
8. Probe pressure
The amount of pressure exerted by the probe on the specimen affects the measured reading, so the probe of this instrument is usedThe spring maintains a substantially constant pressure.
9. Probe placement
The way the probe is placed has an impact on the measurement. During the measurement, the probe should be kept hanging from the specimen surfaceStraight.
10. Deformation of the specimen
The probe deforms the soft-covered specimens, so less reliable data can be measured on these specimens.
2. The regulations that should be observed when using the instrument
1. Matrix metal characteristics
The magnetic and surface roughness of the base metal of the standard piece should be the same as the magnetic and surface of the base metal of the specimenThe surface roughness is similar.
2. Base metal thickness
Check that the thickness of the base metal does not exceed the critical thickness.
3. Edge effects
Measurements should not be made at abrupt changes in close proximity to the specimen, such as edges, holes, and inner corners.
4. Curvature
It should not be measured on the curved surface of the specimen.
5. Number of readings
Often, since each reading of the instrument is not exactly the same, it is necessary to take several in each measurement areareadings. Local differences in the thickness of the overburden also require multiple measurements over a specified area of the surfaceThis is especially true when it is rough.
6. Surface cleanliness
Before measuring, any adherent substances on the surface, such as dust, grease and corrosive substances, should be removedDo not remove any covering substance.
3. Explanation of the measurement results
1. From a statistical point of view, a single reading is unreliable. Therefore any measurement shown by this instrumentValues are all averages of 5 invisible measurements. These 5 measurements are taken in a fraction of a second
head and instrument finished.
2. In order to make the measurement more accurate, this instrument can be used to measure many times at the point to be measured, and the deletion function is used to measure the coarseThe error is deleted and then processed with the statistical function of this instrument to obtain five statistics: the average
(MEAN), maximum value (MAX), minimum value (MIN), number of tests (NO.), standardDeviation (S.DEV).
3. According to international standards, the final measurement results can be expressed as:
CH=M±2S
Wherein: CH - coating thickness
M—MEAN of multiple measurements
S—Standard deviation (S.DEV)
6. Maintenance and repair
1. Strictly avoid collision, heavy dust, moisture, strong magnetic field, oil pollution, etc.
2. Charge the host regularly: generally charge every 8~24 hours, and charge for 12~14 hours each time. 3. If the error code is not displayed and it does not work properly, for example:
The instrument cannot be automatically shut down;
Cannot be measured;
keys don't work;
Measurements are capricious.
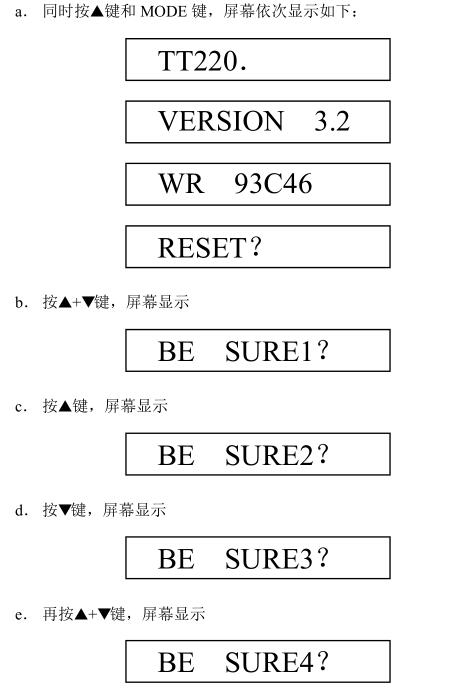
In the event of such a malfunction, the instrument is forcibly reset.
The method of forced reset is:
- 1Beijing Infrared Times TT300 Ultrasonic Thickness Gauge Operation Instructions
- 2Beijing Infrared Times TT310 Ultrasonic Thickness Gauge (Standard) Operating Instructions
- 3Beijing Infrared Times TT140 Ultrasonic Thickness Gauge Operation Instructions
- 4Beijing Infrared Times TT320 Ultrasonic Thickness Gauge (High Steel Temperature Type) Operation Instructions
- 5Beijing Infrared Times TT260 Coating Thickness Gauge operation instructions
- 6German EPK company McCourt automatic cladding Thickness Gauge operating instructions
- 7CMPLEX Handheld Ultrasonic Thickness Gauge Operating Instructions
- 8LANDTEK CM-8820 Thickness Gauge Operating Instructions
- 9Biaozhi GM220 Coating Thickness Gauge Instructions for use