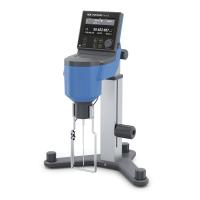
NDJ-4 swirl/spin Viscometer Operation Instructions
1. Purpose
NDJ-4 rotary viscometer can measure the viscous resistance and dynamic viscosity of liquid in a large range. It can be widely used in the viscosity determination of various fluids such as oil, paint, plastic, food, medicine, and viscometer.
2. Main technical specifications
Measuring range: 10~2×10⁶mPa.s
Measurement error: ±5%
Measuring rotors: rotors 1, 2, 3, and 4
Rotor speed: 0.3, 0.6, 1.5, 3,
6, 12, 30, 60 rpm.
Power supply: 220V±22V, 50Hz±0.5Hz
Dimensions: 300×300×450mm
Net weight: 2kg (excluding bracket)
3. Installation
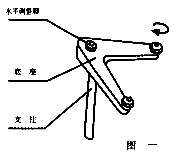
1. Take out the storage box, fixing bracket and lifting column from the packing box.
2. Screw the lifting column into the screw hole at the rear of the fixed bracket, and face the toothed surface on the column to the rear of the bracket, and tighten the hex nut with a wrench to prevent the column from rotating.
3. Turn the knob of the lifting chuck to check the flexibility and self-locking of the lifting chuck. If it is found to be too loose or too tight, use a Phillips or flat head screwdriver to adjust the tightening screw of the chuck at the rear of the lifting chuck so that it can be tightened. 4. When When the value pointed by the pointer is too high or too low, you can change the rotor and speed, and make sure that the reading is preferably between 30-90 on the scale.
5. Selection of range, coefficient, rotor and speed:
a. First roughly estimate the viscosity range of the liquid to be measured, and then select the appropriate rotor and speed according to the range table.
For example, when measuring a liquid of about 3000mPa.s, the following coordination can be used:
No. 2 rotor, 6 rpm or No. 3 rotor, 30 rpm
b. When the approximate viscosity of the liquid to be tested cannot be estimated, it should be set to a higher viscosity first, and try a rotor with a small volume to a large volume and a speed from slow to fast. The principle is that the high-viscosity liquid uses a small-volume rotor and a slow speed, and the low-viscosity liquid uses a large-volume rotor and a fast speed.
c. Coefficient: When measuring, the reading indicated by the pointer on the dial needs to be multiplied by the specific coefficient on the coefficient table to obtain the measured dynamic viscosity (mPa.s).
That is, η=k×α where η——dynamic viscosity
K—coefficient
α——The viscosity indicated by the pointer (deflection angle)
d. Correction of frequency error: When the frequency of the power supply is inaccurate, it can be corrected according to the following formula.
Actual viscosity = indicated viscosity × (nominal frequency/actual frequency)
e. Commonly used viscosity unit conversion:
"Common Dynamic Viscosity Unit Conversion":
1 centipoise (1cP) = 1 millipascal second (1mPa.s)
100 centipoise (100cP) = 1 poise (1P)
1000 millipascal seconds (1mPa.s) = 1 Pascal seconds (1Pa.s)
"Conversion of Dynamic Viscosity and Kinematic Viscosity":
η=ν×ρ where η——sample dynamic viscosity (mPa.s)
ν—sample kinematic viscosity (mm2/s)
ρ——The density of the sample at the same temperature as the measurement of kinematic viscosity (g/cm3)

4. Matters needing attention
1. This instrument is suitable for use in normal temperature environment.
2. The instrument needs to be measured within the specified frequency and voltage tolerance range, otherwise the measurement accuracy will be affected.
3. Try to use the bracket to fix the instrument for use, such as handheld operation should keep the instrument stable and level.
4. Care should be taken when loading and unloading the rotor. When assembling and disassembling, the connecting screw should be slightly lifted for operation. Do not use too much force or force the rotor laterally to avoid bending the rotor.
5. Do not place the instrument on its side or upside down after installing the rotor.
6. Be sure to change the speed when the motor is running.
7. The end face and thread of the connecting screw and rotor should be kept clean, otherwise it will affect the correct connection of the rotor and the stability of rotation.
8. The instrument should be supported by hand when the instrument is raised or lowered to prevent the instrument from falling automatically.
9. The rotor should be cleaned in time after each use (do not clean the rotor on the instrument), and it should be placed properly after cleaning.
10. Do not disassemble and adjust the instrument parts at will, and do not add lubricating oil by yourself.
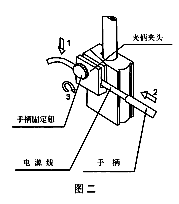
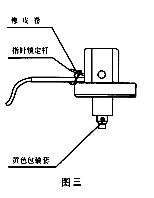
11. When the instrument is moved and transported, the pointer control rod should be surrounded by a rubber band, and put into the yellow packaging ferrule to support the connecting screw rod, and then tightened with the screw.
12. Many suspensions, emulsions, polymers and other high-viscosity liquids are "non-Newtonian liquids". Its surface viscosity changes with the change of shear speed and time, so it is normal for the results to be inconsistent when measured under different rotors, speeds and times, so the viscosity value measured by this instrument for non-Newtonian liquids can only be used as a reference value (Generally, the measurement of non-Newtonian liquids should be carried out according to the rotor, rotational speed and duration specified in the measurement requirements: or the conditions and environment of fixed measurement, and comparative measurement to verify whether the viscosity is qualified).
13. Accurate values can be measured by doing the following points:
a. Accurately control the temperature of the measured liquid.
b. Immerse the rotor in the liquid to be measured for a long enough time and keep the temperature constant so that it can be consistent with the temperature of the liquid to be measured.
c. Ensure the uniformity of the liquid.
d. Place the rotor in the center of the container as much as possible during the measurement.
e. Prevent air bubbles from adhering to the bottom of the rotor when the rotor is immersed in the liquid.
f. Change the rotor or speed to make the reading on the dial higher.
g. Assay using a protected frame.
h. Keep the rotor clean.
i. When the power frequency is not accurate, it should be corrected according to the correction formula.
j. Operate strictly in accordance with the operating rules.
Product execution standard: Q/YXLQ1
5. Operation and use
1. Prepare the liquid to be tested, put it in a beaker or a straight container with a diameter of not less than 70mm, and accurately control the temperature of the liquid to be tested.
2. Install the protective frame on the instrument (screw right to install it, turn left to remove it).
Screw the selected rotor into the connecting screw (screw to the left to install it, and turn to the right to remove it). Rotate the lifting knob to lower the instrument slowly, and gradually immerse the rotor into the measured liquid until the rotor liquid level mark is parallel to the liquid surface. Adjust the level of the instrument, turn on the motor switch, turn the variable speed knob to make the required speed number upward, align with the speed indicator point, and the rotor rotates in the liquid. After several rotations, generally (20-30) s, or according to the specified time, the pointer can be read when it becomes stable. Press the pointer control lever to fix the reading, and turn off the motor when the pointer turns to the reading window (Note: 1. Do not use too much force. 2. When the speed is slow, you can read directly without using the control lever), and the pointer stops at the reading at this time In the window, the measurement data can be obtained. If the pointer is not in the reading window after the motor is turned off, you can continue to press the pointer control lever to turn on and off the motor repeatedly. After several exercises, you can master it proficiently, make the pointer stop in the reading window, and read the data.
4. It is advisable to lift up and down tightly to prevent automatic fall after installing the viscometer.
5. Open the storage box, take out the viscometer, install the viscometer on the lifting chuck, tighten the fixing screw of the handle, take off the rubber band on the pointer control rod, unscrew the screw at the lower end of the instrument, and take off the yellow packaging ferrule.
6. Adjust the level adjustment screw to keep the instrument level.
7. After the above preparations are completed, connect the power supply.
- 1Rotational viscometer - principle, classification, application and calibrating
- 2Application of NDJ-8S digital Rotational Viscometer in viscosity measurement of cosmetic raw materials
- 3NDJ-5S digital Rotational Viscometer accurate measurement of natural oil viscosity
- 4Application of SNB-1 + L0 digital swirl/spin Viscometer in Oil Industry
- 5Application of HBDV-1H swirl/spin High Temperature Viscometer in Viscosity Determination of Plastic Particles
- 6Rotational viscometer selection guide: How to choose the right viscosity equipment for you?
- 7Principle, type and accuracy control of Rotational Viscometer
- 8Which Viscometer to Choose for Licorice Extract Viscosity Testing? How to Test?
- 9Application of Rotational viscometer in Waterborne Polyurethane Adhesive


