MD Density (specific gravity) Electronic Balance Operation Application Note
MD electronic density (specific gravity) balance is an intelligent balance composed of high-stability sensors and a single-chip microcomputer. It can measure solid density and liquid density at the same time, and it has functions such as tare weight removal and calibration. Yueping electronic specific gravity balance is accurate, fast and stable, easy to operate, and has complete functions. It is suitable for rapid determination of the quality and quantity of objects in industry, agriculture, commerce, schools, scientific research and other units.
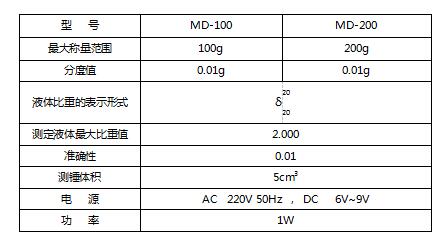
Technical Parameters
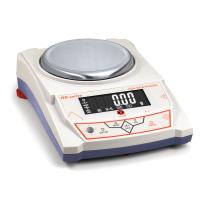
Schematic

1. Operation preparation
1. Place the balance on a stable and flat place, and avoid vibration, sunlight, airflow and strong electromagnetic wave interference.
2. Operating environment: temperature limit: 5C ~ 35C temperature fluctuation: ≤5C/h
Relative humidity: 50~85
3. Please install the screws in the manual bag into the mounting holes of the fixing bracket, and tighten them tightly. Install the fixed bracket on the balance host and place the measuring platform. As shown in Figure 1.
Two, boot
1. Insert one end of the power adapter or power cord into the power input port of the balance, and connect the other end to AC 220V voltage.
2. Turn on the power switch of the balance, "8.8.8.8.8.8.", "Maximum weighing value" and "S-CAL" are displayed in sequence. Finally, the weighing mode of "0" or "0.0" or "0.00" or "0.000" is displayed.
3. Calibrate the balance
1. Turn on the power of the balance and perform calibration after half an hour of warm-up to make the calibration more accurate.
2. Calibration operation: without adding any object on the weighing pan, press and hold the "CAL (calibration)" button for about 3 seconds to enter the calibration state, display "CAL weight value", and then display the flashing "weight" Weight value", put the corresponding weight, and the weight will be displayed later, that is, it will enter the weighing state. If the weighing is still inaccurate after calibration, repeat the calibration several times as above.
3. Calibration mode selection: After entering the calibration state according to the above three and 2., press the "CAL (calibration)" button again and again, and 3 kinds of weight values and "CAL L" will be displayed, and any weight value pair can be selected. Balance calibration, you can also choose "CAL L" for three-point linear calibration.
4. After entering the calibration state, if the weight is not put in for about 10 seconds, "no CAL" will be displayed, and the calibration state will automatically exit.
4. Liquid density measurement
★ Press the "Backlight" key, display "...L..." to enter the liquid measurement mode.
1. For the first measurement, it is recommended to calibrate according to the method of liquid density measurement.
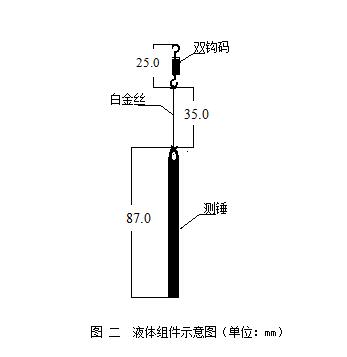
2.按“去皮”键,将液体组件(双钩码、白金丝、测锤)组装后(如图二所示),挂在固定支架的挂钩上,将量杯放置于测量台板中央位置,温度计固定于量杯内壁。待稳定后按“模式”键,当再次显示测锤重量后,往量杯内倒入待测液体(完全浸没测锤为止)。
3.待读数稳定后,按“模式”键,此时的读数即为量杯中液体的密度(比重)值。(注意测锤上不应该有气泡产生,否则影响结果)
4.如需多次测量结果,或对数据存有疑虑,按“去皮”键,使天平置于称量状态,取下量杯和液体组件,檫干测锤,按照四中1~3重新测量数据。
五、去皮
按“去皮”键,可去掉秤盘上的皮重。另外,“去皮”键可以中断操作,使天平回到称量状态。黑点显示时去皮功能无效。
六、固体密度测量
1.第一次测量前按固体校准方法进行校准(建议).
2.挂上挂篮后,倒入275ML左右纯净水,按去皮键,显示”0.00g”
3.将被测固体放在(图一)的称盘上,待数据稳定后,按“模式“键,此时显示 “-----”,待再次显示固体质量时表示数据记忆成功
4.将固体轻轻用镊子等工具拿下,轻轻放到挂篮里,让纯净水把固体完全浸没,待读数稳定后,再次按 “模式”键,
此时屏幕上显示的就是该固体的密度
5.如需多次测量结果,或对数据存有疑虑,按“去皮”键,使天平置于称量状态,取下量杯和液体组件,檫干测锤,按照四六中1~4重新测量数据。
注:如被测固体比重小于1g/cm3,则需将纯净水换成乙醇。
七、打印
按“打印”键,可以将测量数据通过RS232C数据接口连接打印机,将数值输出。
八、称量
1.开机预热稳定或校准后,置称物于秤盘上,待显示屏左下方的黑点消失,即可读取物体的质量。
2.天平的最大称量为开机显示的最大值+9d(d为显示最小读数),超过最大称量后, 显示上横线“------”表示累计称物超过规定范围,应立即拿去称物,不然会损坏天平。
★ 按“背光”键,显示“…S…”进入固体测量模式
九、背光:天平开机就进入背光打开状态,按“BL(背光)”键,可关掉液晶背光。
十、天平零点跟踪和自动去皮功能的设定
1.在天平电源关闭的状态下,一手按住“CAL(校准)”键,另一手打开电源,直到显示“-Zero-”闪烁,松开“CAL(校准)”键,按住“TARE(去皮)”键,显示“Zero*d”,再按“TARE(去皮)”键,“*”从“0-5”变化,“Zero0d”为没有零点跟踪,“Zero5d”为零点跟踪最大。
再按“CAL(校准)”键,显示“-tArE-”闪烁,按“TARE(去皮)”键,显示“tArE *d”, 再按“TARE(去皮)”键,“*”从“0-9”变化,“tArE0d”2.为没有自动去皮,“tArE9d”为自动去皮值最大。
3.按“BL(背光)”键,稍后,显示“0”或“0.0”或“0.00”或“0.000”的称量模式。设定结束。
十一、其它功能(简易天平无以下功能)
1.单位转换:按“MODE(模式)”键,显示“Unit”闪耀,按“TARE(去皮)”键确认,显示“Unit*”闪耀,按“MODE(模式)”键选择到需要的单位,按“TARE(去皮)”键确认,单位转换结束,可以称量。
2.计数功能:按“MODE(模式)”键二次,显示“Count”闪耀,按“TARE(去皮)”键确认,显示“*pcs”闪耀,按“MODE(模式)”键,“*pcs”可从“10pcs”改变到“500pcs”,数字越大,计数精度越高。在秤盘上放上相应闪耀数字的计数物品,按“TARE(去皮)”键确认,显示“------”,稍候,计数设定完成。当计数物品单重约小于2d时,显示“no-Cou”,不能进行计数设定,需将几个计数物品算作一个重新设定。
3.百分比功能:按“MODE(模式)”键三次,显示“PER”闪耀,按“TARE(去皮)”键确认,显示“100%”闪耀,放上要设定成100%的物品,按“TARE(去皮)”键,显示“100%”,取下物品后放上其它物品,即显示该物品与前面设定物品的百分比。当设定物品除以100后约小于2d时,显示“no-PER”,不能进行百分比设定,需增加设定物品质量。
4. Printing function: Press the "MODE (mode)" key four times to display "Prt", press the "TARE (tare)" key to confirm, and display "hAnd".
(1). Press "TARE (tare)" to confirm, enter the manual printing mode, and use it together with the "PRT (print)" key or the print symbol key to complete the printing function.
(2). Press the "MODE" button after the above-mentioned display "hAnd" to display "Auto", press the "TARE (tare)" button to confirm, enter the automatic printing mode, and put about more than 3d on the weighing pan Item, that is, the weight displayed by the printout.
(3). After displaying "hAnd" above, press the "MODE" key twice to display "CLoSE", press "TARE" to confirm, and turn off the printing function.
▲ RS232 print port parameters:
Transmission data format: every 10BIT is a data frame, and the frame format is as follows:
BIT1, BIT2, BIT3, ..., BIT8, BIT9, BIT10.
BIT1: start bit, BIT2---BIT9: data bit, BIT10: stop bit
Baud rate: 9600 bps
All characters are ASCII codes.
12. Precautions for use
1. Power on and preheat according to regulations before use.
2. The sum of the tare weight and the weight of the object shall not exceed the weighing range.
3. If the weighing is inaccurate, calibrate the balance with standard weights.
4. If you need to remove the fixed bracket on the balance, please turn the fixed bracket clockwise and then remove it. Do not pull the weighing pan upwards to avoid damage to the sensor.
5. Low voltage indication: For balances using batteries or rechargeable batteries, when the battery symbol is displayed on the upper left of the LCD screen, it means that the battery needs to be replaced or charged.
13. Precautions for use
1. Power on and preheat according to regulations before use.
2. The sum of the tare weight and the weight of the object shall not exceed the weighing range.
3. If the weighing is inaccurate, calibrate the balance with standard weights.
4. If you need to remove the round weighing pan on the balance, please turn the weighing pan clockwise and then remove it. Do not pull the weighing pan upwards to avoid damage to the sensor.


- 1Proper Use of Electronic Balance
- 2What is the difference between 10,000-level and 100,000-level Electronic Balance?
- 3Selection scheme of solar cell slurry performance testing instrument
- 4Offset printing ink laboratory performance testing instrument scheme
- 5Method of using electronic balance and its structure
- 6How should the calibration weights of precision balances be handled and maintained?
- 7How to choose and use precision electronic balance test weights?
- 8How to choose a precision digital electronic balance?
- 9Edham Adam SAB & SPB Electronic Balance Structure