Anmiao AC-112H-CN Anticorrosive Coating Thickness Gauge Operation instructions
1. Product description
*This instrument is a portable measuring instrument powered by batteries and adopts the principle of magnetic induction. It complies with the measurement method of international standard ISO2178 and national standard GB4956. It adopts computer technology, non-destructive testing technology and many other professional technologies to accurately measure the thickness of the measured object without damaging it.
* The F-type probe can directly measure the thickness of the non-magnetic coating layer (such as: paint, plastic, enamel, copper, aluminum, zinc, chromium, etc.) on the surface of magnetic-conductive materials (such as steel and nickel). It can be applied to the thickness measurement of electroplating layer, paint layer, enamel layer, aluminum tile, copper tile, babbitt tile, phosphating layer, paper, and also can be used for thickness measurement of hull paint and attachments of underwater structural parts.
*The spring guide sleeve probe with wear-resistant hard metal probe can not only measure on hard or rough surfaces, but also ensure that the probe has constant pressing force and stable sampling value. *Digital display, wide measuring range and high resolution.
* Automatic memory calibration value, easy to use.
*Sturdy and delicate structure, easy to carry.
*Small size and light weight.
*Using the optional accessory RS232C software and cable, it can communicate with PC computer to realize the functions of data collection, processing, analysis and printing.
*The instrument is equipped with automatic shutdown to realize power saving function.
2. Technical specifications
Resolution: 0.01mm (below 1.0mm)
0.1mm (above 1mm)
Accuracy: 1~3%n or 0.2mm
Measuring range: 0~12mm
Measuring method: F-magnetic induction
Unit display: metric/imperial
Shutdown:: auto shutdown/manual shutdown
Working environment: temperature -5°C~50°C, humidity <95RH Voltage indication: low voltage indication function
Power supply: 4x1.5vAAA7# battery
Size: 140x70x30mm
Weight: 130g (without battery)
Standard accessories:
*host
*Iron base
*Calibration diaphragm
*Carrying case
*Operation manual
Optional accessories:
* USB data line output
* RS232C communication cable and software
* Bluetooth Bluetooth data output
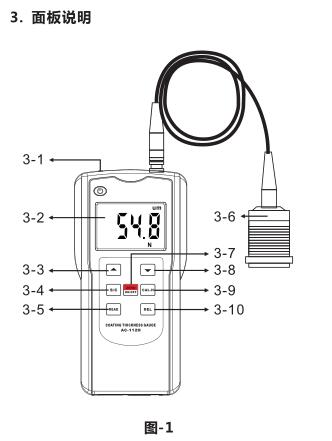
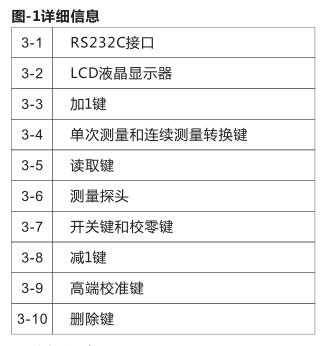
4. Measurement procedure
4.1 For coating Thickness Gauges with a measuring range greater than 5mm, it is recommended to perform zero calibration professionally before measurement to eliminate measurement errors caused by temperature and humidity changes.
4.2 Plug in the probe, lightly press the power button, and after turning on the power of the whole machine, the instrument will automatically enter the measurement state and automatically restore the parameter settings before the last shutdown.
4.3在确认校准正确的前提下,就可开始测量。若对以前的校准有所怀疑的话,应再进行一次校准。校准的具体方法详见仪器校准部分。仪器一旦校准,校准结果将自动存贮在仪器中,下次开机测量时,可不必再次进行校准,除非对测量的准确性有怀疑。
4.4将测量传感器压紧到被测涂层上,显示器上的值即为待测涂层的测量值。
注意:由于所有的磁性涂层测厚仪都是采用电磁感应原理进行测量。因此,一定要注意探头压上被测体的速度不能太慢。否则,会造成人为测量误差。
4 . 5 要进行下次测量,需要将测量传感器提起到1厘米以上,然后再重复4.4。
4.6如有必要,测量值可通过加1键或减1键来修正。需要注意的是,按加1键或减1键修正时,测量探头一定提起,否则,按加1键或减1键无效。4.7要更换测量单位,实现mm和mil的转换,只要轻按一下单位转换键即可。
4.8要更换测量模式,实现单次测量和连续测量的转换,只要轻按“S/C”按键即可。
4.9测量完毕,轻按电源键关断电源。本仪器设有两种关机方式,即手动关机和自动关
机。在任何时侯,只要轻按一下电源键,就可手动关断整机电源;另一方面,若在
50秒钟的时间内,未按动任何按键,则会
自动关机,以实现省电功能。
5.仪器校准
5.1校零
5.1.1将测量探头压在基准块上(或不带涂层的测量体上),再轻按一下校零键ZERO进行校零。在按ZERO键时,测量探头在基准块上不要晃动。同时要注意,只有在按完ZERO键后,才能提起探头,否则,校零不正确。
5.1.2将测量探头提起5厘米以上,然后再将探头以正常的速度压放到基准块上(或不带涂层的测量体上),观察基准块上同一点的测量值,若测量值在0附近,说明校零成功,否则,应重新校零。
5.2校满度
5.2.1According to要测量的涂层厚度,选择适当的标准膜片,进行满度校准。
5.2.2先将标准膜片放在基准块上(或不带涂层的测量体上)。
5.2.3再将测量探头压在标准膜片上,测量值就显示在显示器上,若测量值与标准膜片不同,测量值可通过加1键或减1键来修正。
5.2.4 In order to ensure the accuracy of the calibration, it can be verified by measuring the same standard diaphragm several times.
5.3 High-end calibration
During use, it is found that the linearity of the measurement result is not good, or the number has already appeared when the power is turned on and the measurement is not performed; hang the sensor in the air (more than 30mm away from the metal), and press the CAL-H key to perform high-end calibration.
6. Measurement precautions
6.1 Selection of reference block
The choice of reference block should be consistent with the selected probe. When choosing an iron-based F probe, the reference block should be iron-based.
6.2 In order to reduce the influence of the measuring body material on the measurement accuracy, it is recommended to use the measuring body without coating or the standard test block with the same material as the measuring body as the reference block for calibration.
6.3 If the instrument is not used for a long period of time, it is recommended to apply a little grease on the contact of the measuring head and the reference block to prevent rust.
6.4 The instrument should prevent severe vibration and impact. After use, wipe off the oil on the surface of the instrument and put it in the instrument box for safekeeping.
6.5 It is strictly forbidden to knock or collide with the probe so as not to affect the performance of the probe.
7. Replace the battery
7.1 When the battery voltage is about 5V, the battery will appear on the display
symbol, the battery needs to be replaced.
7.2 Open the battery cover and take out the battery.
7.3 Install the battery correctly according to the label on the battery box.
7.4 If the meter will not be used for a long time, please take out the battery to prevent the battery from rot and damage the meter.
8. Connect to computer
According to the label on the battery box, the optional RS232C software and cable can be used to communicate with the PC computer to realize the functions of data collection, processing, analysis and printing. Please refer to the online instructions for specific operations. Install the battery correctly.
- 1How to choose a logarithmic Thickness Gauge?
- 2Anmiao AC-110B-CN Coating Thickness Gauge operating instructions
- 3Anmiao AC-110AS-CN-F Coating Thickness Gauge operating instructions
- 4Anmiao AC-110A-CN Coating Thickness Gauge operating instructions
- 5Anmiao AC-110AS-CN-N Coating Thickness Gauge operating instructions
- 6What is the effect of matrix material on the detection results of magnetoresistive Coating Thickness Gauge?
黄敏 - 《基体材质对磁阻式涂层测厚仪检测结果的影响》
- 7Talking about the particularity of the measurement of the cladding Thickness Gauge and the choice of the substrate when calibrating
张国恒 - 《覆层测厚仪测量时的特殊性及校准时的基体选择》
