Anmiao AT-137PC-CN-fold Multifunctional Tachometer Operation Instructions
1. Product description
*In line with JJG105-2000 tachometer verification regulations.
*Complete speed measurement function.
*One meter is multi-purpose, one meter can be used as a photoelectric tachometer for non-contact speed-related parameter measurement (measurement speed RPM, cycle ms, frequency Hz). It can also be used as a contact tachometer to measure contact speed related parameters ( measurement speed RPM, period ms, frequency Hz). It can also measure the parameters related to the contact point (measuring linear velocity m/min, ft/min, movement distance m, custom circumference movement distance m).
* It can also measure the number of pulse signals.
*Digital display, no parallax.
* Wide measurement range and high resolution.
*Automatically memorize the maximum, minimum and last measured value during the measurement period.
*Sturdy and delicate structure, easy to carry. The whole machine adopts durable professional electronic components; the outer shell is made of light and hard ABS plastic, which is beautiful in shape and easy to use.
2. Technical Parameters
Display: LCD display
Test range: photoelectric: 2.5~99,999 rev/min (RPM)
Contact: 0.5~19,999 revolutions per minute (RPM)
Linear speed: 0.05 ~ 1999.9m/min(m/min)
0.2 ~ 6, 5 60 feet per minute (ft/min)
Frequency: 0.04~1666.65Hz
Resolution: Speed: 0.1 rpm (0.5~999.9 rpm)
1 rpm (over 1000 rpm)
Linear speed: 0.01 m/min (0.05~99.9 m/min)
1 m/min (above 100 m/min)
or 0.1 feet (0.1~999.9 feet/min)
1 inch (above 1000 inches/min)
Measurement accuracy: ±(0.05%n+1d)
Sampling time: 1.0 seconds (below 60 rpm)
Range selection: automatic switching
Memory function: automatically memorize the maximum value and minimum value during the measurement period
value and last measured value
Time Base: Quartz Crystal
Effective distance: 50~250mm (typical value) up to 600
mm depends on the brightness of the LED
Power supply: 4X1.5VAAA AAA batteries.
Power consumption: Approx. 80 mA (during measurement)
Operating temperature: 0~50℃
Size: Host: 145X74X32mm
Split sensor: Φ45X195mm
Weight: 245g (excluding batteries)
Standard accessories: host tapered adapter
Carrying case Funnel adapter
Manual speed wheel
4. measurement procedure
The tachometer has two measurement modes, photoelectric measurement mode and contact measurement mode. The measurable parameters in the photoelectric measurement mode include rotational speed, cycle, and frequency; the measurable parameters in the contact measurement mode include not only rotational speed, cycle, frequency, but also linear speed, motion distance, and custom circumference motion distance. Select the corresponding measurement parameters according to the needs of users.
4.1 Photoelectric mode measurement procedure
4.1.1 Put reflective marks on the object to be tested.
4.1.2 Without installing the contact sensor, press the power key (3-4) or the power/measurement key (3-8) to turn on the instrument, and the instrument is in the photoelectric measurement mode.
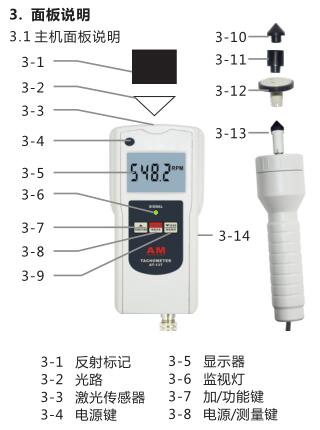
4.1.3 Press the Plus/Function key (3-7) to select the desired measurement parameter, each time the Plus/Function key (3-7) is pressed, the measurement parameter is converted once, and different parameter units or indications will be called out on the display symbol.
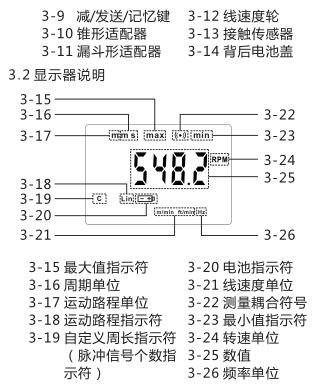
A. When the speed unit (3-24) is called out, the speed can be measured.
a. Press the power/measure key (3-8), the laser sensor emits laser light. Aim the laser beam at the object , when the reflective paper passes through the laser beam, the monitor light (3-6) lights up, the measurement coupling symbol (3-22) appears on the screen, and the instrument starts to measure.
b. The maximum value, minimum value and last are automatically memorized in the meter.
c. After the measurement is completed, you can press the Minus/Send/Memory key (3-9) to check, see 7. Memory function description for details.
B . 当调出周期单位(3-16),可进行周期的测量。
a . 按电源/测量键(3-8),激光传感器发射出激光。将激光光束对准待测物体,当反光纸通过激光光速时,监视灯( 3 - 6 )亮,测量耦合符号( 3 - 22 )出现在屏幕上,仪器开始测量。
b . 测量期间的最大值、最小值和最后一个显示值自动记忆在仪表中。
c . 测量完毕后,可以按减/发送/记忆键(3-9)查看,详见 7 . 记忆功能说明。
C . 当调出频率单位(3-26),可进行频率的测量。
a . 按电源/测量键(3-8),激光传感器发射出激光。将激光光束对准待测物体,当反光纸通过激光光速时,监视灯(3-6)亮,测量耦合符号(3-22)出现在屏幕上,仪器开始测量。
b . 测量期间的最大值、最小值和最后一个显示值自动记忆在仪表中。c. 测量完毕后,可以按减/发送/记忆键(3-9)查看,详见7. 记忆功能说明。
4.2 接触模式测量转速、周期、频率
4.2.1 在接触传感器(3-13)上装上锥形适配器(3-10)或漏斗形适配器(3-11)。
4.2.2 把接触传感器(3-13)接在主机上,按电源键(3-4)或电源/测量键(3-8)开机。仪器处于接触测量模式。
4.2.3 按加/功能键(3-7)选择所需的测量参数,每按一次加/功能键(3-7),测量参数转换一次,显示器上会调出不同的参数单位或指示符。
A . 当调出转速单位(3-24),可进行转速的测量。
a . 按电源/测量键(3-8),并将适配器顶在待测旋转体的中心,监视灯( 3 - 6 )亮,测量耦合符号(3-22)出现在屏幕上,仪器开始测量。
b . 测量期间的最大值、最小值和最后一个显示值自动记忆在仪表中。
c. 测量完毕后,可以按减/发送/记忆键(3-9)查看,详见 7 . 记忆功能说明。
B . 当调出周期单位(3-16),可进行周期的测量。
a . 按电源/测量键(3-8),并将适配器顶在待测旋转体的中心,监视灯( 3 - 6 )亮,测量耦合符号(3-22)出现在屏幕上,仪器开始测量。
b . 测量期间的最大值、最小值和最后一个显示值自动记忆在仪表中。
c. 测量完毕后,可以按减/发送/记忆键(3-9)查看,详见 7 . 记忆功能说明。
C . 当调出频率单位(3-16),可进行频率的测量。
a . 按电源/测量键(3-8),并将适配器顶在待测旋转体的中心,监视灯( 3 - 6 )亮,测量耦合符号(3-22)出现在屏幕上,仪器开始测量。
b . 测量期间的最大值、最小值和最后一个显示值自动记忆在仪表中。
c. 测量完毕后,可以按减/发送/记忆键(3-9)查看,详见7. 记忆功能说明。
4.3 接触模式测量接触点相关参数
4.3.1 接触点相关参数的定义接触点相关参数,包括线速度、运动路程、自定义周长运动路程,其定义如下:
A. 线速度:
线速度轮与待测物体接触点的线速度。
B. 运动路程:
线速度轮与待测物体接触点的运动路程。由线速度轮周长C 0 乘以转动圈数n 所得,
计算公式如下:
s = C 0 n
C. 自定义周长运动路程:
当选用周长不同的线速度轮时,可以自由定义线速度轮的周长 C,来测量运动路程。线速度轮周长的设定详见6. 自定义周长的设定。此时运动路程由自定义线速度轮周长 C 乘以转动圈数n 所得,计算公式如下:
s = C n
4.3.2 接触模式测量线速度、运动路程
4.3.2.1 在接触传感器(3-13)上装上标配的线速度轮(3-12)。
4.3.2.2 把接触传感器(3-13)接在主机上,按电源键(3-4)或电源/测量键(3-8)开机。仪器处于接触测量模式。
4.3.2.3 按加/功能键(3-7)选择所需的测量参数,每按一次加/功能键(3-7),测量参数转换一次,显示器上会调出不同的参数单位或指示符。
A. 当调出线速度单位(3-21),可进行线速度的测量。
a. 按电源/测量键(3-8),并将线速度轮附在待测物体上,监视灯( 3 - 6 )亮,测量耦合符号(3-22)出现在屏幕上,仪器开始测量。
b. 测量期间的最大值、最小值和最后一个显示值自动记忆在仪表中。
c. 测量完毕后,可以按减/发送/记忆键(3-9)查看,详见7. 记忆功能说明。
B. 当调出运动路程单位(3-17)和运动路程指示符( 3 - 18 )时,可进行运动路程的测量。按电源/测量键(3-8),并将线速度轮附在待测物体上,监视灯( 3 - 6 )亮,测量耦合符号(3-22)出现在屏幕上,仪器开始测量。屏幕上的数值即运动路程。
4.3.3 接触模式测量自定义运动路程
4.3.3.1 在接触传感器(3-13)上装上不同周长的线速度轮。
4.3.3.2 把接触传感器(3-13)接在主机上,按电源键(3-4)或电源/测量键(3-8)开机。仪器处于接触测量模式。
4.3.3.3 According to所安装的线速度轮周长,设定自定义周长。自定义周长的设定方法详见
4.3.3.4 按加/功能键(3-7)选择所需的测量参数,每按一次加/功能键(3-7),测量参数转换一次,显示器上会调出不同的参数单位或指示符。当调出运动路程单位(3-17)、运动路程指示符(3-18)和自定义周长指示符(3-19)时,可进行自定义运动路程的测量。
4.3.3.5 按电源/测量键(3-8),并将线速度轮附在待测物体上,监视灯( 3 - 6 )亮,测量耦合符号(3-22)出现在屏幕上,仪器开始测量。
4.3.3.6 屏幕上的数值即自定义运动路程。
4.4 测量脉冲信号个数脉冲信号个数,即光电测量时反光纸经过激光光速的次数,或接触测量时接触传感器转动的次数。不论在光电测量模式,还是在接触测量模式都可以测量脉冲信号个数。
4.4.1 按电源键(3-4)或电源/测量键(3-8)开机。
4.4.2 按加/功能键(3-7)选择所需的测量参数,每按一次加/功能键(3-7),测量参数转换一次,显示器上会调出不同的参数单位或指示符。当调出脉冲信号个数指示符、(3-19)时,可进行脉冲信号个数的测量。
4.4.3 按电源/测量键(3-8),若在光电测量模式,将激光对准待测物体,使激光通过反光纸;若在接触测量模式,将适配器顶在旋转体中心或将线速度轮附在待测物体上。监视灯(3-6)亮,屏幕上显示脉冲信号个数。
5. 自定义周长的设定。
5.自定义周长的设定
5.1 按电源/测量键(3-8)不放,直到屏幕出现LEn字样松开(大概6秒钟),可进行线速度轮自定义周长的设定。
5.2 按加/功能键(3-7)或减/发送/记忆键(3-9)调整自定义周长。
5.3 按电源/测量键(3-8)储存并退出。
6.叶轮数的设定
6.1 当用光电模式测量风扇叶轮转速时,可以进行叶轮数的设定。按电源/测量键(3-8)不放,直到屏幕出现 n o字样松开(大概9秒钟),可进行叶轮数的设定。
6.2 Press the plus/function key (3-7) or minus/send/memory key (3-9) to adjust the number of impellers. The number of impellers can be set as any integer from 1 to 9.
6.3 Press the power/measurement key (3-8) to save and exit.
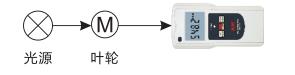
6.4 When the number of impellers is set to be greater than 1, the laser sensor will no longer emit laser light during the measurement process . When making measurements, an external . Make the light source pass through the impeller and shine on the laser sensor (3-3) (as shown in the figure below), press the power/ measurement key (3-8), when the impeller passes through the optical path, the monitor light (3-6) lights up, The measurement coupling symbol (3-22) lights up, and the instrument starts to measure.
6.5 The maximum value, minimum value and last displayed value during the measurement period are automatically memorized in the meter.
6.6 After the measurement is completed, you can press the Minus/Send/Memory key (3-9) to check, see 7. Memory function description for details.
7. Description of memory function
The maximum, minimum and last measured values during the measurement are automatically stored in the meter. After the measurement is over, just press the minus/send/memory key (3-9), the display will first display the maximum value indicator (3-15) and the maximum value during the measurement, and then display the minimum value indicator (3-23) and the minimum value, the measurement is displayed at the end , and the three values are displayed cyclically.
8. Replace the battery
8.1 When the battery voltage is too low, the battery symbol will appear on the right side of the display, and the battery needs to be replaced.
8.2 Open the battery cover and take out the battery.
8.3 Install the battery correctly according to the label on the battery box.
8.4 If the meter will not be used for a long time, please take out the battery to prevent the battery from rot and damage the meter.
