A method of verifying (calibrating) the Rovipen Colorimeter
1 Overview and problems encountered in verification (calibration)
1.1 Overview
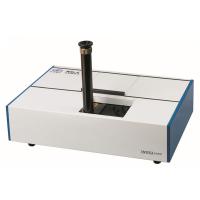
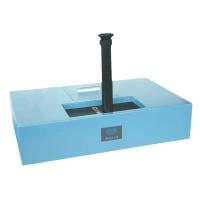
Lovibond Colorimeter is also called (Lovibond) comparative Colorimeter or Lovibond color meter. It is a color Measurement Instrument (that is, it adopts a special Lovibond color system and Lovibond color unit, which can achieve the purpose of color measurement well). The instrument is widely used in the color measurement of grease, paint, plastic, jam, textile, grain and other different substances.
1.2 Problems encountered during verification (calibration)
The verification (calibration) of the Lovibond Colorimeter should be carried out according to JJG758-91 Lovibond Colorimeter verification regulations, but some indicators are not very operable in the actual operation process.
For example: 1. The reference oil with data provided by relevant departments (or standard filters equivalent to three oil colors) is used in the accuracy index of the instrument. After inquiry, many departments have not obtained it, so the method cannot be carried out according to the regulations. Verification of indicators (calibration);
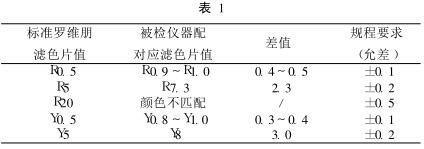
2. During tolerance verification (calibration) of Lovibond color filters:
A. If the standard Lovibond color filter cannot be fixed on the tested instrument, the indicator cannot be verified (calibrated);
B. If the standard Lovibond color filter is fixed on the instrument, follow the regulations
When performing the verification (calibration) of this index, the allowable error between the Lovibond color filter equipped with the tested instrument and the standard Lovibond color filter greatly exceeds the allowable error range specified in the regulations (most domestic instruments have this problem), so the index It is difficult to control when making judgments. For example: On November 25, 2009, for a Lovibond Colorimeter with an instrument model of WSL and no instrument number, we carried out the allowable error verification (calibration ), most of which cannot meet the requirements of the regulations, and the differences are large. Now select a few values to explain. The list is shown in Table 1: R (red), Y (yellow)
Due to the above problems, we carried out verification (calibration) on multiple Lovibond Colorimeters according to the verification regulations and combined with the actual situation, and obtained the following verification (calibration) method.
2 Verification (calibration) equipment and methods
2.1 Verification (calibration) equipment
(1) Standard color filter: It is the Lovibond color filter produced by the British Lovibond Colorimeter Company , whose model is TINTOMETERMODELE. Specifies the requirements.
(2) Reference oil: Choose oils of two to three colors, dark, intermediate, and light .
2.2 Verification (calibration) method
① Appearance: According to the appearance requirements in Chapter 3 of JJG758-91 Verification Regulations;
② Measuring range of the instrument: according to Chapter 16 of JJG758-91 Verification Regulations;
③Liquid sample pool: according to Chapter 21 of JJG758-91 Verification Regulations;
④ Tolerance of Lovibond color filter:
①Remove the Lovibond color filter block provided with the instrument, visually inspect for damage and wipe it off with a silk cloth (if necessary, use a mixture of alcohol and ether for cleaning), to prepare for the test;
② Match the Lovibond color filter equipped with the instrument with the corresponding color number of the standard Lovibond color filter, and visually observe them one by one under a strong incandescent light box or a light source equivalent to this effect to see if there is any difference, and inform the user discrepancies.
2.5 Instrument accuracy (instrument measurement tolerance)
①According to the customer's use of the tested instrument, select 2 to 3 reference oils of different colors and put them into the liquid sample pool that is equipped with the instrument and meets the requirements of the regulations (the specification of the liquid sample pool is selected according to the relevant oil testing standards. ), and put them into the sample chamber of the instrument under test respectively;
②Use the instrument under test (i.e. the color filter equipped with the instrument) to test the above reference oil, according to the requirements of the relevant oil testing standards, first fix the yellow color filter, then adjust the corresponding color filter, and carry out visual observation until the two The field of view achieves a good color match, at which point the value obtained is the reference oil measurement; placed on the same limb.
1.2.3 Use of non-invasive blood pressure measurement
Inaccurate measurement is a common problem in use. The patient's limbs move during the measurement, the selected cuff is too large or too small, and the position of the cuff bundle is correct, which are the main reasons for the inaccurate measurement. The same as manual blood pressure measurement, if the patient wears a cuff during the measurement If the limbs and the heart are not on the same level, the measured value will also be biased. If the ECG filter is used to measure the ST segment offset of the electrocardiogram, some models will cause inaccurate measurement. If the NBP measurement mode is set to the child mode when monitoring adults, the average blood pressure may be measured. , but the income systolic and diastolic blood pressure cannot be measured. If the adult mode is set when measuring the blood pressure of children, the cuff inflation with too high pressure may cause harm to children. In short, there are many factors that affect the measurement of non-invasive blood pressure. The repeatability of non-invasive blood pressure measurement by monitors is sometimes poor, and the individual differences in blood pressure of patients are also very large. Therefore, the alarm limit should be selected according to the actual situation of each patient.
1.2.4 Use of respiration measurement
In monitoring the patient's breathing, the setting of the apnea (Apnea) alarm is very important, and the setting of the apnea time is generally 5s to 30s, which should be carefully selected.
2 Precautions for verification of multi-parameter monitor (ECG part)
Monitors have various specifications and models, with great differences in technical performance and various operation methods. Most of the monitors are connected to the electrodes attached to the human body through snap buttons or crocodile clips at the end of the lead wire to transmit signals. When the transmitter transmits signals remotely, the end of the lead wire cannot be directly connected with the measurement standard, and it is completed by self-made multiple lead wire clips. This can easily cause some random abnormal phenomena, especially for those who are not very experienced in testing, they often encounter some inexplicable problems that are difficult to analyze in theory. Make the verification work can not be carried out smoothly.
In the overview part of the JJG790-2003 test procedure for monitors, ECG monitors are divided into four types according to different functions and structures: ECG display type; ECG and heart rate display type; ECG display and recording type; ECG, heart rate display and ECG recording type .
(1) The waveform is a non-standard square wave signal, which can be solved by setting the ECG mode to "diagnosis" for some models, and setting the pacemaker to "off" for some models.
(2) No heart rate display. When verifying the error of the heart rate display value, the monitor has no heart rate display. It may be caused by one or more of the following five reasons.
①The lead (LEAD) of the monitor is wrongly selected: re-select.
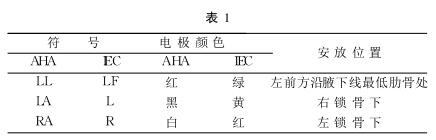
Now compare the three-electrode lead methods of the American Heart Association (AHA) and the International Electrotechnical Commission (IEC) as shown in Table 1:
② Some monitors have low sensitivity and have signal output but the standard heart rate is not displayed or is unstable. At this time, the voltage signal amplitude should be increased.
③ Poor contact between the monitor and the standard device: reconnect.
④ For those with a remote control transmitter, check whether there is a battery or replace it with a new one, whether the switch of the transmitter is on, and whether the number of CH (CHANNEL) is consistent with the number displayed.
⑤ The panel of the standard instrument is working normally but there is no output, please refer to the manual or relevant information to find out the reason.
(3) The alarm is abnormal
For some monitors, when verifying the heart rate alarm occurrence time and the heart rate alarm preset value, the alarms such as respiration (RESP), blood oxygen saturation (SPO2), pulse (PULSE), blood pressure (NBP) should be turned off (OFF) first. ) state and then test again, otherwise, the alarm bell will ring continuously, affecting the normal test, such as PM-8000 (Shenzhen Mindray), CMS9000 (Kangtai Medical) monitors, etc. Generally speaking, the setting of the alarm limit (ALARMLIMIT) is expressed by heart rate HR (HEARTRATE), or by upper limit (HIGH), lower limit (LOW) (Hi/Lo). Some can be set in the PARAMETER (parameter) menu. For the HP78352C instrument, the heart rate alarm audio is inconsistent with other alarm audio, so it is easier to distinguish.
(4) Verification of input loop current, step conversion sensitivity
(Sen, sSiz, eGain, etc.) should be set to 10mm/mV, and the continuously adjustable type should also be adjusted to 10mm/mV, otherwise, it may be unqualified.
(5) When detecting the noise level, the sensitivity of the monitor should be adjusted to
20mm/mV, the sensitivity of the monitor should be set at 10mm/mV when testing the sensitive threshold.
(6) When verifying the amplitude-frequency characteristics of the electrocardiogram recording part, you can adjust the
Check the amplitude of the output signal of the node calibrator to ensure that the amplitude of the 10Hz sinusoidal signal recording is 10mm, and then detect other frequencies. Note that the ECG mode is selected as "diagnostic" mode; because the filter state in this mode is "off".
In a word, the measurement and verification of ECG monitor is a long-term and arduous work. Only by practicing and exploring and summarizing, can we be familiar with it.
- 1Determination of the color of transparent liquids with a Roviben Colorimeter
- 2Installation and operation of Suoguang WSL-2 Rovibon Colorimeter
- 3Use of the Rovibon Colorimeter
- 4Determination of Solid and Paste Color Values by Rovipen Chromatometer
- 5Comparison of Colorimetry and Luster Measurement Values of Iron Diamonds by Lo Weipeng Method
- 6Application of Lovibon Automatic Colorimeter in Oil Color Determination
- 7Several factors affecting the measurement results of Rovipen Colorimeter
- 8Coating performance test preparation
- 9Summary of routine performance test methods related to marine and heavy corrosion protection Coatings