Effect of surface state on coating mass
1. The influence of part shape
The shape of the part is designed and determined by the designer according to the needs of the product structure, but the shape of the part often brings many thorny problems to the surface treatment production. For example, large-area planar parts, formed tubular parts, spherical
Parts, parts with blind holes or internal threads, parts with edges that are not chamfered or rounded, thin sheet parts , the working surface is conical
When surface treatment of complex-shaped parts such as small parts, box-shaped parts, bottle-shaped parts, etc., it is difficult to obtain a satisfactory quality coating on the surface of the part without taking special technical
The influence of part shape on electroplating quality is mainly because it affects the uniformity . The edge parts and orifice parts on the part are the parts where the current is relatively concentrated. The electroplating current may be many times higher than other surfaces, and on the deep concave surface, such as the inner surface of the hole, the internal thread Surface, it is often difficult to introduce electroplating current without using auxiliary anode. It can be seen that when electroplating on the surface of parts with complex shapes, the thickness of the coating on the surface of each part must vary greatly. the impact caused. Therefore, for the surface of parts with complex shapes, the
It is not objective to determine the uniformity index of the coating thickness or to require all surfaces to be coated. For this reason, electroplating companies need to coordinate with users on the requirements of the coating layer when encountering electroplating of parts with complex shapes. When parts with complex shapes are treated with electroless plating and conversion coating, although the influence of the shape on the unevenness of the coating thickness is reduced, it is difficult for the solution in the cavity or deep recess to exchange with the main solution in the tank , so that the solution at the interface is updated in time, and when the surface of these parts reacts chemically with the solution, the gas is not easy to discharge and forms an "air pocket", which often has a negative impact on the quality of the coating. In addition, parts with complex shapes are easy to pick up the solution, bringing the solution between processes, causing cross-contamination of the solution. Therefore, it is necessary to reserve process holes that facilitate the flow and discharge of solutions and gases on parts that do not affect the appearance and use.
Thin sheet parts of very light weight are also very difficult to coat when placed in a drum or placed in a basket for processing, they are easily attracted to each other, hindering the normal plating or conversion coating deal with. Sometimes such a part is encountered, every surface of it is considered as a working surface, and it is almost impossible to find a suitable position, which can be used as a clamping point of the fixture, which makes electroplating difficult, which requires the cooperation with the part. The designer negotiates the location of the clamping.
2. Influence of part dimensional accuracy
Since the plating layer has a certain thickness, after the surface treatment of the parts, the size of the parts will inevitably change . Usually, the dimensions and tolerances of the parts specified on the design drawings refer to the final dimensions and tolerances of the parts. If the parts do not have matching requirements, it is still feasible to perform electroplating or electroless plating on the final dimensions of the parts; if the parts have high The fit gap after assembly cannot accommodate the thickness of the plating layer and its deviation, so plating on the final size of the part is detrimental to the assembly and working performance of the product. In order to solve the problem of size matching after plating of parts with matching requirements , it is necessary to negotiate with the design and process departments of the parts to determine the pre-plating process size of the parts, and reserve the thickness of the coating and the size deviation of the plating in advance. Beichao reminds you: It is not feasible to only reserve the thickness of the coating but not the thickness deviation that may occur during the coating .
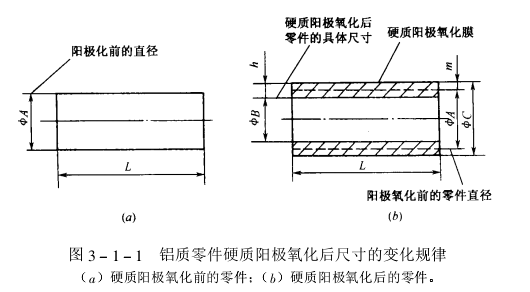
The law of the final dimensional change of the parts caused by conversion coating treatment is different from that of electroplating and electroless plating. Since the conversion coating layer is formed by the dissolution and transformation of the surface of the metal part itself in the chemical solution, the conversion coating is usually very thin, and the conversion coating treatment of the parts generally does not cause significant changes in the final size. After the parts are treated with conversion coating, the final size changes significantly and affects the fit of parts. It is common in hard anodic oxidation of aluminum and aluminum alloys, thick film anti-corrosion phosphating and other processes. Since the strength of the phosphating film layer is not as good as that of metal, it is not suitable to adopt the measure of reserving the thickness of . In order not to affect the fit of the parts, it is advisable to use a low-film heavy phosphating system solution for phosphating treatment to reduce the thickness of the film layer while still having good corrosion resistance .
The hard anodized film on the surface of aluminum and aluminum alloy has high hardness and excellent wear resistance. It is a common means to improve the wear resistance of the surface of aluminum In order to improve the service life of parts, product design usually requires hard The quality anodic oxide film layer has a relatively large thickness. Therefore, after the aluminum parts are hard anodized, the final size of the parts will change greatly rule is followed, that is, the increase in the final size of the parts is roughly equal to 1/2 of the film thickness , as shown in the figure. This value is widely used to estimate the .

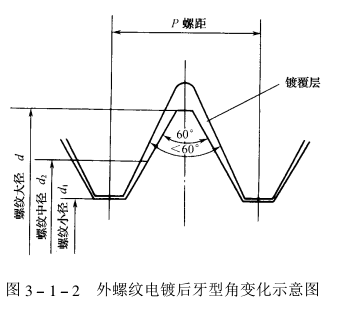
Parts and fasteners with common threads often encounter the problem of mating barriers after plating. When the thread is electroplated , the thickness of the coating at the cusp and valley of the thread is different, and the thickness of the coating at the cusp will be significantly greater than that at the valley. As the thickness of the coating increases, the difference between them will become larger. As it gets larger, the thread profile angle becomes smaller, as shown in the figure. With the different thread diameters and pitches, although the ratio of the coating also different, as the coating thickness increases, the tooth angle angle tends to be smaller all the time . The larger the thread diameter and pitch, the lower the precision, and the fewer obstacles to fit the thread after plating, and vice versa. Practice has proved that the main reason for the fit barrier after thread plating is the deformation of the tooth angle after plating, followed by the thickness of the plating layer .
At present, there are roughly the following methods to solve the problem of matching obstacles after thread plating:
1. Under the condition that the corrosion resistance is allowed, the thickness of the coating should be appropriately reduced, and the plating solution with excellent dispersion ability should be selected for plating;
2. In unavoidable circumstances, sufficient margin can be reserved in accordance with Appendix E of GB197 and GB5267 standards and the thickness of the selected coating layer ;
3. Coat the fasteners with Dacromet coating (also known as zinc-chromium coating). The coating is composed of ultra-fine flaky zinc, aluminum powder and chromate mainly composed of trivalent chromium. Dacromet coating solution is applied to the surface of the part, and after by sintering coating. The atmospheric corrosion resistance of the coating is much better than that of the electro-galvanized layer. The thickness of the coating can be adjusted arbitrarily according to the needs, and it is relatively uniform without causing changes in the tooth angle. Therefore, it is a more satisfactory protection method for fasteners.

3. Influence of surface defects of parts
Defects on the surface of parts will also affect the quality of the coating.
1. Parts may be mechanically damaged due to lack of careful protection during process transfer or transportation, resulting in defects such as grooves, scratches, and impact dents on the surface of the parts . If these defects are not eliminated, the parts will still , which will affect the appearance of the plating layer. Even if they are plated in a plating solution with very good leveling performance, they cannot be completely covered.
2. There are processing burrs, sharp corners not chamfered or rounded on the upper edge of the part. After surface treatment, it will cause serious defects in the coating layer on the upper edge of the part .
3. On the weld surface of the welded assembly, if there is unremoved welding slag, the integrity and appearance of the coating will be affected after surface treatment. If there are pores on the welding seam, it will not only affect the compactness of the coating, but more seriously, the chemical solution will seep into the pores. After the surface of the part is dry, the solution contained in the pores will slowly seep out, lightly Frost will form near the air hole, and the severe one will corrode the plating layer around the hole.
4. If there are metal or non-metallic impurities on the surface of the part (such as unremoved sealed grease, paint marks, coloring of scribed lines, copper traces, magnetic powder or fluorescent powder that has not been completely removed after flaw detection inspection, etc.) , will affect the normal plating of the plating layer on the substrate , the bonding force with the substrate and the continuity of the plating layer.
5. There is rust or obvious rust marks on the surface of the parts.
Fourth, the influence of surface roughness of parts
零件的设计者在确定零件表面加工粗糙度的指标时,较多考虑的是产品的使用性能、装配性能等因素,往往忽视零件表面粗糙度对镀覆质量的影响。譬如,零件在进行电抛光或化学抛光时,零件处理前的表面粗糙度,明显的影响着抛光后表面粗糙度的降低程度,零件抛光前的表面粗糙度越低,抛光后表面粗糙度的降低幅度就越大。对具有孔隙率质量指标要求的镀覆层来讲,零件镀前的表面粗糙度越低,越容易获得无孔隙的镀覆层,反之,即使增加覆盖层的厚度,有时候仍难以获得无孔隙的镀覆层。此外,零件表面的粗糙度越大,镀覆表面的真实面积与计算面积之间的偏差就越大,当表面粗糙度小的零件与粗糙度大的零件在同样的电流下电镀时,镀覆层达到同样平均厚度所需的时间,前者将明显的少于后者。当镀覆具有内孔、内螺纹的零件时,表面粗糙度大了之后,不仅降低镀速,还明显的影响深凹部位镀层镀入的深度及镀层的均匀性。零件镀前表面粗糙度大了之后,还会降低镀覆层的外观和耐蚀能力。
除非零件表面粗糙度大对产品的使用性能有特别的作用之外,应该尽可能的降低零件镀前表面的粗糙度,至少应该低于图纸上规定的零件最终的表面粗糙度值。实践证明,采用具有良好表面质量的型材、精密成型技术制造零件的毛坯、降低切削表面的粗糙度等提高零件镀前表面质量的措施,对提高零件表面镀覆层的质量,减少不合格品,降低零件总的制造成本具有显著的效果,现已逐步成为设计人员和制造工艺人员的共识。
五、零件结构的影响
在要求镀覆的零件中,常会遇到将边棱折叠或卷边的金属薄板件、用搭接焊或点焊组合的零件、其他留有缝隙没有进行满焊的焊接件、用压配合或铆接方法连接的组合件等类零部件,它们的缺陷就是在零件上留下可容留化学溶液的缝隙或孔穴,镀覆之后,不仅缝隙或孔穴内容留的溶液会在工序间被带来带去,使工作溶液遭到污染,另一方面残留在缝隙或孔穴中的溶液干固后,将成为日后零件在自然环境下使用时,使零件产生缝隙腐蚀和破坏镀覆层的主要腐蚀介质。
电镀企业遇到上述类形的零部件时,需要与用户进行技术协调,要求零部件制造企业设法封闭零部件上存在的缝隙与孔穴,或者双方制订专项的验收技术.
六、冶金因素的影响
冶金因素是造成零件表面上存在宏观或微观的物理和化学不均一现象的主要原因。由于零件表面物理和化学的不均一,导致镀覆层的质量受到明显的影响。譬如,基体材料的化学组成、热成型方法、冷塑成形方法、热处理方法和化学热处理方法等对镀覆过程特别是转化膜处理过程的影响很大。
金属材料中含有的元素种类和数量决定了材料的牌品、规格和金相组织特点。具有固溶体金相组织的金属,通常自身都有较好的耐蚀性,表面很容易被钝化或氧化,如果没有使表面很好活化的措施,就很难在这种金属表面上获得与基体结合牢固的镀覆层,也很难在其上面获得质量好的转化膜层。具有多相金相组织的金属,随所含的元素种类和含量的不同,金属表面上的化学不均一性差异很大。它不仅影响金属表面镀前活化处理的质量,还影响镀覆层的质量。譬如,合金钢中如Cr、W、Ni、Mo、V 等合金元素的含量总和超过5%,在这种钢材的表面上就很难进行磷化或碱性氧化;在变形铝合金中如果铜的含量超过5%,就很难在其表面上获得硬度比较高、膜层比较厚的硬质阳极氧化膜;对压铸锌合金来讲,如果合金中铝、铜、镁等金属的含量以及明显影响电镀质量的铅、锡、镉等杂质金属的含量超过规定的指标,就很难在其表面上获得合格的镀覆层。
铸造零件表面往往存在较多不利于获得良好镀覆层的铸造缺陷,譬如,铸造表面的粗糙度大,常存在化学成份的偏析和非金属的夹杂,组织内部气孔、疏松多,影响镀层和转化膜的质量。采用压铸方法制造铝合金和锌合金零件的毛坯,大大地减少了铸造的缺陷,降低了表面粗糙度。用冷镦、冷挤压、冷冲压等方法制造的零件,尺寸精度、表面质量均比铸造好,但是也存在其他一些缺陷,譬如,在冷变形表面易存在拉沟、折叠、划伤、夹杂氧化物等表面缺陷。在冷变形表面出现加工硬化应变强化层,变形程度越大,加工硬化层就越深。由于加工硬化表面很难活化,因此,很难在其表面上获得与基体的结合力好的镀层,也难以在这种表面上形成良好的转化膜层。
粉末冶金也是一种少切削的零件成型方法。用这种方法制造的零件增多,像磁性材料成型零件。其基体组织是否致密、零件表面是否有裂纹、是否有可见的针孔等缺陷,影响着镀层的质量。零件进行热处理会影响零件表面镀覆和转化膜处理的质量。零件使用传统的加热方法进行热处理后,在零件表面上形成一层氧化膜层。将这层妨碍镀覆的氧化膜除去之后,改变了零件的基体尺寸(缩小或增加了相当于氧化膜厚度的尺寸);零件热处理后,在不再加工的表面上保留有氧化物,不仅影响镀覆的质量,反而增加了清除这部分氧化物的难度。
After heat treatment of parts made of high-strength steel or ultra-high-strength steel, if the tensile strength is greater than 1800Mpa, it is very easy to cause hydrogen embrittlement of high-strength parts during plating or conversion coating treatment. Therefore, unless there are special Effective preventive measures that have been repeatedly verified are required and have been taken. Generally , surface treatment methods that will be accompanied by hydrogen generation during the surface treatment process are not used for treatment. Aluminum alloys that can be strengthened by heat treatment often adjust their metallographic structure and mechanical . When anodizing and hard anodizing of aluminum are performed on the surface of these aluminum alloys, the thickness of the film, Density , hardness, corrosion resistance and other properties are subject to the specifications of aluminum alloy quenching and aging. Generally, the higher , the more difficult it is to obtain an oxide film with excellent properties on the surface. When the process specifications of aluminum hard and the power waveform is changed, if it is still difficult to obtain an oxide film of satisfactory quality, it is usually possible to conduct technical consultations with process technicians, and by properly adjusting the heat treatment specifications of aluminum alloys, Improve the quality . After local carburizing, nitriding or cyaniding on the surface of steel parts, although the strength of the local surface can be improved, it causes the macroscopic chemical inhomogeneity of the part surface. When such parts are subjected to conversion coating treatment, the appearance, thickness and corrosion resistance of the film on the surface that has undergone chemical heat treatment and the surface that has not undergone chemical heat treatment are inconsistent.
- 1Eletroplating platings thickness measurement
- 2High-precision roughness instrument measures the surface roughness of plastic materials Case sharing [Video demonstration]
- 3Surface roughness of metal
- 4Surface roughness measurement
- 5What are the main manifestations of the influence of surface roughness on parts?
- 6What data is the surface roughness mainly evaluated by?
- 7Understand the meaning of surface roughness symbols
- 8Mechanical protection performance and Electrochemistry protection performance of coating
- 9Film thickness arbitration method - metallographic method
-
-
-
-
TQC DC9000 Hull Roughometer$ 10657.00
-


