Film thickness test method - X-ray Light spectrum method
When X-rays hit the surface of a metal, the metal produces secondary rays. The frequency of secondary rays is a function of the atomic number of the metal , and its intensity has a certain relationship with the thickness of the coating. Therefore, this method can be used to determine the thickness of metal coatings within about 15 μm on any metal or non-metal substrate . It can measure extremely small areas and extremely thin coating thicknesses (hundredths of microns). It can measure both flat and irregular-shaped parts, and can also measure the thickness of multi-layer coatings at the same time. It can also measure the composition of the binary alloy coating, such as the composition of the Pb-Sn alloy coating, while measuring the thickness of the coating. It is a professional coating thickness measurement method. The shortcomings of this measurement method and the factors affecting the accuracy of measurement are similar to those of the X -ray backscattering method.
X -ray spectrometry is less accurate in the following cases:
1. When the same composition as the coating exists in the base metal or the base metal component exists in the coating.
2. When the plating layer is more than two layers.
3. When the chemical composition of the coating is very different from that of the calibration sample.
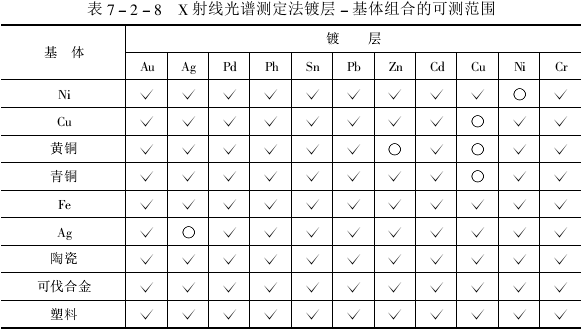
The commonly measurable coating-substrate combinations measured by X -ray spectrometry are shown in Table 7-2-8. The measurable thickness range of common coatings is shown in Table 7-2-9.


- 1Aluminum Panel platings thickness measurement
- 2Film thickness arbitration method - metallographic method
- 3How to calculate Film thickness?
- 4Electroplated coating mass detection and evaluation method
- 5Determination of Bonding Strength of Hard Coating by Automatic Scratch meter
张平余;刘洪;王秀娥;顾则鸣;侯企贤;肖永东 - 《摩擦学学报》
- 6Film thickness measurement method of magnetic coating
- 7Film thickness test method overview
- 8Film thickness test method - Double beam of light Microscope method
- 9Film thickness test method - β-ray backscattering method

