Coating bond strength test method and standard [full]
There are many methods to evaluate the bonding strength between the coating and the base metal, but quantitative determination is difficult. Some qualitative test methods are commonly used at present.
1. Friction test method
1. Friction polishing test
On the surface of the coating with an area of less than 6cm², use a round steel bar with a diameter of 6mm and a smooth hemispherical end as a tool to rub for 15s. The pressure applied during the friction is limited to polishing and cannot cut the coating. If it continues to grow and bubbles appear, it indicates that the bonding strength of the coating is poor. This test is suitable for examining thin coatings.
2. Steel ball friction rolling test
Put the sample into a roller or vibrating roller with a steel ball with a diameter of 377mm and soap as a lubricant. The speed or vibration frequency and test time depend on the complexity of the sample. Poorly bonded coatings will blister after this test. This test is suitable for examining thin coatings on small parts.
2. Cutting test method
1. File test
Hold the plated part in a vise and file the edge of the plated part with a coarse-toothed flat file. The file should form an angle of about 45° with the surface of the coating, and file from the base metal to the direction of the coating, and the coating must not be lifted or peeled off. This test is only applicable to thicker and harder coatings.
2. Grinding saw test
Grinding or cutting the plated parts with a grinding wheel, Grinder, hand saw or sawing machine. The direction of the grinding saw is from the base metal to the coating, and then check the bonding strength of the coating on the saw section. This test is especially effective for hard and brittle coatings such as nickel and chromium.
3. Scribing and scratching test
Use a hardened steel scribe with a sharp edge of 30° to draw two parallel lines or a square grid of 1mm² apart on the surface of the coating. Observe whether the plating between the scribe lines is lifted or peeled off. The pressure when scribing should be such that the scribing knife can scratch the coating and reach the base metal in one stroke. This method is suitable for thin coatings.
3. Deformation test method
1. Chisel test
Place a sharp chisel on the back of the plating protrusion and give it a sharp hammer blow. If the bonding strength is good, the coating will not be separated from the substrate even if the coating may be cracked or pierced. This test is only applicable to thick coatings (greater than 125μm), not to thin and soft coatings.
2. Bending test
(1) Bend the sample 180° along the axis whose diameter is equal to the thickness of the sample, and then use a magnifying glass with a magnification of 4 times to check the bent part. The coating is not allowed to peel or fall off.
(2) Clamp the sample in a vise, and repeatedly bend or bend until the substrate and the coating are broken together. Observe the adhesion of the coating at the fracture. If necessary, pick and pry the coating with a knife, and the coating should not peel or fall off. Or check with a magnifying glass with a magnification of 4 times, and the separation between the coating and the substrate is not allowed. This method is widely used for thin-section specimens.
3. Winding test
Wind a metal wire sample with a diameter of 1 mm or less on a shaft whose diameter is three times that of the sample, and wind a wire sample with a diameter of more than 1 mm on a metal shaft with the same diameter as the wire sample, and wind it into 10~15 Coil with turns in close proximity to allow direct observation of the bond strength of the outer plating. There should be no peeling, chipping or flaky peeling of the coating.
This method is often used to test the bonding strength of the coating on the wire or strip substrate.
4. Tensile test
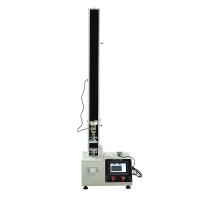
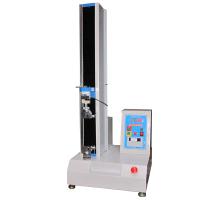
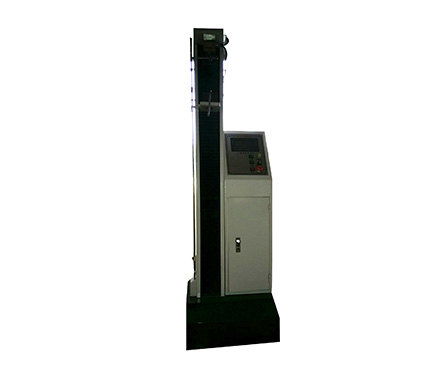
The electroplated sample is subjected to tensile stress on a Tensile Testing Machine until it breaks. Observe the combination of the coating and the substrate at the fracture, and the covering layer should not be seen peeling off from the substrate metal. The size and other requirements of the sample shall be handled according to the design requirements of the tension bar during the mechanical performance test. The tensile rod should be electroplated under the same conditions as the parts before conducting the bonding strength test. When necessary, the material and heat treatment process of the tension rod are the same as the actual plated parts.
5. Deep lead test
The test is carried out on a special pressure testing machine. Use a special punch to punch a sample of a certain size, such as 70mm×30mm×1mm, until the substrate and the coating are deformed together, and finally rupture. Observe the bonding strength between the coating and the substrate at the crack. There are two commonly used test methods:
(1) Erichson cupping test
Use a suitable hydraulic device to press a spherical punch with a diameter of 20mm into the sample at a speed of 0.2~6mm/s until the desired depth is reached. Coatings with poor bonding strength are peeled off or peeled off from the base metal after a few millimeters of deformation.
(2) Romanoff (FPRomanoff) flange cap test
The test instrument is equipped with a set of adjustable dies for stamping flange caps. The diameter of the flange is 63.5mm, the diameter of the cap is 38mm, and the depth of the cap can be adjusted between 0 and 12.7mm. The specimens are generally tested to the point where the cap breaks. The undamaged part after deep drawing will show how deep drawing affects the coating structure.
This test is often used to check the bonding strength between the substrate and the coating of thin plate coatings. Especially suitable for harder coatings such as nickel and chrome. However, it is impossible for the deep drawing test to effectively explain the bonding strength for the ductile and thinner coatings. Because it includes the ductility of the coating and the base metal.
4. Peeling test method
1. Welding: peel test
Bend a 75mm×10mm×0.5mm tin-plated low-carbon steel or tin-plated brass test piece at a right angle at a distance of 10mm from one end, weld the short side to the surface of the sample coating, and apply a perpendicular to the long side. Pull on the welding surface until the test piece is separated from the sample coating. Bond strength is considered good if fracture occurs at the weld or within the coating.
This test is applicable to the inspection of coatings with a thickness less than 125 μm.
本方法未被广泛应用,因为焊接过程达到的温度可能会改变结合强度。
2、粘接 - 剥离试验
将一种纤维粘胶带(粘胶带的附着强度值大约是每25mm的宽度为8N)粘附在镀层上,用一定重量的橡皮滚筒在上面滚压,以除去粘接面内的空气泡。间隔 10s后,用垂直于镀层的拉力使胶带剥离,镀层无剥离现象说明结合强度好。
本试验特别适用于检验印制电路板中导体和触点上镀层的附着强度。试验面积至少应有30mm²。
五、加热试验法
1、热震试验
热震试验温度见表/7-2-11。应该注意,易氧化的镀层和基体应放在惰性气体中或在适当液体中加温。
2、塑料电镀件的热循环试验
由于塑料的热膨胀系数比金属镀层高6~7倍,因此温度的任何变化将会在金属和塑料界面上产生应力。通过多次冷热循环试验,塑料镀件内应力愈来愈大,当达到极限时,便产生裂纹,以此可用来定性评价镀层的结合强度。
GB/T12610塑料上电镀层热循环试验中规定:
![1481719226745048887.png Coating bonding strength test methods and standards [full] with Figure 1](http://img.nbchao.com/upload/editor/image/20161214/1481719226745048887.png)
注:把试样放在炉中加热至表中规定的温度,然后取出放入室温的水中骤冷,观察镀层是否鼓泡或脱落。
(1)热试验条件分类:
A循环:上限温度75±2℃,下限温度20±5℃;
B循环:上限温度75±2℃,下限温度-20±2℃;
C循环:上限温度±2℃,下限温度-40±2℃;
(2)各类循环每个周期的试验程序
A循环:
①在温度为75±2℃的干燥箱内放置 1h。
②在温度为20±5℃的干净环境中放置1h。
B循环:
①在温度为-20±2℃的低温箱内放置1h。
②在温度为20±5℃的干净环境中放置1h。
③在温度为75±2℃的干燥箱放置1h。
④在温度为20±2℃的干净环境中放置1h。
C循环:
①在温度为-40±2℃的低温箱内放置1h。
②在温度为20±5℃的干净环境中放置1h。
③在温度为75±2℃的干燥箱内放置1h。
④在温度为20±5℃的干净环境中放置1h。
热循环试验类型及其周期数应按产品技术条件规定或供求双方协商确定。经试验后试样主要表面不应有起泡、起皱、裂纹或脱落等。
六、阴极试验法
将试样作阴极放入 *0的氢氧化钠溶液(ρ=1.054g/cm³)中用10A/dm²的电流密度,在90℃时通电处理,2min为观察起点,15min后不起泡表明结合强度好。也可在5%的硫酸中用10A/dm²的电流密度在60℃条件下通电,经 5~15min不起泡为结合强度好。
本试验只适用于能够透过阴极释放氢气的镀层(如镍和镍 ! 铬)、对铅、锌、锡、铜或镉等软镀层不适用。
七、塑料基体上金属镀层剥离强度的定量测定
1、试样的制备
According to规定,试样为75mm×100mm的塑料板,并镀上厚度为40±4μm的酸性铜层。
2、测定程序
用锋利的刀子切割铜镀层至基体,成 /25mm宽的铜条(如图7-2-4 ) 所示),并小心地从试样任一端剥起铜层约15mm长,然后用夹具将剥离的铜层端头夹牢,用垂直于表面90±5°的力进行剥离。剥离速度为25mm/min,且不间断地记录剥离力,直到铜镀层与塑料分离为止。
剥离强度可按下式计算:
![1481719708009083719.png Coating bonding strength test methods and standards [full] with Figure 2](http://img.nbchao.com/upload/editor/image/20161214/1481719708009083719.png)
Fr表示剥离强度(N/cm);
Fρ表示剥离力(N);
h表示切割铜层宽度(mm)。
八、塑料基体镀层拉脱强度的定量测定
1、试样的准备
取截面积为1cm²的铜柱(或铝柱)和预制的塑料酸性镀铜试样(铜层厚度为 30~40μm进行粘合(按图7-2-5所示)。在室温下加压固化24h,然后用刀子除去铜柱周围的粘合剂,并切断四周镀层(切至塑料基体)待用。
![1481719897110051283.png Coating bonding strength test methods and standards [full] with Figure 3](http://img.nbchao.com/upload/editor/image/20161214/1481719897110051283.png)
![1481719871789048469.png Coating bonding strength test methods and standards [full] with Figure 4](http://img.nbchao.com/upload/editor/image/20161214/1481719871789048469.png)
2、测定程序
在拉力机上,用垂直于镀件表面的力进行拉脱试验,直到铜层与塑料基体分离为止。记下拉力值即可求得该塑料镀层的拉脱强度FH(N/cm²)。几个试样的拉脱强度的平均值作为测定结果。
3、拉脱强度与剥离强度之间的关系
拉脱强度与剥离强度之间的关系为:
FH=5.5Fr/σ3/4
式中
FH———拉脱强度(N/cm²)
Fr——剥离强度(N/cm)
σ———被削离金属层的厚度(cm)
九、金属镀层的拉力试验
1、奥拉(Ollard)法
先在金属棒材试样上电镀1.5mm以上厚度的镀层(见图)并加工成如图的试样,最后在专用夹具上进行测试(见图)。此法只适于棒材。
![1481720246347007037.png Coating bonding strength test methods and standards [full] with Figure 5](http://img.nbchao.com/upload/editor/image/20161214/1481720246347007037.png)
2、改进的Ollard法
First electroplate a coating with a thickness of 1.5mm or more on the plate (see picture), then process it into a test sample as shown in the picture, then assemble it with the pressure rod, spacer and screw (see picture), and finally test it on a special fixture (see picture). This method is only applicable to plate
![1481720367384056361.png Coating bonding strength test methods and standards [full] with Figure 6](http://img.nbchao.com/upload/editor/image/20161214/1481720367384056361.png)
3. I-beam method
In this method, two grooves are first processed on the plate sample as shown in the figure below, and the grooves are filled with removable fillers such as wax preparations or low-melting alloys (if wax preparations are used, silver powder needs to be coated to make them conductive) , and then electroplate a coating with a thickness of more than 2mm (see the figure below), and finally process it into an I-shaped sample and remove the filler for testing on a special fixture.
4. Tapered head method
Firstly, electroplate the coating on both sides of the plate sample at the same time (see picture), then process it into a conical head sample (see picture), and then test it on a special fixture.
5. Ring shear method
First, electroplate a coating with a thickness of about /2.0mm in the middle of the bar sample, and then process the two ends of the coating to be flat, and then put it into a steel mold for testing (see figure).
![1481720507008039763.png Coating bonding strength test methods and standards [full] with Figure 7](http://img.nbchao.com/upload/editor/image/20161214/1481720507008039763.png)
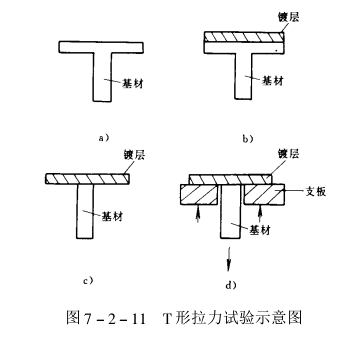
6. T-type test method
Coat one end of the T-shaped sample (see figure) with a thick coating, then cut off the protruding substrate under the coating, and then perform a tensile test.
The characteristics of the above tensile test methods are shown in the table below:
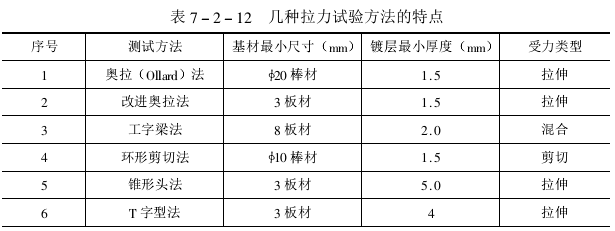
Note:
1. The above minimum thickness values are for reference only, and should vary depending on the coating and substrate.
2. For the precious metal or soft metal coating, only a thin layer can be plated, and then thickened with nickel plating.
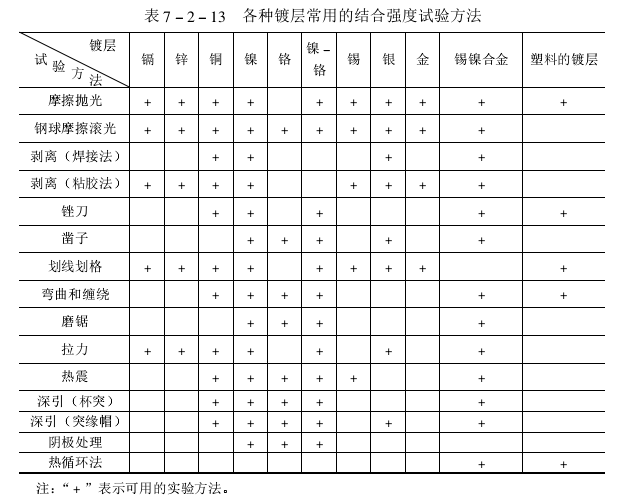
Although there are many coating bonding strength test methods described above, when selecting applications, factors such as coating characteristics, substrate material, coating thickness, substrate heat treatment requirements and equipment conditions should be considered comprehensively. The same method cannot be abused for various coatings and situations.
Common bonding strength test methods for various coatings are shown in the table below:
- 1Determination of Bonding Strength of Hard Coating by Automatic Scratch meter
张平余;刘洪;王秀娥;顾则鸣;侯企贤;肖永东 - 《摩擦学学报》

