Determination method and selection of coating ductility
1. Measurement method
The ability of metal or other materials (including film layers) to undergo elastic or plastic deformation without cracks under external force is called ductility.
The method of measuring the ductility of the coating can be divided into tensile test method and bending test method. During the measurement, the coating can be peeled off for measurement , and the coating can also be measured directly without peeling off the coating.
(1) Measurement of stripped coating
① Tensile test: Use a sample of a certain size to measure the elongation of the coating with an ordinary tensile machine. Calculate according to the formula
D=△L/L×100%
Among them, D represents the elongation of the coating (%); △L represents the annual difference before and after the test of the sample (mm); L is the original length of the sample (mm).
② Micrometer bending test
This method uses a micrometer to turn the coating into a U-shape (the outside of the U-shape needs to be the outside of the coating), and clamp it slowly until the coating breaks. Elongation can be calculated as follows:
D=T/(2R-T)×100%
Among them, D represents the elongation of the coating (%); T is the thickness of the coating (μm); 2R is the reading of the micrometer (μm);
This method is suitable for the determination of coatings with poor ductility (such as bright nickel coating).
③Vise bending test
Fix the test piece on the vise with a special fixture, bend it to 90°, and then bend it to 90° in the opposite direction, and bend it repeatedly until the coating cracks. The ductility of the coating is characterized by the number of bending.
④ Hydraulic expansion test
Use the water pressure to rise slowly to cause the deformation of the test piece. The ductility of the test piece is calculated from the volume of water squeezed out by the swelling of the test piece. The hydraulic expansion method is suitable for measuring the ductility of thin plate-shaped coatings, but the device is complicated and the operation is troublesome.
⑤Mechanical cupping test
Select a specified steel ball or spherical punch according to the width of the sample, apply pressure evenly to the sample clamped in the specified die, record the indentation depth (mm) when the coating starts to crack, and take it as Coating ductility index. The greater the cupping depth, the better the ductility of the coating, and vice versa, the greater the brittleness.

(2) Determination without peeling off the coating
① Tensile test
The measuring device and measuring method are basically similar to those of peeling off the coating. When the ductility of the base material is better than that of the coating, the test by stripping the coating is generally not used.
②Three-point bending test
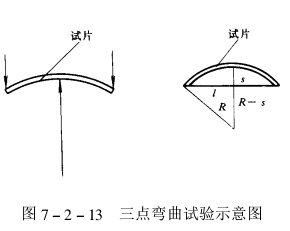
In this method, three-point forces in the vertical direction are applied to the curved part (usually the center) of the test piece (see figure). The ductility can be obtained by the following formula:
D=4TS/l2×100%
Among them, T is the thickness of the sample (mm); S is the vertical displacement (mm); l is the standard length (span) (mm).
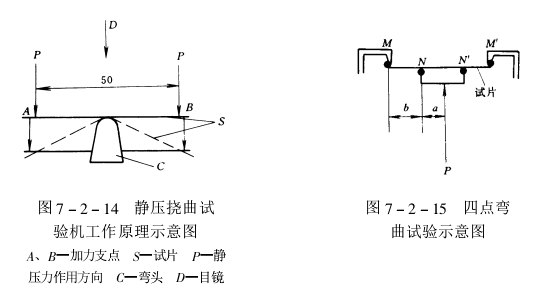
This test can also be performed on a static flexural Tester. Place the sheet sample S on an elbow with a certain bending radius, apply pressure to the test piece, and the test piece will undergo deflection deformation until cracks occur. The deflection value (mm) when the coating starts to crack is used as an indicator of ductility.
③ Four-point bending test
The test piece is subjected to two loads, and the force is applied symmetrically to the center. At this time, the ductility is calculated according to the following formula:
D=TS/(b2+2ab)×100%
Among them, T is the total thickness of the test piece (mm); S is the vertical displacement (mm); a+b is half of the distance between two fulcrums (mm); a is half of the distance between loads (mm).

④ Cylindrical mandrel test: place a strip-shaped test piece with plating or coating on the mandrel and bend it. The ductility is calculated by the diameter of the smallest mandrel that prevents the coating from cracking.
⑤Rotating mandrel bending test: bend the plated test piece on a mandrel with gradually decreasing curvature, and use the curvature of the coating when it breaks to find the ductility.
⑥Conical mandrel bending test: Bend the plated test piece on a conical mandrel, and observe the cracks with a 10 times magnifying glass or a microscope to compare the ductility. This method is only applicable to thin-section samples with poor coating ductility.
⑦Mechanical cupping test: the same method as that of peeling off the coating.
2. Choice of measurement method
(1) The coating below 10μm does not need to be peeled off, and satisfactory results can be obtained by bending test, especially the mechanical cupping test is very good.
(2) For coatings over 10 μm, it is advisable to peel off the coating for measurement. For coatings with good ductility, hydraulic expansion test can be used. For slightly brittle coatings, a micrometer bend test or a mechanical cupping test can be used.
(3) For highly brittle coatings, it is advisable to use a substrate with good ductility as the electroplating sample for spiral mandrel bending test or mechanical cupping test.
The applicability of various test methods to different coatings is shown in the table below:

The numbers in the figure above mean:
1 Only applies when no other assay is available.
2 Applies when correctly rated due to other factors.
3 can generally meet the requirements.
4 Although not satisfactory, but can meet the requirements.
5 good ones.

