How to calibrate PHYNIX Coating Thickness Gauge?
Calibration procedure
To eliminate or reduce the influence of certain sources of error, the coating thickness meter may require calibration measurements.
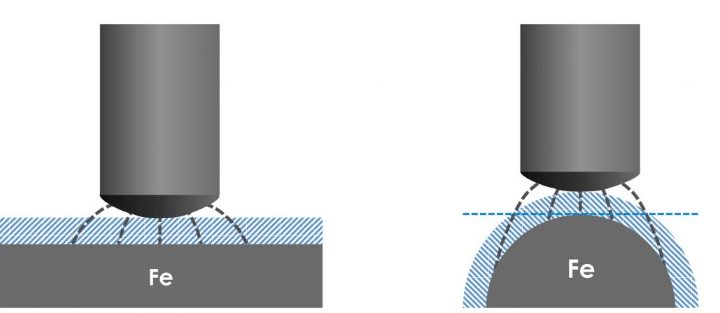
If the same probe is applied to a cylindrical workpiece (right), you will see that it is longer than the plane in the direction of the same coating thickness. In this example of the principle, a larger coating thickness will be shown than the actual one.

This effect, which can be completely removed by the measurement of the coating thickness, can be simply and completely removed by the calibration process.
When measured with the eddy current method, a similar effect can be observed on the measurement surface.
Type of calibration
The one-point calibration period is already due to the fact that the characteristic curve of the probe has only one reference point, i.e. zero value (zero coating thickness).
This standard type, also known as zeroing, does not require a film standard. It is used for the measurement of small parts with dimensions larger than standard geometries. A little calibration is also used when selecting a higher accuracy than factory calibration.
Zero is the uncoated specimen corresponding to the test object after the coating is removed and approached by the probe as much as possible at the point of application to be determined.
Foil calibration (two-point calibration)
This type of calibration requires that the thickness of the calibration foil should be as accurate as possible. This is where the accuracy required for selection should be higher than zero. The use of "two-point calibration" is due to the characteristic curve of the probe, which uses two points to determine the value of "zero" and "foil".
In order to achieve high accuracy, it is necessary to select a foil calibrated with a slightly thicker layer thickness than expected, but no more than 1.5 times the thickness.
Two-point calibration requires zero first. The calibration foil is then used for another calibration. For this purpose, the aluminum foil is placed on the coated specimen and the probe is placed in the same position, focusing attention. After multiple applications of the probe, the arrow on the device comes to show the thickness value until it corresponds to the change in the thickness value of the foil. Now you can measure in the corresponding measurement object.
Two foil calibration
This type is especially used to measure roughness, such as putting the basic material. It is also suitable for basic measurements of weakly magnetic materials, either according to the magnetic induction method or according to the eddy current method.
For this type of calibration, two different calibration foil thicknesses are used. The thickness of the foil should be chosen so that the thin foil is 0.5 to 0.9 times the expected layer thickness, and the thick foil is 1.1 to 1.5 times the expected layer thickness. The two foil calibration specifies the two reference points of the probe characteristic curve, which are the thin and thick foil values.
- 1Nondestructive measurement Coating thickness
- 2Principle, application and selection of traffic coatings Coating Thickness Gauge
- 3Principle, Application and Selection of Eddy current Coating Thickness Gauge
- 4Principle, Application and Type Selection of Electronic Coating Thickness Gauge
- 5Explore the principle, application and selection of phosphating layer Coating Thickness Gauge
- 6Principle, Application and Type Selection Analysis of Chrome Coating Thickness Gauge
- 7Principle, Application and Selection of Coating Thickness Gauge for inner wall of small pipe
- 8Basic principle and application scenario of steel Coating Thickness Gauge
- 9Principle and Application Analysis of Coating Thickness Gauge


