Analysis of the use method of trace Moisture Meter
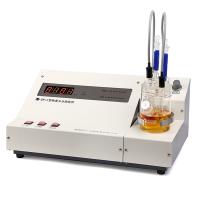
Instrument self-calibration
Plug the power socket on the rear panel of the host into the AC 220V power supply, press the power switch, and the LCD screen will light up at this time, and the host power will be turned on. Press any key to enter the test interface, then press the electrolysis key, at this time the instrument will count automatically and the self-test will start:
1. Short-circuit the inner and outer electrodes of the electrolytic electrode socket, and the display will quickly count at this time.
2. Short-circuit the inner and outer electrodes of the measuring electrode socket, the status of the display screen will show that the iodine is over, and the number will stop counting.
3. Press the start button on the main unit, and the display will reset to zero. After about one minute, the buzzer will sound, and the display will prompt: Please connect the measuring electrodes.
If the above three items are met, it means that the host is working normally.
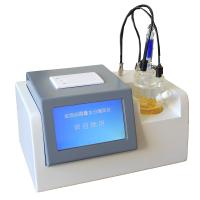
Cleaning, drying and assembly of titration cells
1. Before use, open all the glass ports of the titration cell. The titration cell, drying tube, sealing plug, and stirring bar can be cleaned with water, methanol or acetone. The cathode chamber and the measuring cell can be cleaned with methanol or acetone, but do not clean the electrode leads. place. (Note that the cathode chamber and the measuring electrode must not be cleaned with water, otherwise it will cause measurement errors.) After cleaning, dry them in an oven at about 60C for 4 hours, and then let them cool naturally. (New electrolytic cells and electrodes generally do not need to be cleaned and can be used directly)
2. Put the color-changing silica gel into the drying tube (be careful not to put the powder into it); put the silicone rubber pad into the sampling cock, and screw it into the fastening stud; carefully put the stirring bar into the titration cell; Apply a thin layer of vacuum grease evenly to the grinding ports of the measuring cell, drying tube, sampling cock, and sealing plug, except for the drying tube and sealing plug in the cathode chamber, install the others on the corresponding parts, lightly Gently turn it a few times to make a better seal.
3. Use a dried funnel to inject about 100-120mL of electrolyte into the cathode chamber through the sealed port, and then use the funnel to inject the electrolyte through the dry tube socket of the cathode chamber. The liquid levels in the cathode and anode chambers should be basically level. After the completion, install the drying tube and sealing plug, and turn it gently a few times to make it better sealed (the electrolyte should be loaded in a fume hood).
4. Put the titration cell on the electrolytic cell seat on the host, and then insert the measuring electrode plug and the electrolytic electrode plug on the cathode chamber into the measurement and electrolysis sockets respectively.
Reagent adjustment and blank current removal
Reagent adjustment: press the power switch, the LCD screen lights up, and the power is turned on. Adjust the stirring speed control knob of the stirrer so that the electrolyte in the anode chamber forms a vortex, but it cannot splash on the pool wall. At this time, if the status shows over-iodine and prompts: Please inject an appropriate amount of pure water. Press the electrolysis button, use a 50ul sampler to draw a certain amount of pure water (the new reagent needs to inject about 20-50ul pure water) and slowly inject it into the reagent through the sampling cock. The color of the reagent gradually changed from dark brown to light yellow until the state became overwater. At this time, there will be a real-time electrolysis curve, and the display will start counting. Take out the injector at this time and wait for the instrument to automatically adjust the balance. The status of the instrument is displayed as normal, and the alarm reaches the equilibrium state.
Clearing of blank current: If the electrolytic curve is relatively high or the measurement indicator number is unstable, it means that there is moisture attached to the wall of the titration cell. At this time, the electrolysis can be turned off, the titration cell can be removed, and the titration cell can be rotated slowly so that the water on the cell wall can be absorbed, and then the electrolysis button can be pressed to continue the electrolysis. This step can be repeated several times, the electrolysis curve will drop to a relatively low level, and the test can be carried out after the measurement signal is stable.
Through the above operations, if the blank current (electrolysis curve) still cannot be reduced, it may be affected by the intrusion of moisture from the atmosphere, or the ceramic filter plate in the cathode chamber absorbs moisture.
At this time, check the sealing condition of the grinding joint surface of the titration cell, whether the silica gel is invalid, whether the hole of the silicone rubber pad in the sampling cock is too large, and whether the cleaning and drying effect of the cathode chamber is good, etc. Perform corresponding processing and repeat the above operations.
Calibration of the instrument
When the instrument reaches the initial equilibrium point and is relatively stable, it can be calibrated with pure water (the electrolysis switch (7) should be pressed).
1. Use a 0.5?l micro-syringe to draw 0.1?l of pure water to prepare for sample injection.
2. Press the start key once.
3. Inject 0.1?l of pure water into the electrolyte in the anode chamber through the injection cock. Pay attention to insert the needle tip into the electrolyte and avoid contact with the cell wall or electrodes. After injection, the titration will start automatically.
4. The buzzer sounds and the status is normal, indicating that the electrolysis has reached the end point, and the displayed result should be 100±10ug, generally calibrated 2 to 3 times, and the sample can be measured if the displayed number is within the error range.
Influence of the size of the blank current on the measurement accuracy
When measuring the moisture content in the sample, in order to obtain high-precision data, we hope that the blank current should be as small as possible. Under normal circumstances, as long as the status prompt is normal, the measurement can be carried out. When there are special requirements for measurement accuracy or the water content in the sample to be tested is low, the electrolytic curve should be relatively low and stable, and the measurement signal should be relatively stable, which is beneficial to the determination of samples with low content.
Through the introduction of the method of using the laboratory instrument trace moisture analyzer, I hope it can be helpful to our daily use and operation.


- 1How to replace the reagent of the microMoisture Meter
- 2Moisture meter common faults
- 3How to compare the true cost performance of trace Moisture Meters
- 4Introduction to the related problems of the trace moisture determination test
- 5Moisture meter electrolysis solution how to replace
- 6Technical characteristics of micro Moisture meter
- 7How often is it appropriate to maintain the trace Moisture Meter?
- 8Influence Factors of Temperature on Trace Moisture Meter
- 9What is unique about an automatic micro Moisture Meter