YT-H4E Computer Film thickness Tester Instruction Manual
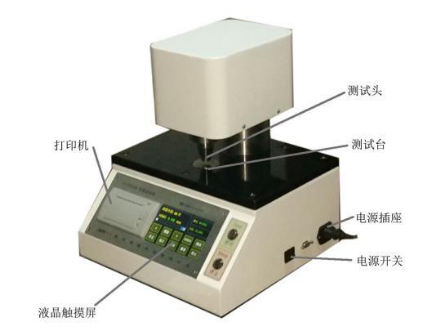
Power switch: Located at the rear right side of the instrument, it is used to control the power on and off.
Operation button
The operation keys of the instrument are concentrated on the operation panel, as shown in the figure.
The functions of each operation button are as follows:
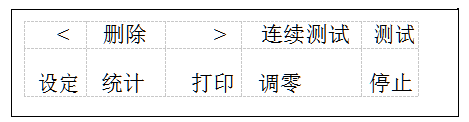
[Zero adjustment] key, when the test bench is clean and tidy (no sample), the display is not 0, press the [Zero adjustment ] key to perform zero adjustment.
【Continuous test】key , continuously test the thickness data according to the set interval and speed.
[Test] key : After the sample is placed, press [Test] to perform a test.
[Stop] key : Press [Stop] in the continuous test mode to exit the continuous test mode.
【Delete】key: used to delete the current or all test data; double-click the delete key to clear all test data.
【Statistics】key: used to display test statistical results.
【Print】key : used to print data.
[ < ] key : View the previous data , double-click to view the previous 5 data.
【> 】Key : View the last data , double-click to view the last 5 data.
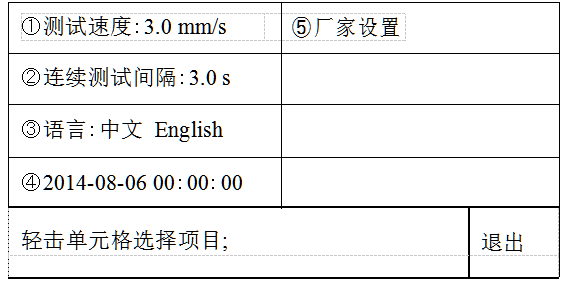
【Setting】key to enter the test setting parameter setting , including test speed, continuous test interval, language, time, factory settings. Press【Exit】key to exit the settings as shown in the figure below :
Operation Guide
1 Unpacking and Installation
① Open the upper cover of the outer packing box, take out the accompanying technical documents, and read the instruction manual carefully.
② Place the host machine on a flat and stable horizontal workbench, and pad the four feet under the flat bottom plate.
③ Turn on the power, turn on the power switch, and wait for the self-test of the instrument to complete.
2 Operation steps
① Set the speed to 3 mm/s. Press the [Setting] key, tap the [①Test Speed] cell, input 3 , and press the [Enter] key to complete the input.
② Wipe the flat surfaces of the test bench and test head with a clean cloth. Then press 【ZERO 】key to calibrate.
③ Double-click the [Delete] button to clear the historical data and avoid adding unnecessary data into the statistical results.
④ Put the sample to be tested on the test bench, and press the [Test] key to perform a test. Replace the sample for the next test.
3 View, delete and print out test data
① View the measured data (for a group of sample tests, the data can be saved up to 99 times, if there are more than 99 times, the last 99 times will be kept). Press 【<】key to view the previous data. Press 【>】key to view the last data. (Note: Double-click the key to quickly flip through)
② delete
Press the "Delete" button to delete the current test value; double-click the "Delete" button to delete all data.
③ Statistics and printing
After a group of samples has been tested (the number of samples is greater than 3), press the [Statistics] key to display the statistical results. Press【Print】to print the statistics report.
When the printing paper roll is used up, the printing paper should be replaced. The printing paper is thermal printing paper (size: Φ 30mm×57mm).