How to use YT-PRT48 Penetration strength Tester?
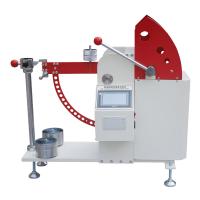
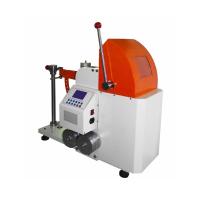
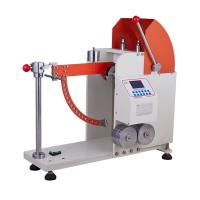
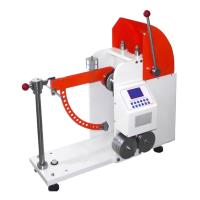
YT-PRT48 touch screen version puncture strength Tester is a special instrument for measuring the puncture resistance (ie puncture strength ) of corrugated cardboard.
Installation and Precautions
1. Instrument placement
The instrument should be placed on a solid and stable platform with a roughly level table, or fixed on a solid foundation.
There should be enough space all around to ensure unobstructed operation. The power cord plugs into the power outlet on the right side of the control box on the front of the instrument to provide power to the instrument.
2. Precautions
2.1. When installing the heavy thallium, be sure to lock the release lever to avoid accidents;
2.2. It is strictly forbidden to pierce the head and hit hard objects, and the positioning block on the operating handle cannot be adjusted at will (it has been adjusted before leaving the factory);
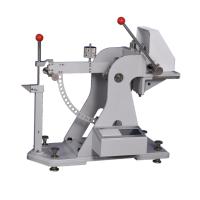
2.3. After use, place the swing arm at the position shown in the attached figure, and lock it with a locking block, remove the weight, and tighten the fastening screws;
2.4. It is strictly forbidden to release the pendulum when there is no sample;
2.5. It is strictly forbidden to arbitrarily adjust the up and down position of the balance thallium.
product structure


1. Touch panel description

Operation Guide
1. Boot up
1.1 Insert the power plug of the device into the power socket.
1.2 Turn on the power switch.
1.3 The system enters the test interface, as shown in Figure 1.
1.4 Place the swing arm at the position to be tested, and power on for 30 minutes to preheat.
1.5 Observe whether the level is leveled, otherwise it should be leveled; then put the friction sleeve on the head and tail of the puncture.
2. Parameter setting
2.1 In the interface shown in Figure 1, press the setting key on the touch screen to enter the interface shown in Figure 2
2.2 Items ①, ②, ③, ④, ⑥, and ⑦ are set by the factory. The factory has already set them before leaving the factory, and the user does not need to set them.
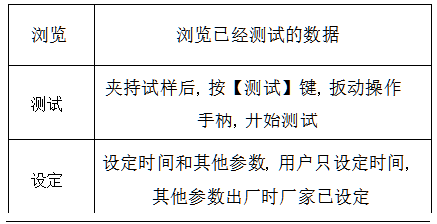
2.3 Item ⑤ is time setting
Tap the cell to select the item "⑤2014-03-05 11:28:21", and enter the interface shown in Figure 3:
Tap the number keys in Figure 3 to input the year to be adjusted, press the "Enter" key to confirm the input year, and then input the month, date, hour, minute, and second to be adjusted in the same order in the same way. After all input, it will automatically return to the interface shown in Figure 2. Press the "Exit" button on this interface to return to the interface shown in Figure 1.
3. Puncture strength test
3.1 Select the appropriate test gear, the indication value of the tested sample is between 20% and 80% of the range corresponding to the gear, and try to make the test reading in the middle of the range of the selected gear. For this reason, it should be tested in advance with the sample to be tested to determine the corresponding gear.
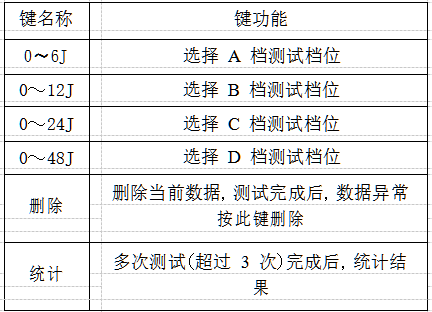
3.2 轻击触摸屏上的档位键,选择需要的档位,确定档位后,将摆臂放在待测试位置,挂上所需的重铊及滚花螺母(A 档除外),使触摸屏显示窗口中显示的测试档位与选挂重铊的档位相一致。
3.3压下杠杆手柄,将试样(注意方向)放在上、下压板间,轻放杠 杆手柄。
3.4在图 1 所示界面,在触摸屏上按“测试”键。出现如图 4 所示 界面:

3.5松开紧固螺钉,打开锁紧块,向左方拉操作手柄(注意用力干 脆),释放摆臂。
3.6测试完成后,返回图 1 界面,并在触摸屏上显示读数,如“W:5.68J”,如果测试数据有误(操作不当引起),可按“删除”键删除。
3.7将摆臂拉回到待释放位置,用锁紧块锁紧,装上摩擦套。
3.8压下杠杆手柄,取出被戳破的试样。
3.9更换试样,按上述程序进行下一次试验。
注:取样尺寸、试验时试样的正反面及瓦楞纵横向按有关标准执行。
4、测试数据浏览
4.1戳穿强度测试完成后,在图 1 所示界面,轻击触摸屏上的“浏览”,进入数据浏览界面,如图所示:

4.2 在图 5 界面按“打印”,进入图 6 所示界面:

其中,“全打印”-----------打印所有的测试数据;
打印格式如下(测试次数为 3 次):
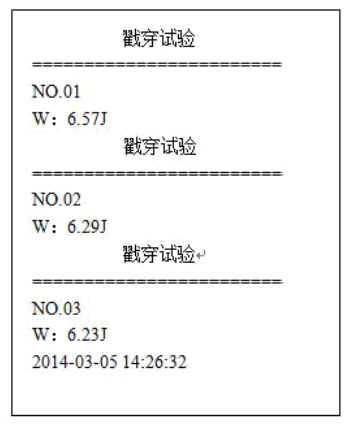
“单打印”-----------打印当前的测试数据; 打印格式如下(打印第 3 次测试数据):

“退出” ------------退出浏览界面。
4.3 在图5浏览界面按“删除”, 进入图所示界面:

其中,“单删除”-----------删除当前的测试数据;
“全删除”-----------删除全部的测试数据;
“退出” ------------退出浏览界面。
4.4 图 5 触摸屏显示最下面的一排按键为查看戳穿试验数据的按键。
5、测试数据统计
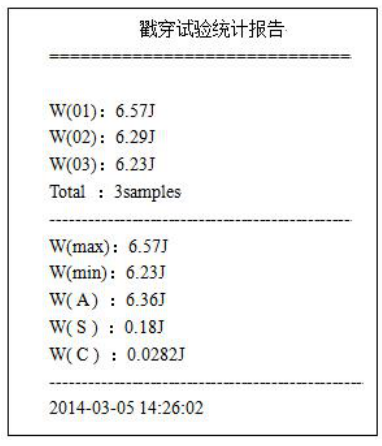
在图 1 所示界面,按触摸屏上的“统计”键,进入如图 8 所示界面:

点击图 8 中的“打印”键,可打印出“戳穿试验统计报告”, 打印格式如下(测试次数为 3 次):
6、测试结果打印输出说明
6.1 单打印、全打印格式说明

6.2 “戳穿试验统计报告”打印格式说明

7、测试注意事项
7.1仪器需要调水平,否则会造成测试数据不准。
7.2挂重铊时(A 档除外),先将锁紧块锁紧,两边重铊尽量靠贴在 摆臂上,并将两端滚花螺母旋紧,以防重铊脱落。
7.3按动【测试】键后,不允许掀动摆臂;否则应按“停止”键,取消本次测试。
7.4 若戳穿头被“卡”在试样中,应拿住挂铊杆先往戳穿方向转动,再顺势往后拉,从试样中退出戳穿头。
7.5 如打印纸卷用尽,请换装新纸卷。
维护与保养
1.仪器调试
1)调整水平
拧动调整支脚,直到仪器水平,此时底座上的水平指示器内的水平泡在指示器中间,旋紧锁紧螺母,锁紧支脚。
2)调试摩擦套阻力
将摩擦套安装在戳穿头部,摩擦套与戳穿头部的配合不能过紧,以空载摆动(将上、下夹板往后转开)中摩擦套不往下脱落为宜。摩擦套与戳穿头部的配合 松紧可通过旋动三角体顶部的顶丝(退出摩擦套可见)调节。
2.仪器校准
警告:非厂家技术人员与专业计量技术人员不得进行此操作!
1)调节仪器底座上的四个可调支脚,将仪器上的水平泡调水平,旋紧锁紧螺母,锁紧支脚。
2)调节摆臂水平——竖直 90°角度:
(1)将设备电源插头插在电源插座上;
(2) 打开电源开关;
3)系统进入测试界面,如图 1 所示;
4)点击触摸屏上的“设定”键,进入如图2所有界面;
5)6.2.5点击“⑦出厂调试”,进入如图 9 所示界面:

6)将摆臂置于待测试位置(水平放置),点击图 9 中的 调零 再将摆臂下放到竖直位置,待其静止不动后,查看图 9 中的“角度值”是否为 090.000(误差:90°±0.05°)。
7)如果角度值不为 090.000(误差:90°±0.05°),调节平衡砣,再多次重复上述 2.6 步骤,使“角度值”显示为 090.000(误差:90°±0.05°)。
8)角度值调节完成后,点击图 9 中的退出键,退回图2所示界面。
3.档位砝码质量输入:
1)用弹簧秤测量、记录 A 档位(摆臂)质量,测量时将质量可以 忽略不计的绳子两端绑在挂重铊架的二边,绳子两端尽量靠贴在摆臂 上,用弹簧秤勾住绳子,向左方拉开操作手柄,用弹簧秤将摆臂拉到 水平位置进行测量,测量得到的数值为 A 档位砝码质量(kg);完成 后,去掉绳子。
2)用电子秤测量、记录 B 档、C 档、D 档档位砝码质量(kg):
B 档:在 A 档质量的基础上+最轻的重铊和滚花螺母质量
C 档:在 B 档砝码质量的基础上+中间档的重铊质量
D 档:在 C 档砝码质量的基础上+最重的重铊质量
3)在图 2 所示界面点击“①砝码校准”,进入图 10 界面,输入密码“12345”,点击“确认”键,进入图 11 所示界面:
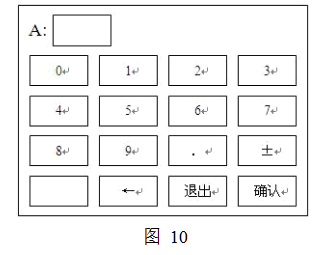

4)点击图 11 中的“①A 档砝码质量(kg):1.970”选项,进入图 12 所示界面:
5)点击图 12 中的数值键,输入仪器校准 3.1 步骤中测量记录好的
A档位砝码值,再按“确认”键返回图 11 界面。
6)分别点击图 11 中的“②、③、④”选项,输入仪器校准 3.2 步骤中测量记录好的 B、C、D 档位砝码值,再按“确认”键返回图 11界面。
7)点击图 11 界面的“退出”键,退回图 2 界面。
4、零点校准(整机调零):
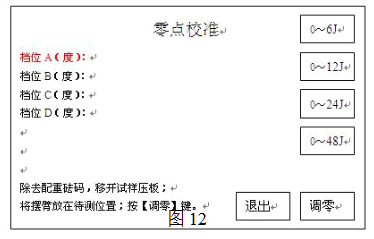
1)点击图 2 界面中的“②零点校准”, 进入图 10 界面,输入密码“12345”,点击“确认”键,进入图 13 所示界面:
2)拆去防护罩,拆去前压板与支架之间的 2 颗紧固销和 4 颗螺丝,将前压板打开角度大于 90°度。
3)A档调零:不挂任何分档砝码轻轻将摆臂(空载时)放到水平位 置,点击图 13 界面中 A 档位“0-6J”,“档位 A(度):”字样变成红 色,按“调零”键,拉动操作手柄放下水平摆,听到蜂鸣器“滴”一声,A 档位调零完成。
4) Zero adjustment of B, C, and D gears: Hang the weights with corresponding values B, C, and D on the horizontal swing arm, and select the corresponding gears of the instrument (after selecting the corresponding B, C, and D gears, "Gear B (degree):", "Gear C (degree):", "Gear D (degree):" the corresponding words turn red), press the "ZERO" key, pull the operating handle to lower the swing arm, and hear the buzzer After the zero adjustment is completed, press the "Exit" key to return to the interface shown in Figure 11, and then press the "Exit" key to return to the interface shown in Figure 1.
5) After the calibration of the instrument is completed, replace the 2 fastening pins and 4 screws between the front pressure plate and the bracket, and replace the protective cover.
Note: Professional metering technicians should remove the protective cover, remove the 2 fastening pins and 4 screws between the front pressure plate and the bracket, and open the front pressure plate to an angle greater than 90° when measuring!


- 1Working principle and test method of puncture strength Tester
- 2Cardboard - Determination of puncture strength