Operation instructions for YT-ACM automatic Colorimeter
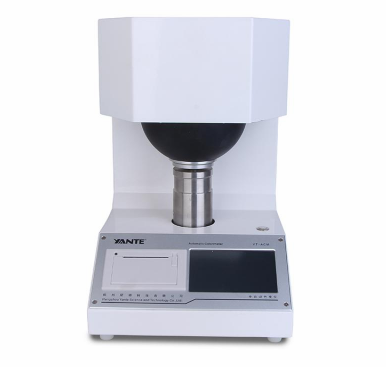
YT-ACM automatic Colorimeter is used to test the color and color difference, whiteness and brightness of objects reflected.
Installation and Precautions
The power supply of YT-ACM automatic Colorimeter needs to be 220V±10% 50Hz. If the voltage does not meet the requirements, please use an AC voltage stabilizer. After the instrument is used, the power switch should be turned off, and the cover should be protected to keep it clean.
Working environment: temperature 5~35℃, relative humidity not more than 85%
Key Function
key symbol | Function |
set up | Calibration, reference samples, chromaticity options, averaging times, fluorescence factors and other parameter settings. |
Print after testing; print while browsing. | |
browse | View the data that has been tested and stored. |
to clear | After the test, if the test value is no longer needed, press the [Clear] key to clear it. |
storage | When the test of all items is completed, press the [Save] key to store the data. |
BaiDu | There is no need to measure color, just measure whiteness (R457) and press [Whiteness] key to test . |
test | Equivalent to external metal buttons, test chromaticity and whiteness data. |
REF | A real sample is tested and stored as a reference sample. |
f | To test the fluorescent whiteness, R457 must be tested before the test, then pull out the pull plate and press the [F] key. |
OP/T | Test for opacity and transparency. |
SA | Measure the light scattering coefficient and absorption coefficient. |
I | Test the ink absorption value. |
Operation Guide
Press【SET】key to enter the following menu:
Fluorescence factor of this instrument =; Fluorescence correction =.
① Calibration | ⑧ Average times 1 |
② Reference sample | ⑨Fluorescence factor 1.17 |
③Chroma options | ⑩Fluorescence correction 0.00 |
④ help | ⑾ Quantitative 100.0 |
⑤ Factory debugging | ⑿Ink coefficient 0.00 |
⑥Language selection | ⒀2013-08-19 17:05:25 |
⑦Screen Calibration | ⒁Reserved by the manufacturer |
Tap a cell to select an item; | confirm |
Note: In addition to pulling out the pull plate when measuring the fluorescent whiteness F, all other operations need to push the pull plate to the end.
1. Calibration
Push the pull plate, press the [Setting] key, click the [①Calibration] cell, place the black tube on the sample holder, press the [Enter] key, and wait for the zero adjustment to be completed. Then the following interface is displayed:

Push the No. 1 standard plate on the sample holder, and check whether the data on the cover is consistent with the displayed data. If not, click the corresponding cell to modify. After [OK] button and wait for the calibration to be completed. .
2. Reference sample setting
在做色差试验时,需要有参考样。本仪器可以输入 10 组参考样,有两种方法可以输入,一种是数据输入,另一种是实样测量输入。
按【设置】键,轻击【②参考样】单元格显示如下:
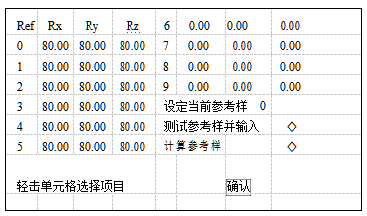
数据输入参考样:选项状态【测试参考样并输入 ◇】【计算参考样 ◇】,点击相应的单元格,输入参考样数据。
测试输入参考样:
a.选项状态【测试参考样并输入 ◆】【计算参考样 ◇】,在试样 托上放置参考试样,点击相应的单元格,等待测试完毕,自动输入参考样。
b.在测试面板,按【REF】键可快捷测试输入参考样。
计算参考样:选项状态【测试参考样并输入◇】【计算参考样◆】,本仪器增加了此功能方便用户计算色度数据,点击任意一组参考样自动计算色度数据。
设定当前参考样:做色差测试需要有参考样,那么当前参考样就是当前测试色差时比对的参考样。点击【设定当前参考样 x】输入 0-9 数据,然后按【确认】键,设置完成。
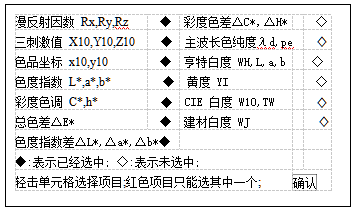
3.色度选项
用户According to自己需要选择色度数据,在显示和打印时只有选定参数,使显示和打印更清晰。
4.参数设定
4.1 调节照明紫外辐射分量 (一般隔 1 个月,调节 1 次)如需测量荧光增白试样的 R457 白度,应放上 3 号工作板,推进拉板,按【白度】键,显示数应该接近 3 号板的 R457 标准值(以相差不超过 0.3 为好)。若显示数小于标准值,可用一字头小螺丝刀顺时针方向转动拉板旁边的调节螺钉(反之,若大于标准值,应反时针方向转动调节螺钉),再推进拉板到底(螺钉调节后拉板有可能不到底),再
按【白度】键。然后按 6.1 校准。如此调节,直到显示数等于 3 号板R457 标准值为止,取下 3 号板。
4.2 设定荧光因数U值
如需测量荧光增白试样的荧光增白度,还应预先设定荧光因数U 值。推进拉板,如 5.4.1 调好照明紫外分量后,试样托上放 3 号工作标准板(标有白度 R457 和荧光增白度 F 数值)。按【白度】键,测定值应等于 R457 标准值;接着拉出拉板,按 F 键,显示 r457值。

按【设置】键,轻击【⑨荧光因数 x.xx】单元格,输入荧光因数;
4.3 设定荧光修正值 FA:(出厂时已设置,用户一般不需要修改)将标准纸样的 3 号纸样(不含荧光增白剂)或 80 度左右的陶瓷白板(1 号标准板也可以)放置在试样托上,推进拉板,按【白度】键,得到 R457,再拉出拉板得到 r457,两者相差不超过 0.05,则设为 0,否则设为 FA=R457-r457。
按【设置】键,轻击【⑩荧光修正 x.xx】单元格,输入 FA 计算值,可以有正负符号。
4.4 定量设置:
在测试光散射和刚吸收系数时,需要置入定量。按【设置】键,轻击【⑾定量 xx.xx】单元格,输入定量值。
4.5 油墨系数设置:
在测试油墨系数时,需要置入油墨系数,按【设置】键,轻击【⑿油墨系数 xx.xx】单元格,输入油墨系数。
4.6 时间设定:
按【设置】键,轻击【⒀2013-xx-xx xx:xx:xx】单元格,输入时间。
5.测量 According to需要设置平均次数,按【设置】键,轻击【⑧平均次数 x】输入平均次数最多 8 次。如不需做平均设为 1 即可。
5.1白度和色度测量
推进拉板,将需要测试的试样放置在试样托上,按【测试】或面板上的金属按钮,仪器进入测试状态,等待测试完成,立即显示色度(According to色度选项)和白度数据。
如需存储则按【存储】键,也可以等其他项目(如荧光白度、不透明度等)测试完后再存储。
5.2 ISO 亮度(蓝光白度)测量推进拉板,如果用户不需要测量色度,可直接按【白度】键进行白度测试,优点是节约测试时间。
5.3 荧光增白度测量
首先需已经测试 R457 白度值(做过 7.1 或 7.2 后),拉出拉板后,按【F】键。显示荧光增白度 F。
5.4 不透明度测量 OP
推进拉板,按【OP/T】键,放多层纸按【R∝】键,然后单层衬黑筒按【R0】键,即测得不透明度 OP。
5.5 透明度测量 T推进拉板,按【OP/T】键,单层纸衬 84 度白板(可以用 1 号板代
替)【R84】键,然后单层纸衬黑筒按【R0】键,即测得透明度 T。
5.6 光散射系数、光吸收系数测量(S、A)推进拉板,按【S.A】键,首先放多层纸按【R∝】键,然后单层衬黑筒按[【R0】键,即测得 S、A。
5.7 油墨吸收值测量
推进拉板,【I】键,首先将未涂油墨的纸放试样托上,按【R∝】键,然后将涂油墨后的纸按【RI】键,即得 I 油墨吸收值。
故障与修复
1.操作错误
拉板位置错误:
除了测荧光白度 F 时需要拉出拉板,其它所有操作都需要推进拉板到底。如果拉板位置错误,将引起测试数据误差。
特别注意的是 5.1 校准时,试样托上放置的标准器错误,第一步调零应放黑筒,第二步应放 1 号标准板。操作错误导致测试任何试样都为 0,用户以为是仪器故障,只要用户重新正确校准,就可以解决此问题。
仪器故障
开机无显示,按键无反应,请检查电源插座里面的保险丝是否损坏,损坏请更换保险丝 1A/250V。测试数据始终为 0:
※检查灯泡是否发光,如不发光请更换灯泡,更换时注意灯丝因跟透镜中心平齐。
※检查灯泡是否发黑或发白等异常,如果异常,请更换灯泡。
※如果灯泡正常,请检查其位置,即灯丝是否和透镜中心平齐,如位置不正确,请调整位置。
※关掉电源以及拔掉电源插座;打开上盖板和后盖板重新插紧所有插座,再盖上盖板通电试验。测试数据重复性变差超过 0.2 度:
按【设置】键,轻击【⑤厂家调试】,仪器将显示信号:
Push the drawing plate forward, place the No. 1 standard plate on the sample holder, press the [Rx], [Ry], and [Rz] keys respectively , and the voltages of Mes and Ref are within 0.5-2.0, which are normal. If the signal is close to 0V, check whether the bulb is on.

-
![CHINA LS171 Portable Color Difference Meter Test Car Paint, Metal, Plastic and Other Colors]()
-
![YINUO YN-SD01 Colorimeter whiteness fluorescent whiteness opacity chroma yellowness]()
-
![JINGQI WSD-2P turbidity Colorimeter with printing function]()
-
![JINGQI WSD-2 turbidity Colorimeter]() JINGQI WSD-2 turbidity Colorimeter$ 724.00
JINGQI WSD-2 turbidity Colorimeter$ 724.00 -
![JINGQI SD-500BJ Handheld Colorimeter with Printing Function]()
-
![JINGQI SD-500P Precision Colorimeter Tape Printing]()