How to use X-4 series Melting point meter
The micro-melting point apparatus is suitable for studying and measuring the characteristics of the measured substance under a microscope, which is called TOA analysis (THERMO-OPTICAL ANALYSIS). It can be used not only for the determination of the melting point of trace samples, but also for the determination of the melting point of sliced samples, as well as for bioengineering thermodynamics research. It is widely used in medicine, chemical industry, synthetic fiber, biology, mineralogy, criminology and other fields.
working principle
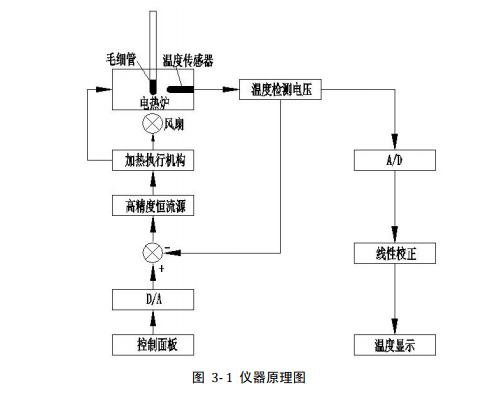
The working principle of the instrument is shown in Figure 3-1. The temperature detection adopts the platinum resistor directly inserted into the electric heating furnace as the probe, and the obtained temperature measurement signal is sent to the A/D converter through voltage amplification, and the temperature is calculated and displayed by the software. Different heating rates can be set through the control panel. The temperature analog voltage obtained by the D/A converter and the temperature measurement unit is sent to the adder together. Through such a closed-loop system and automatic correction of the temperature by the software, the following function of the electric furnace is realized, and the influence of the seasonal temperature difference on the heating rate is also eliminated. Influence.
Steps
6.1 Start up
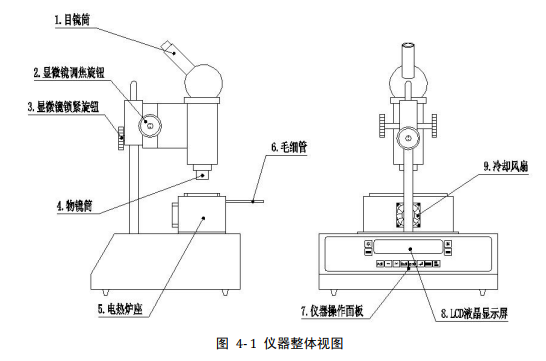
1. Place the instrument on a horizontal workbench and keep a distance of at least 30mm between the rear panel of the instrument and the wall;
2. Plug in the power cord, and then connect to the power supply. Note that the input voltage range is: 220V±10%V, 50/60Hz;
3. Turn the power switch to the ON position, the instrument will be powered on, and the LCD screen will be lit at this time, and with the beep of the buzzer, the instrument will enter the startup procedure and start working;
4. It is recommended to wait for 20 minutes before starting the measurement to ensure the accuracy of the measurement;
6.2 Shutdown
1. Turn the power switch to the OFF position, the instrument will shut down;
2. Disconnect the power cord from the instrument;
3. If the machine is not used for a long time, it is recommended to pack the machine according to the factory way to prevent accidental damage;
6.3 Welcome interface
1. When the instrument is just turned on, the “Welcome Interface” is displayed first, as shown in Figure 6-1 below;
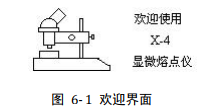
2. The "Welcome interface" will be displayed for 5 seconds, and then the instrument will automatically enter the "Measurement" interface;
6.4 Main menu interface 1. Press the "Main Menu" button to display the "Main Menu" interface as shown in Figure 6-2 below:
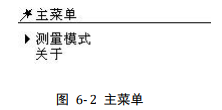
2. Press the "︰" key, the cursor will switch back and forth between "measurement mode" and "about";
3. Press the "︰" key, the cursor will switch back and forth between "measurement mode" and "about";
4. Press the " " key to enter the interface where the cursor is located;
6.5 Measurement of melting point
1. 在“主菜单”下,按下“数字键 1”,仪器将进入测量模式并显示“测量界面”如 图 6- 3 测量界面;

2. 初始进入“测量界面”的时候,仪器将处于待机状态,炉芯不加热,冷却风扇也不 开启;
3. 进入升温状态 3.1 按下“升温键”,仪器将进入测量状态,炉芯开始以最大的速率上升,状态栏 将动态的显示图标:
4. “升温速率”的调整:
4.1 每按下一次“︾”键,升温速率将减小一档;
4.2 每按下一次“︽”键,升温速率将增大一档;
4.3 速率栏会显示当前设定的升温速率,分别为:1.0℃/min、3.0℃/min、5.0℃/min、 10℃/min 和全速升温档;
4.4 备注:
4.4.1本仪器支持五档升温速率,分别是 1.0℃/min、3.0℃/min、5.0℃/min、10℃ /min 和全速升温档;
4.4.2 升温速率刚刚切换的时候,因为温度的惯性,炉温会暂时的停滞以及升 温速率不准属于正常现象,速率过渡完了将以新的升温速率匀速的上升;
4.4.3考虑到炉芯的温度惯性大,建议用户在当前炉温即将到达:样品熔点温度 -30℃时提前将升温速率由最大档调整为 10℃/min,然后逐步减小升温速 率,直到炉温即将到达:样品熔点温度-8℃的时候,将速率调整问 1℃/min, 这样可以避免因为升温速率的切换影响测量结果;
4.4.4 测量样品的时候请盖好随机附送的保温罩,并且不要在通风的环境下测 量;
5. “装样”:
5.1 盖玻片装样方式:将微量样品放在盖玻片上,按图 6- 4 所示,使样品大致放在 小圆范围之内,然后盖上盖玻片,并小心用随机附带的镊子钳夹着样品放入热 台,并用镊子钳推动被测物对准热台中心的观察孔,然后盖上保温盖;测试完 成后,再用镊子钳小心地从加热镜台将盖玻片移除;
备注:以前的装样方式是:用载玻片作为底板,放上被测样品,然后盖上盖玻片; 考虑到载玻片比较厚,对测量结果影响较大;现在取消了载玻片,而上下都用盖玻 片装样了;
5.2 毛细管装样方式:
7.2.1 将被测样品的粉末倒在干净的玻璃板上;
7.2.2 取数支毛细管开口朝下对齐装入粉末,来回数次直到粉末高度大约为 5mm;
7.2.3 然后调转毛细管,使封口端朝下,用一根约 90cm 长的硬质管(如玻璃管) 垂直放置做导引,将装有样品的毛细管从管道的上端放入,自由落体到底 部的玻璃板上,来回数次,使样品压实即可;
7.2.4 将装样的毛细管插入侧面的毛细管孔,调整好焦距既可以通过显微镜观察 样品的熔化状态(备注:采用毛细管测量样品熔点,不需要盖保温罩!);
6. 熔点的判断:
6.1 初熔点:当通过显微镜观察到样品开始熔化了,可以按下“初熔键”,这时仪 器会将当前温度做为初熔点加以记录,并将结果显示在 LCD 初熔的位置处, 如果仪器连接了电脑,亦会将该初熔温度显示在电脑软件里;
6.2 终熔点:当观察到样品完全熔化了,按下“终熔键”,仪器会将当前温度做为 终熔点加以记录,并将结果显示在 LCD 终熔的位置处,同时蜂鸣器会“嘟” 一声以提醒用户测量完成了;
7. 测量过程中,如果用户想取消本次测量,按下“取消键”即可终止测量而进入待机 状态;
8. 焦距的调整 当将被测样品放入热台后,用户可以通过显微镜目镜观察样品的熔化状态,如果发 现样品比较模糊或者根本看不到样品,此时用户需要:
8.1 如果看不见样品,用户需要用镊子钳将被测样品推到观察孔的中心;
8.2 松开“显微镜锁紧旋钮”调整显微镜筒,使物镜对准被测样品而位于其正上方;
8.3 如果物镜正好位于被测样品的正上方,而观察样品模糊,则可以调节“显微镜 调焦旋钮”调整其上、下位置,直到样品观察清楚为止;
9. 备注:
9.1 样品装样的好坏及一致性将直接影响到测量读数的准确性,“装样不好”或者 样品回潮了,可能导致样品周围都熔化了,局部还有较大颗粒处于未熔化状态 或者含有气泡,此时用户可以自己判断是否完全熔化而结束测量;
使用注意事项
1. When the vapor pressure of the sample is very low, the cover glass may not be placed. If the sample is heated and volatilizes, the insulating glass on the stage will be covered with a layer of fog soon. At this time, the insulating glass can be pulled out with a Clean with distilled water or other solvents, then dry with absorbent cotton pads;
2. When continuously testing high-temperature samples, in order to prolong the life of the objective lens, it is recommended to turn the objective lens out of the optical path during the temperature setting stage, and enter the optical path for focusing observation when it is about to reach the measurement temperature;
3. The linear heating rate is different, and the measurement results are also inconsistent, so it is required to formulate certain specifications. Generally, the higher the speed, the higher the reading value. The melting point readings for each rate can be unified with experimental corrections. For samples with unknown melting point values, a faster heating rate can be used first to obtain a preliminary melting point range before precise measurement;
4. When there is a reference sample, the reference sample can be measured first, and a certain heating rate can be selected for comparative measurement according to the requirements, and the initial and final melting readings of the reference sample can be used as the basis for assessment. Units with melting point standards used as temperature transfer standards can correct results based on adjacent standard readings;
5. It is better to fill 5 groups of tested samples at a time, discard the maximum and minimum values after measurement respectively, and take the average value of the middle 3 readings as the measurement result to eliminate accidental errors caused by capillary and sample preparation and filling;
6. In order to prevent fire or electric shock accidents, please do not expose the machine to rain or humid environment. There are dangerous high-voltage accessories inside the machine, so do not open the case, but should be maintained by professionals authorized by our factory;
7. To prevent electric shock, please be sure to use a three-core voltage socket with a grounding wire to secure the power cord;
8. When pulling out the power plug, please do not pull the power cord directly to prevent it from being broken;
9. When the instrument is working, the heated mirror stage will generate high temperature, be careful of burns.


- 1Microscope classification, operation and application
- 2Melting point determination and its importance in material analysis
- 3Method and significance of determination of melting point of polyester resin
- 4How to use trinocular Microscope
- 5How to detect the color difference of fluorescent color-changing materials?
- 6Determination of Initial Melting Point of Anthraquinone (AQ) Dry Products
- 7Determination of Purity of Anthraquinone (AQ)
- 8How is the content of non-fibroblasts determined?
- 9 How to measure cell wall thickness and cell cavity diameter?