JENCO 6308 cst conductivity meter operating instructions
Model C6308CST is a multi-functional test and controller designed with a single-chip microcomputer. It is packaged in a ¼ DIN waterproof case and can be used in high humidity without affecting the function of the machine, making this model a A satisfactory controller, suitable for use in laboratories and various control places.
installation steps
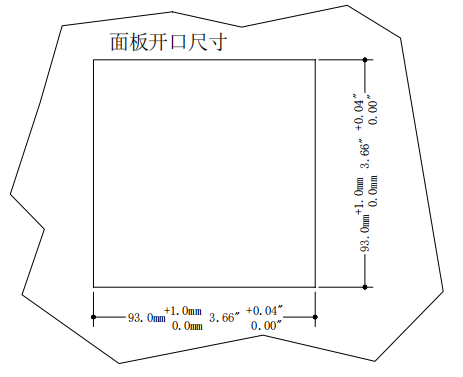
1. Dig a square hole with the size shown in the above picture on the mounting plate with a thickness of 1.5mm~9.5mm.
2. First remove the bracket and put the machine into the above square hole.
3. Install the bracket and push the bracket forward to ensure that the machine is fixed on the mounting plate.
Use of MODEL C6308CST
A. Front panel and key description
1. [MODE/-] key
1a. In normal display mode: Press this key to select different display units, such as uS (mS) or ppt.
1b. In calibration/setting mode: press this key to select the next digit to be set.
1c. In the calibration/setting mode: Press and hold the [MODE/ -] key for 2 seconds to return to the previous setting parameter.
2. [CAL/VIEW] key
2a. In normal display mode: Press and hold this key for 2 seconds to enter calibration/setting mode.
2b. In the calibration/setting mode: press this key to skip the current setting screen and directly enter the next setting screen. If you continue to press the last one, you will leave the calibration/setting mode and return to the normal display mode.
3. UP key
In calibration/setting mode: press this key to increase the number on the flashing position.
4. DOWN key
In calibration/setting mode: Press this key to decrease the number on the flashing position.
5. ENTER key - In the calibration/setting mode: press this key to store the set parameters in the EEPROM memory, and enter the next parameter or next page of setting.
6. LIGHT key - Press this key to turn on/off the backlight of the LCD display. If no key is pressed for more than two minutes, the backlight will be automatically turned off to prevent the machine from overheating and affecting performance.
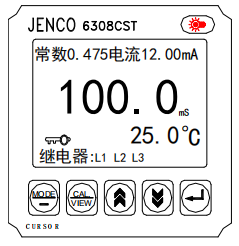
B. Normal display screen and instructions
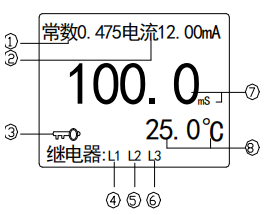
1. Constant: Displays the constant .
2. Current: Display the output size of the actual isolation current. When returning to the normal display screen from the calibration/ setting mode, the word "lock" is displayed for about 2 seconds. When the difference between the set value of the current output is less than 10 words (least significant digit), it will be displayed as "error".
3. Key: The key indicator lights up to indicate that the setting mode is protected. Unless the user enters the correct four-digit password, all the setting values can only be viewed but not changed.
4. H1/L1: If the indication signal of H1 is on, it means that the conductance of RELAY1 has exceeded the set value of the control; if the indication signal of L1 is on, it means that the conductance value of RELAY1 has been lower than the set value of the control value. (H means high point control, L means low point control)
5. H2/L2: If the indicator signal of H2 is on, it means that the conductivity value of RELAY2 has exceeded the control setting value; if the indicator signal of L2 is on, it means that the conductivity value of RELAY2 has been lower than the control setting value. Value.
6. H3/L3: If the indicator signal of H3 is on, it means that the temperature display signal has exceeded the set value of the control; if the indicator signal of L3 is on, it means that the temperature display signal value of RELAY3 has been lower than the control value set value.
7. The measured display value of conductivity or salinity.
8. The measured display value of the temperature.
C. Terminal Wiring Diagram
Before connecting the conductance electrode, relay control, analog output, RS-485 interface and power cord , please read the figure below carefully, and connect them correctly to the wiring pins.
1. Do not plug in the power supply when installing the machine, otherwise it may cause danger such as electric shock.
2. 装机时需要确定所有接线接在正确的接脚。
3. C6308CST使用电源为230VAC 50/60Hz。功率消耗为6瓦特。确认机器的地线连接到交流电源的地线上。
4. 4~20 mA的输出最大负载不能超过 500 欧姆。
5. 继电器的电阻性最大负载不能超过2.5A 230VAC。
☆ 警告:请确定使用正确的交流电源并接到正确的脚位,否则会对机器造成长久性的损坏。
D. 开/关机
只要将本机插上正确的交流电源(230VAC,50/60Hz)即可开始工作,不使用时只要拔掉交流电源即可。
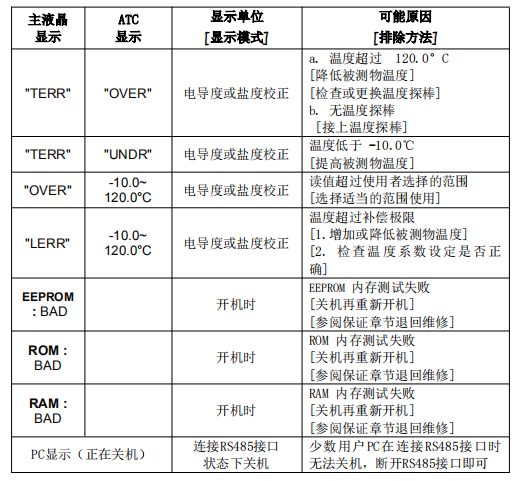
每当本机开始工作时,机器内的微电脑即会执行自我检查并出现左边的画面,检查的项目包括 EEPROM、RAM,ROM和软件版本等,正确的项目会显示 “OK”,若有问题的项目会显示 “BAD”, 有问题的项目请参照错误显示与排除方法章节处理。
每当本机完成自我检查后,使用者只要将探棒装好即会显示出电导度和温度值,并可做探棒校正和控制的各种设定。
IV. MODEL C6308 CST 的显示模式
A. 正常显示模式
插上电源开机后,本机会进入正常显示模式(如左画面),一共有下列两种显示参数:
1. 温度 ℃ – 显示目前被测液温度。
2.电导度值 –本机会依使用者设定的参考温度,温度系数和被测液温度去显示有温度补偿的电导度。使用者亦可按 [MODE/-] 键选择盐度(ppt) 单位显示。
注: 若需无温度补偿的电导度只要将温度系数设为0.00%即可获取。
B. 校正/设定模式
在正常显示模式时,只要按住 [CAL/VIEW] 键两秒钟即可进入校正/设定模式的第一画面(即主设定画面),再按一次 [CAL/VIEW] 键即可进入第二画面,再按一次 [CAL/VIEW]键即可进入第三画面,继续按最后可回到正常显示模式画面。
设定的方法:
1. 使用者可以按 [ ] 或 [ ] 键去改变闪烁位置上的数字。
2. 使用者可以按 [MODE/ - ] 键使闪烁的位置往下一个位数移动。
3. 使用者可以按住 [MODE/ - ] 键两秒使闪烁的位置往上一个设定位置移动。
4. 使用者可以按 [CAL/VIEW] 键使闪烁的位置往下一页移动。
5. 当任何数字/参数设定好以后或不要改变设定时,只要按 [ ]键确认即可,闪烁的位置会自动往下一个设定位置移动。
下图为所有菜单画面的流程图,共分六个校正/设定画面:
a. 密码检查
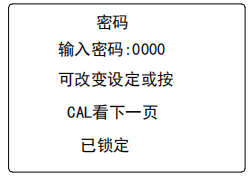
密码检查画面如左图所示
并说明如下:
正常显示画面有 钥匙指示讯号时,按[CAL/VIEW] 键2秒使用者将会看到此页,要想更改校正/设定参数,使用者必须在输入密码的右边输入正确的密码去解码,否则你只能按[CAL/VIEW] 键去查看各画面的设定而无法变更任何设定,此时控制功能不受查看而受影响。若密码已解码时,“已锁定”字体消失,机器会自动进入下一个设定画面(使用者设定画面)使用者可以按[CAL/VIEW]键到下面的校正/设定画面去重新校正电导探棒或重新设定数据。
b. 使用者设定画面
 若密码解码后,可看到图示画面,而此画面主要是警告使用者进入设定步骤,所有控制器和隔离电流输出都已经被锁定,即控制器和隔离电流输出不随着输入而改变,直到离开校正模式。使用者可按[CAL/VIEW ] 键进入下一校正画面 (电导度校正画面 ) 。
注意:使用者在下面的校正/设定过程中,继电器控制/隔离电流输出被锁定,原来的控制值和电流输出值不会随着校正/设定输入而改变,直至校正/设定设定完毕回到正常显示画面锁定才会被解除。
c. 电导度校正画面
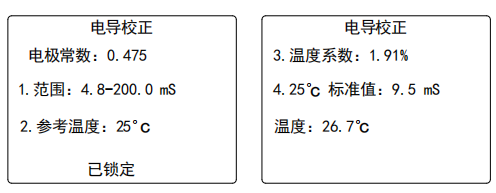
电导度校正画面如上图所示,说明如下:
本机的电极常数固定为0.475。
1.范围的设定:使用者可按 [ ] 或 [ ] 键选择适当的控制范围,期范围有六种 (电导度和 盐度各三种) 范围可供选择,选好以后即可按 [ ] 键确认,机器会自动进入下一步骤参考温度的校正。
2.参考温度的设定:使用者可按 [ ] 或 [ ]和[MODE/ -]键输入不同的参考温度(范围从 10℃ 到 29℃ ),当设定完成后即可按[ ] 键确认,机器会自动进入电导校正画面的下一页。如果温度系数不是零的话,那么仪器会According to此参考温度值来计算并显示出有温度补偿电导值或盐度值。
注意:电导校正画面共有二页,如果这里按[CAL/VIEW]键,机器将跳过电导校正画面的第二页,要进入电导校正画面的第二页必须按[ ] 键。
3.温度系数的设定:
如果设定是0.00%,温度补偿则不起作用。
a. 校正时:使用者需要输入标准液的温度系数(范围从 0.0% 到4.99% ),可按[]或[]键和[MODE/ -] 键去设定,当设定值正确时即可按 [ ] 键确认,机器会自动进入下一步骤25℃标准值的校正。
b. 测量时:当被测溶液的温度系数与标准液的温度系数不同时,在你做完标准液校正后,你需要再按住 [MODE/-] 键两秒直到退回重新设定被测溶液的温度系数,当设定值正确时即可按[ ] 键确认。若被测溶液的温度系数与标准液的温度系数相同时,则不须再按住 [MODE/-] 键两秒退回去重新设定被测溶液的温度系数。之后,使用者需要按 [CAL/VIEW] 键跳过标准液校正直接进入下一画面电导控制的设定。
4. 25℃标准值的校正:
用户在此输入标准液25℃时的电导或盐度值。使用者只要将洗净的电导度探棒放入标准溶液中,机器会显示目前的电导度值,下一行会显示目前的溶液温度和上一次校正的探棒常数值,等电导度和温度读值显示稳定时,使用者可以按 [ ]键锁住显示值(此时显示值不再随输入改变),再按[]或[]键和[MODE/ -] 键输入闪烁位置的标准液数值,当输入正确的标准液值时,即可再按 [ ]键确认,如此即完成标准液的电导探棒校正,新的探棒常数值与温度会显示在下一行,约数秒后即进入下一画电导继电器的设定。
校正注意事项:
1. 探棒需要清洗干净且避免被气泡干扰。
2.标准液电导度值尽量选择与被测液接近,可以减少温度系数的误差。
3.选择适当的测量范围使被测液的电导度值及控制皆在其测量范围内。
4. 当被测液与标准液之温度系数不同时,校正完后记得输入正确的被测液温度系数。
5. 需要有足够的时间使探棒温度到达稳定。
d. 电导度继电器设定画面
 使用者可以在此画面设定两个继电器的控制模式和迟滞的大小。
1. 继电器1的设定:
继电器的控制形态是可以选择的,使用者可以按 [ ] 或[ ] 键选择 “高” (表示是高点控制,当输入值高于设定值时,继电器即会开始工作)或“低” (表示是低点控制 ,当输入值低于设定值时,继电器即会开始工作)的控制状态,再按 [ ] 键确认。
使用者可以按 [ ] 或 [ ]和[MODE/-] 键设定继电器1的设定值,当设定值正确时即可按 [ ] 键确认,即进入 RELAY2 的设定。
2.继电器2的设定:
本继电器的控制形态和数值设定方法是与 RELAY1 的设定方法相同的,请参照 RELAY1 的设定。
3.迟滞值的设定:
使用者可以按 [ ] 或 [ ]和[MODE/- ]键输入适当的迟滞值,当设定值确定正确后可按 [ ] 键确认。迟滞值若设定太小可能会引起继电器震荡,请依经验输入适当的值即可。
※此迟滞模式默认为“EDGE” 控制 (迟滞模式的说明请参照V节)。
e. 隔离电流的设定画面
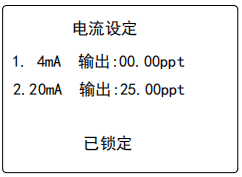
1. 4 mA 输出 的设定– 使 用 者 可 以 按 [] 或[]和 [MODE/-] 键输入适当的数值,当设定值正确时即可按 [ ] 键确认,闪烁的讯号会自动进入20mAOUT 的设定。
2. 20mA 输出的设定–20 mA 输出设定方法同4mA输出的设定 的设定方法相同的,设定完成后,闪烁的讯号会自动进入下一画面温度控制的设定。
当设定完成时,本机的电流输出即会以此设定的范围线性比例输出隔离电流并显示在正常画面上。(隔离电流输出的说明请参照VI章节 )。
f. 温度继电器设定画面
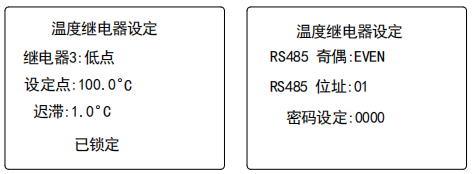
1. 继电器3:
使用者可以按 [] 或 [] 键选择为“高点”或“低点”的控制形态,(高点控制:当温度高于设定值时,继电器即会开始工作(ON);低点控制:当温度低于设定值时,继电器即会开始工作(ON) 再按 [ ] 键确认。
2. 设定点:
使用者可以按[]或[]键和[MODE/-]键输入适当的数值,按[ ] 键确认。
3. 迟滞值
迟滞可设定的范围从0.0 ℃ 到19.9 ℃,使用者可以按 []或 [] 键和[MODE/-]键输入适当的数值,当设定值确定正确时即可按 [ ] 键确认。
※ 此迟滞模式默认为“EDGE” 控制 (迟滞模式的说明请参照V节)
注意: 温度设定画面共有二页,如果这里按 [CAL/VIEW]键将跳过温度设定画面的第二页,要进入第二页需要按[ ] 键。
4. RS485 奇偶:
有EVEN,NONE和ODD三种方式选择。
5. RS 485 位址:
假如使用者同时使用多台C6308CST,每一台需要指定一个机号(ID No.),这个机号是的,而这个机号也是与 PC 计算机连络的机号设定需要是相同的。
6. 密码设定:
这里会显示一组四位数密码,可能是工厂的设定值0000或使用者先前设定的密码,使用者可以重新输入一组四位数密码再按[ ] 键即可保护设定值不会被误设或乱设定,请记下密码以便下次译码 / 变更设定使用,忘记密码只能一组一组重试。
V. 继电器控制
A. (隔离电压)ISOLATION VOLTAGE
继电器的最大隔离电压是 1500 VDC,即继电器的接点间电压差值不可以超过1500 VDC。
B. (继电器输出负载)OUTPUT LOAD
继电器接点间的输出负载建议不超过2.5安培/230VAC,以免减少继电器寿命或损坏继电器,本继电器只适合接电阻性负载(resistive load)。
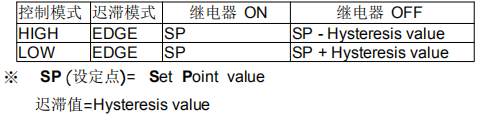
C. 关于继电器的动作(ACTION),设定点(SETPOINT),迟滞模式(HYSTERESIS MODE) & 迟滞(HYSTERESIS)
假设使用者选择“高点”控制,迟滞模式为“EDGE”时,当输入值超过设定值时,继电器将会打开(ON),而当输入值低于设定值再减迟滞值时,继电器将会关闭(OFF)。
假设使用者选择 “低点” 控制,迟滞模式为“EDGE”时,当输入值低于设定值时,继电器将会打开(ON),而当输入值超过设定值再加迟滞值时,继电器将会关闭(OFF)。
参照下表:
D. 关于 电导度 / TEMP 的继电器
在本机电导部分的控制里有两个可独立设定的开关(ON/OFF)式继电器输出,使用者可以依自己的需求设定下列各参数: 控制的模式(High /Low),控制点(SET POINT)的设定和迟滞(Hysteresis)的大小。 请参照下图。
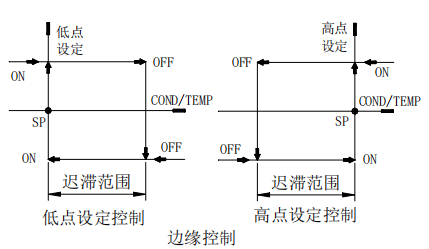
在温度的控制里本机提供一个可程序设定的开关(ON/OFF)式继电器输出,使用者可以依自己的需求去设定下列各参数:控制的型式(HIGH/LOW),控制点(SET POINT)的设定和迟滞(Hysteresis)的大小。
VI.关于 4 - 20 mA 隔离电流的输出
A. 隔离电压(ISOLATION VOLTAGE)
本机与负载之间隔离电流输出的隔离电压是 500 VDC,若超过此隔离电压,可能会造成本机的损坏。
B. 隔离电流的负载(OUTPUT LOAD)
隔离电流的最大负载为 500Ω,如负载超过 500Ω时,可能会引起隔离电流的输出错误。
C. 电导度隔离电流线性输出
电导度隔离电流的输出是依使用者在隔离电流画面的设定作线性比例输出,隔离电流的输出公式如下:
mA(C)=4mA+(16mA)*(D(C)-C (4))/(C (20)-C (4))
其中 : mA(C) = 隔离电流的输出值
D(C) = 目前的电导度或盐度显示值
C(4) = 4 mA. 的电导度或盐度设定值
C(20) = 20 mA. 的电导度或盐度设定值

注意:
4mA和20mA的设定差值范围需要大于或等于10个LSD(即最低有效数位。)
VII. RS485 接口使用
A. 简介
The RS485 of this instrument adopts the standard MODBUS communication protocol. Users who need it can compile subsequent applications according to the protocol attached to the instrument CD.
B. Communication connection
The RS-485 communication interface of this machine needs to be connected , and ordinary cable can be used for single-machine communication in the laboratory.
VIII. Error display and troubleshooting

- 1The Working Principle of Gel Conductivity Meter Has Been Detailed
- 2Detection Principle and Application Analysis of Conductivity Meter
- 3Principle of Conductivity Analyzer
- 4Several common electrode types for Conductivity Meters
- 5Differences between three STIP-scans: pH Meter, Conductivity Meter, and Dissolved Oxygen Meter
- 6Conductivity Meter and Ion Meter specific differences
- 7Common types and application differences of STIP-scan
- 8How to detect the conductivity of lithium battery coating slurry?
- 9How to choose a high-precision conductivity meter?