PosiTector CMM IS Concrete Hygrometer Instruction Manual
quick start
The PosiTector CMM IS probe is designed for use with the PosiTector App or the PosiTector Advanced Gage.
Power up the PosiTector CMM IS probe by unscrewing the battery cover and inserting the battery (positive "+" facing up). Replace the battery cover. The probe will start broadcasting and can now be seen by the PosiTector App and PosiTector Advanced instruments.
To turn off the PosiTector CMM IS probe, unscrew the battery cover and use a pointed tool such as a probe extraction tool to remove the battery.
View readings from PosiTector CMM IS probes
PosiTector CMM IS measurements can be viewed using the PosiTector App or the PosiTector Advanced instrument. To record measurements, see How to Measure.
Using the PosiTector App:
Install the PosiTector App from the App Store (Apple iOS) or Google Play (Android).
Open the PosiTector app. Available probes within 10 m (30 ft) will be displayed as "CMMIS" with the corresponding serial number as follows:
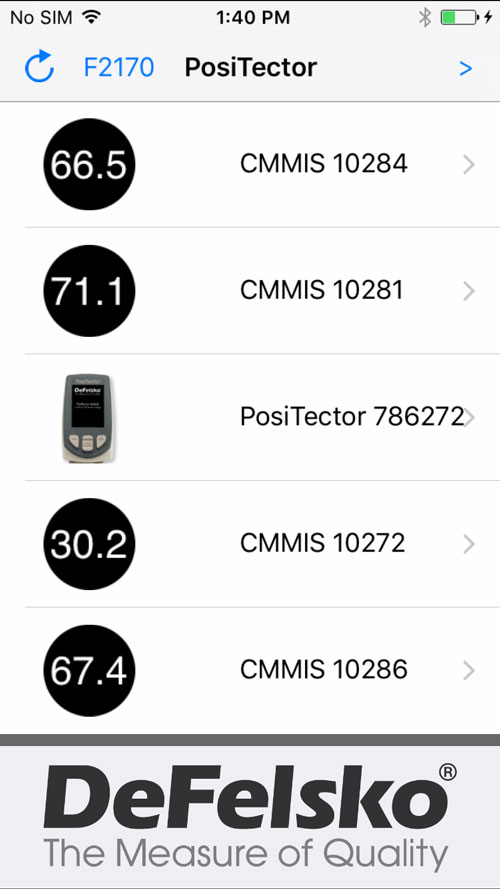
NOTE: The PosiTector App will also display any PosiTector Advanced instruments in range (shown above)
The small circle icon to the left of each PosiTector CMM IS probe shows the most recent relative humidity reading. This value is updated every five minutes.
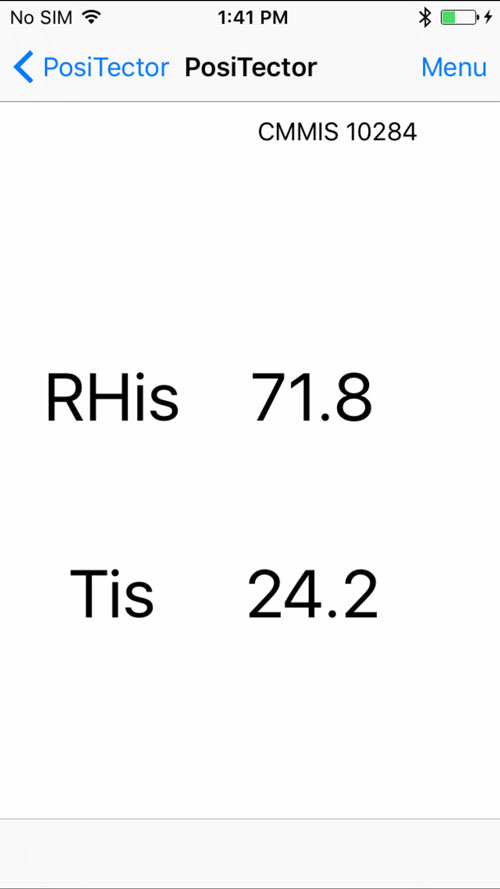
To view measurement results from a PosiTector CMM IS probe, select it from the search screen. Once connected, a blue light emits from the bottom of the probe, updating the value every five seconds and displaying it as shown on the right. The battery indicator light in the upper left corner shows the battery level of the PosiTector CMM IS probe.
Using PosiTector Advanced:
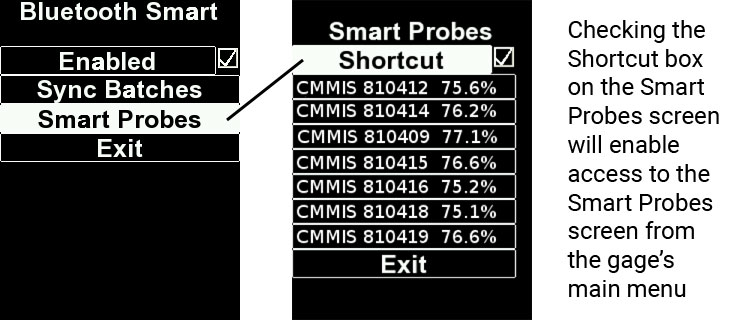
To see available probes, select Bluetooth Smart from the gage's Connections menu. Then select Smart Probes (shown below).
Available probes within 10 m (30 ft) will display as "CMMIS" with the corresponding serial number and new relative humidity reading as follows:
选择探针以显示其相对湿度和温度值。连接后,从探头底部发出蓝光,每五秒更新一次值。
注意:当PosiTector DPM环境探头连接到PosiTector主体时,PosiTector CMM IS测量数据可以记录到量具的存储器中。当连接任何其他探头时,例如PosiTector 6000探头,只能查看PosiTector CMM IS读数。
校准和准确度验证
校准
校准通常由制造商或合格的实验室执行。所有PosiTector CMM IS探头均包含校准证书。ASTM F2170,探头需要每年重新校准。DeFelsko建议从校准日期,购买日期或收货日期开始校准间隔。
验证准确性
建议PosiTector CMM IS探头在不使用时存放在校准检查室内。校准检查室和饱和盐溶液ASTM E104设计,以保持恒定的相对湿度。ASTM F2170,校准检查室和饱和盐溶液保持75%的恒定相对湿度(在25°C时)并使探头保持在即用状态。
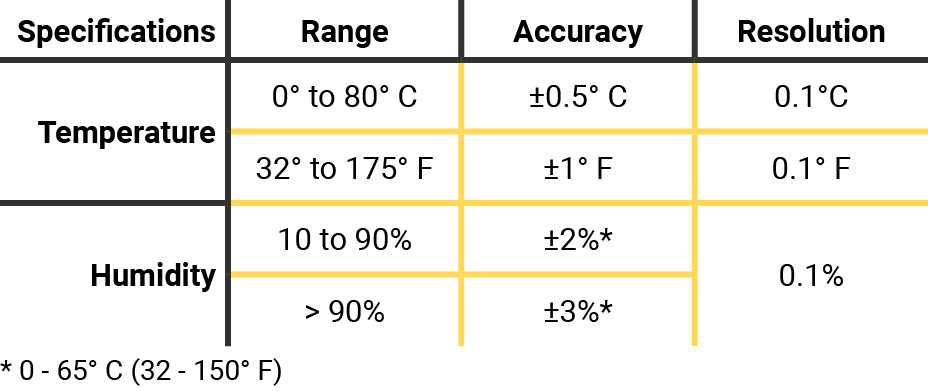
ASTM F2170要求在使用前30天内验证校准。通过插入电池正极(+)朝上来启动探头。通过将探头插入校准检查室,连接到PosiTector App或PosiTector Advanced测量仪主体并进行测量(在允许探头至少1小时以适应当前环境之后)来验证探头校准。探头应报告相对湿度在表1中列出的湿度值的2%范围内的相应温度。为简化验证过程,我们建议使用PosiTector App或PosiTector Advanced的校验功能。校准检查功能自动确定探头是否在公差范围内读数。
在校准检查之前,应允许探针在校准检查室和可溶性盐溶液中适应至少24小时。
在校准检查室内保持恒定温度非常重要。由校准检查室的温度波动引起的相对湿度变化如表1所示。
表1
从表A1.1中提取的选择饱和水盐的平衡相对湿度值(ASTM E104)
| t°C | t°F | 氯化钠(RH%) |
| 五 | 41 | 75.7±0.3 |
| 10 | 50 | 75.7±0.3 |
| 15 | 59 | 75.6±0.2 |
| 20 | 68 | 75.5±0.2 |
| 25 | 77 | 75.3±0.2 |
| 三十 | 86 | 75.1±0.2 |
| 35 | 95 | 74.9±0.2 |
| 40 | 104 | 74.7±0.2 |
| 45 | 113 | 74.5±0.2 |
公差计算示例:
在25℃时,可溶性盐溶液的相对湿度范围为75.3%±0.2。包括ASTM F2170中规定的±2%相对湿度公差,如果测量在73.1-77.5%之间,则认为探针处于公差范围内。
注意:当饱和盐溶液(Boveda)完全干燥时,它会凝固。它们应该在仍然存在水分并且在它们完全固化之前进行更换。
如何测量(ASTM F2170)
PosiTector CMM IS探头与PosiTector App或PosiTector DPM Advanced配合使用,可简化ASTM F2170的查看,记录和报告过程。
步骤1.评估位置以确定需要执行多少测试。
ASTM F2170指定3次测试需要针对第一百米进行2(1000英尺2的混凝土)和一个附加测试每个百米2(1000英尺2的混凝土)。需要在每个外墙3英尺(1米)范围内进行一次测试。
步骤1b(如果使用PosiTector应用程序)。该PosiTector应用程序可以很容易地查看,记录和报告符合ASTM F2170。该应用程序可在App Store(Apple iOS)和Google Play(Android)中使用。
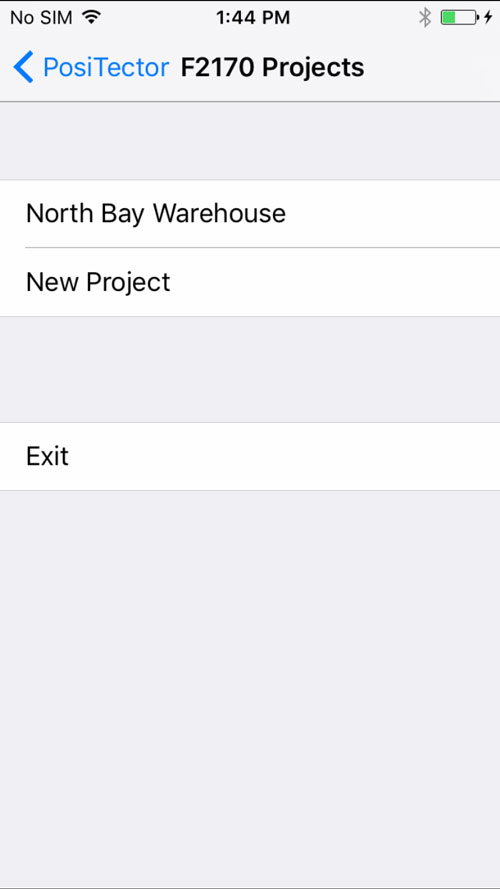
打开PosiTector App并从顶部菜单栏中选择F2170。接下来,选择New Project并输入作业详细信息。
甲PosiTector DPM高级仪器或备用PosiTector CMM IS探针可以被用作需要通过ASTM F2170以记录环境温度。在环境仪器下,选择可用的PosiTector CMM IS探头或从PosiTector DPM手动输入数据。要启用广播,请确保已启动PosiTector Advanced(已启用Bluetooth Smart)或已安装PosiTector CMM IS探针中的电池。
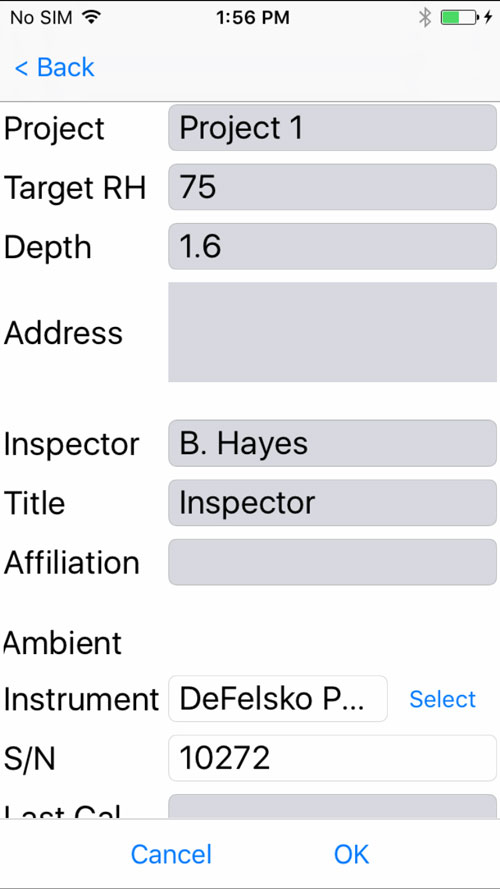
选择确定以保存项目。
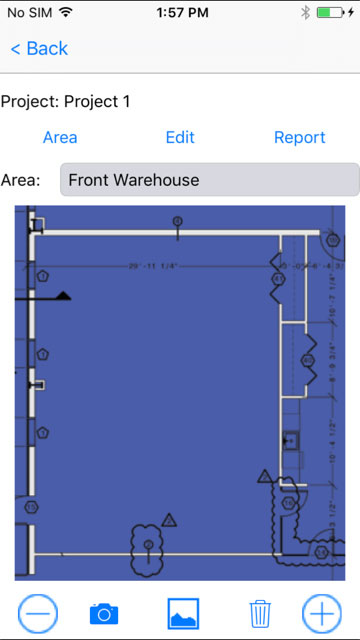
步骤1c(限PosiTector App)。如果需要,插入要测量区域的图片或蓝图。使用它 来拍摄蓝图的照片,或使用
 从照片库中插入图像。此背景图像可以轻松找到该区域内的每个探针。
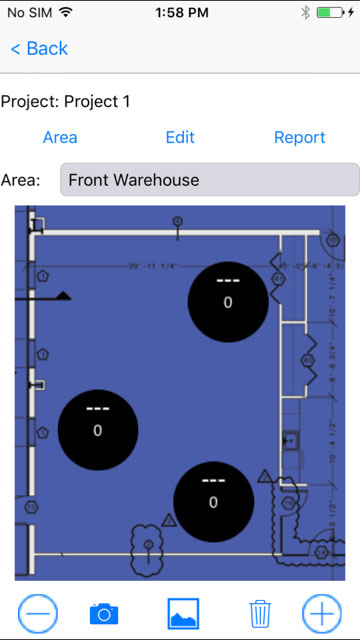
步骤1d(限PosiTector App)。按“ 项目”屏幕右下角的(+)图标,然后触摸所需位置的屏幕以放置孔。新的孔位置将叠加在图像上,并将被标识为包含---的圆圈。对区域内的每个测量位置重复此操作。According to需要创建其他区域。
第2步 - 钻孔
ASTM F2170规定了对孔深和直径的严格要求。使用带有硬质合金尖头砖石钻头(直径3/4“)的电锤钻,钻孔至所需深度。不要用水冷却或润滑。
ASTM F2170的孔深要求:
仅从一侧干燥的混凝土板:距板坯顶部40%的深度
混凝土板从两侧干燥:距板坯顶部20%深度
第3步 - 清洁并检查孔
确保从孔中除去任何灰尘和碎屑。Complete Kit和Pro Kit附带的真空附件非常适合此用途。它也可以从经销商处单独购买。
ASTM F2170,使用附带的卷尺检查孔的直径和深度。如果任一尺寸不正确,则需要重新钻孔并清洁孔。孔径不正确可能导致插入或移除PosiTector CMM IS探头时出现问题。
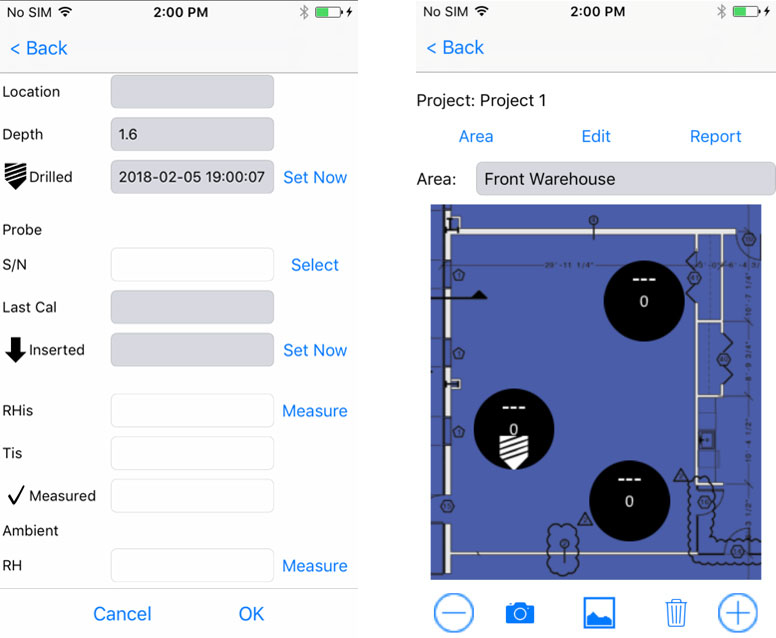
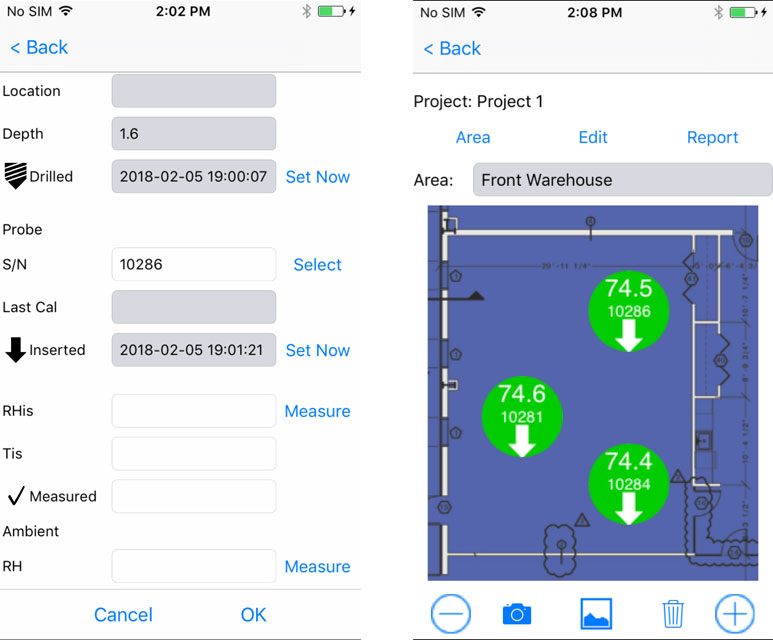
如果使用PosiTector App,请触摸与孔对应的圆,并记录钻孔的位置,深度和日期/时间。选择立即设置以输入当前时间和日期,或手动输入。
第4步 - 插入探针
PosiTector CMM IS探头设计成在孔准备好后立即放入孔中。从校准检查室和饱和盐溶液中取出探头,拧下电池盖并插入电池,(+)正极朝上。盖上盖子。
探头将立即开始通过蓝牙广播读数,并可从PosiTector App或PosiTector Advanced查看。
上电并运行后,将探头完全插入并推入孔底。用附带的黄色塑料盖盖住孔。ASTM F2170,探头需要在孔中保留72小时,以便在记录测量值之前达到水分平衡。
如果使用PosiTector App,请触摸与孔对应的圆,然后选择插入探针的序列号以将该探针与孔关联。
通过选择立即设置以自动设置当前时间和日期,或手动输入,记录插入每个探针的日期和时间。
注意:新电池将持续为探头供电长达3周。
第5步 - 记录测量
在记录探针测量之前,ASTM F2170需要等待72小时。无需取下黄色盖子或进入孔中的探针。探头保持通电并在原位进行广播。
使用PosiTector App记录测量结果:
打开PosiTector App并从顶部菜单栏中选择F2170。
打开关联的项目。
记录项目中每个孔的测量值:
要记录探针测量值,请触摸与孔对应的圆,然后触摸测量按钮以记录相应孔内的相对湿度和温度。
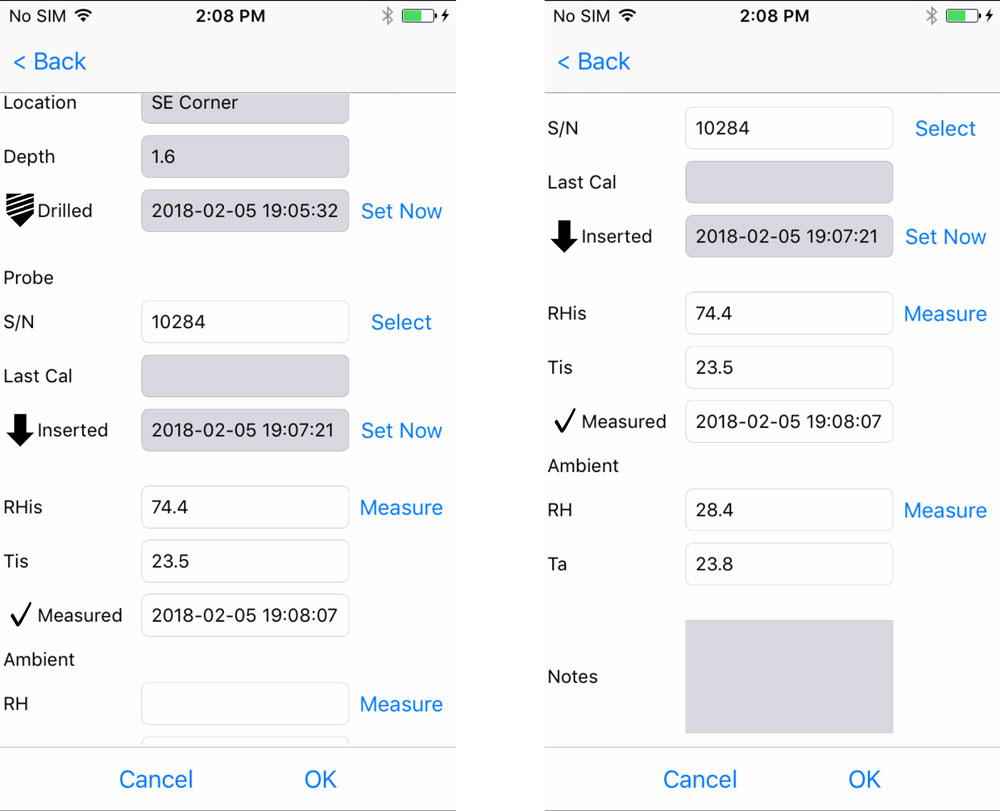
可使用备用PosiTector CMM IS探头或PosiTector DPM Advanced仪器记录环境相对湿度和空气温度(孔洞上方)。正在使用的环境仪器在项目设置中指定。选择Measure,然后单击确定以存储显示的值。或者,可以手动输入相对湿度和温度值。
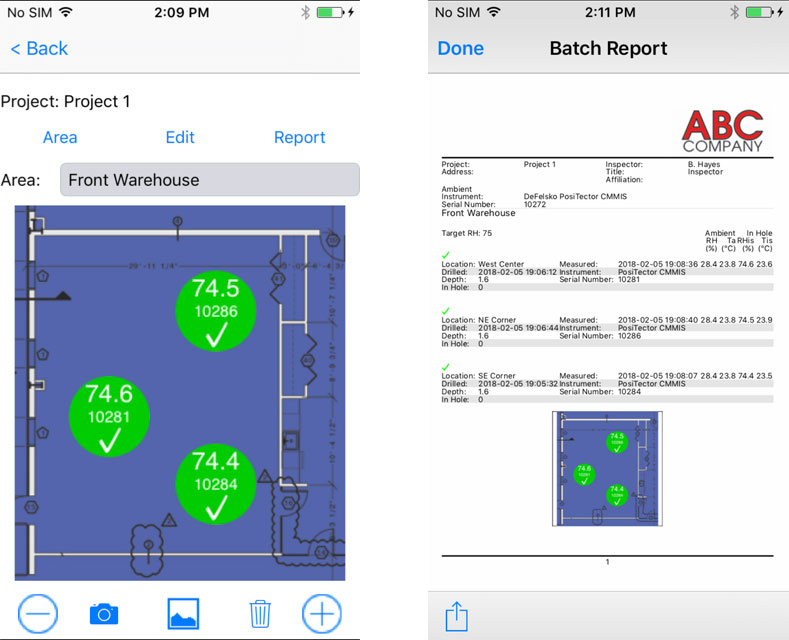
对项目中的每个孔重复步骤3。一旦记录了项目中所有孔的读数,就可以生成符合ASTM F2170的专业报告。从项目中选择REPORT以自动生成报告。
注意:帮助文件中提供了有关使用PosiTector App的更多详细说明,该文件位于www.defelsko.com/app-help
使用PosiTector DPM Advanced 记录测量值:
访问量具菜单中的“ 连接 ”菜单。
在Bluetooth Smart下,选择Smart Probes(如下所示)。可用PosiTector CMM IS探测器将是可见的。选择要录制的探测器。

PosiTector CMM IS探头测量的相对湿度和温度将显示在PosiTector DPM探头测量的环境相对湿度,空气温度和表面温度以下,如下所示:


要进行记录,请确保在内存中打开批次,然后按下量具上的(+)按钮。PosiTector DPM探头和PosiTector CMM IS探头的显示读数将记录到量具的存储器中。如果批次当前未打开,请从量具的“内存”菜单中选择“新建批次”。要将测量值添加到现有批次,请从量具的“ 内存”菜单中选择“ 打开 ” 。
通过对项目中的每个探头重复上述步骤,可以在同一批次中记录多个PosiTector CMM IS探头的测量结果。
注意:如果PosiTector Advanced主体连接到PosiTector CMM IS探头时,PosiTector DPM探头以外的任何探头都连接到PosiTector Advanced主体,则测量仪主体将忽略连接的探头并仅显示PosiTector CMM IS测量结果。
可以使用PosiSoft Solutions报告记录的测量值。有关详细信息,请参阅PosiTector DPM使用手册。
步骤6 - 移除PosiTector CMM IS探针
该PosiTector CMM IS探头被设计成可重复使用的。测量完成后,使用提取工具从孔中取出探针。清洁探头上的任何可见碎屑或混凝土灰尘,并检查硅胶翅片。如果硅树脂翅片损坏或磨损,应更换。如果不需要进一步测试,请拧下电池盖并使用探头拔出工具将电池推出,然后将每个探头放入校准检查室进行存放,以取出电池。
一旦测试完成,应ASTM F2170用水泥修补化合物填充孔。
故障排除
插入电池后,PosiTector CMM IS探头未出现在PosiTector App或PosiTector Advanced Gage Body中
检查探头中的电池并According to需要进行更换。确保在PosiTector主体中运行PosiTector App或Bluetooth Smart 的智能设备上启用了蓝牙。
RH Values Stabilize Slowly
If the probe is exposed to very low humidity for a period of time and then placed in a high humidity environment, the displayed relative humidity (RH) may appear to respond slowly. The probes were allowed to stabilize for at least 60 minutes with a greater than 50% RH change. Allow at least 24 hours for the relative humidity to stabilize when placed in a calibration check chamber.