Detailed explanation of the correct operation process of Richter Hardness instrument
How much do you know about the correct operation process of the Leeb hardness instrument? This article mainly introduces the operation process of the Leeb hardness instrument.
4.5 Setting the Average Times

For example: if you set the average number of times to 3, then the instrument will automatically display an average value of the 3 measurements after three consecutive measurements, accompanied by an AVE symbol indication on the display.
4.6 Measurement procedure
If necessary, the instrument can be inspected with a standard test block before the test. In general, the value of the standard hardness block is measured vertically downward for 5 times with a calibrated Leeb hardness meter, and the arithmetic mean value is taken as its hardness value. If the value exceeds the standard, you can use the user calibration function to calibrate.
4.6.1 Loading
Push the loading sleeve down to lock the impact body, then pinch the loading sleeve to return it slowly.
Note: Do not spring back the loading sleeve freely to avoid damage to the sensor.
4.6.2 Positioning
Press the support ring at the lower part of the impact device against the surface to be tested, and the distance between the two test points should be ≥ 3mm. NBCHAO reminds you: the support ring at the lower part of the impact device must be pressed tightly, and the impact direction should be perpendicular to the surface to be tested, otherwise, the test results will have errors.
4.6.3 Release
Test by pressing the release button on the top of the impact device. At this time, it is required that the workpiece under test, the impact device, and the operator are all stable, and the direction of the force should pass through the axis of the impact device. After each test, the hardness value of the test will be displayed on the display, and the number of stored measurements will be automatically increased by 1.
If the test value displays "E", it means that the conversion range is exceeded. The fact that one conversion hardness is out of range does not mean that the other hardness is also out of measurement range.
In any case, do not press the release button when the impact device is not firmly pressed against the sample surface, otherwise the support ring will easily loosen.
Each measurement area of the sample usually needs to be measured 3-5 times, and the data dispersion should not exceed ±15HL of the average value.
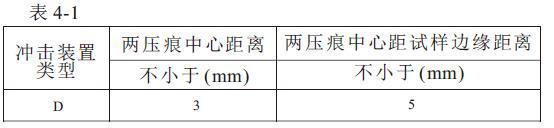
Refer to Table 4.1 for the distance between any two impact points or the distance between the center of any impact point and the edge of the sample
To accurately complete the conversion from the Leeb hardness value to other hardness units, please refer to the operating procedure in 4.4.
4.7 Data storage
In the measurement state, the symbol "M" is indicated on the display. All measured values will be automatically saved to the memory, and at the same time, the number of stored data will also be
Automatically increment by 1 and display on the screen. The instrument can store up to 250 sets, when the measured value exceeds 250 sets, the host will automatically delete the earlier data, that is to say, the instrument only retains the new 250 sets of data.
4.8 Browse stored data
4.11 Automatic shutdown
The instrument has an automatic shutdown function to save battery power. If there is neither measurement nor any key operation within 3 minutes, the instrument will automatically shut down
4.12 Replacing the battery
When the battery symbol appears on the screen, the battery needs to be replaced. Gently slide down the battery box, take out the battery, and then install a new battery according to the positive and negative poles of the battery, and close the battery cover.
The above is the description of the operation process of the Leeb Hardness Tester. For details, please refer to the "Leeb Hardness Tester Instruction Manual"

- 1Beijing Times TH132 Integrated Richter Hardness Instrument Operation Instructions
- 2Beijing Times TH130 Integrated Richter Hardness Instrument Operation Instructions
- 3Beijing Times TH134 Integrated Richter Hardness Instrument Operation Instructions
- 4HS series Shore digital display durometer instruction manual
- 5DHT-200 Leeb Hardness Tester operation manual
- 6DHT-300 Richter Hardness Instrument Operation Manual
- 7DHT-100 Leeb Hardness Tester manual instructions
- 8Discussion on the use and testing of Leeb Hardness Tester
朱绯红 - 《浅谈里氏硬度计应用和检测》
- 9Graphic analysis The development, correct selection and correct use of Leeb Hardness Tester
桑国旗 - 《里氏硬度计的发展及正确选型与正确使用》