Installation steps of SNB-AI Rotational Viscometer
SNB-AI intelligent digital viscometer adopts 16-bit microcomputer processor core control circuit, without gear drive, and has intelligent automatic measurement and manual measurement methods. The blue-screen LCD digital display directly displays viscosity, speed, temperature, percentage torque, rotor number and the maximum viscosity value of the selected rotor that can be measured at the current speed. The sample volume is small, just 10-20ml. Optional "Data Acquisition and Drawing Software" can perform multiple mathematical statistical analysis tasks such as data acquisition, data storage, and historical data comparison. The circuit adopts patch technology, with compact structure and reasonable layout. The measurement performance and functions of this series of products are close to the professional level of similar foreign products.
The instrument can measure the viscous resistance of the liquid and the dynamic viscosity of the liquid. Widely used in the viscosity measurement of various fluids such as oil, paint, food, paper, cosmetics, chemicals, coatings, capsules, etc. Equipped with a special temperature-controlled heater, it can be used to measure the apparent viscosity of asphalt, hot melt, paraffin, medicine, high polymer and other fluids.
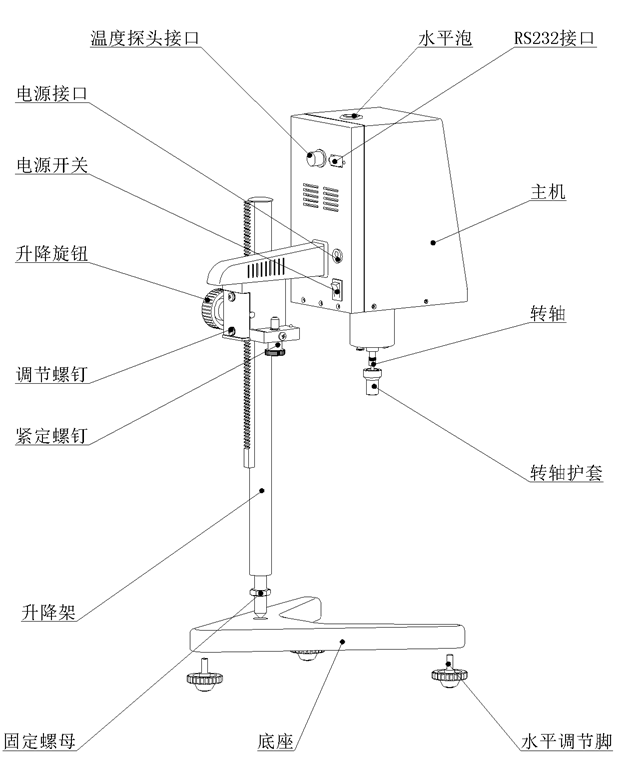
installation steps
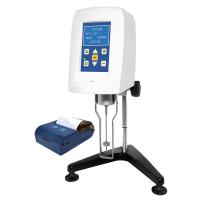
4.1 Take out the base, lifting frame and lifting mechanism, host, power adapter, etc. from the packing box.
4.2 Screw the lifting frame into the corresponding screw hole of the base according to the direction shown in Figure 1 and tighten the fixing nut with a wrench.
4.3 Turn the lifting knob. The lifting should be flexible and self-locking. If it is too loose or too tight, you can use a screwdriver to adjust the adjusting screw.
4.4 Install the main unit on the lifting frame and tighten the fixing screws at the same time, take off the rotating shaft sheath on the plastic shell under the main unit, when the instrument is not used for a long time or transported, be sure to cover the sheath back to the original place.
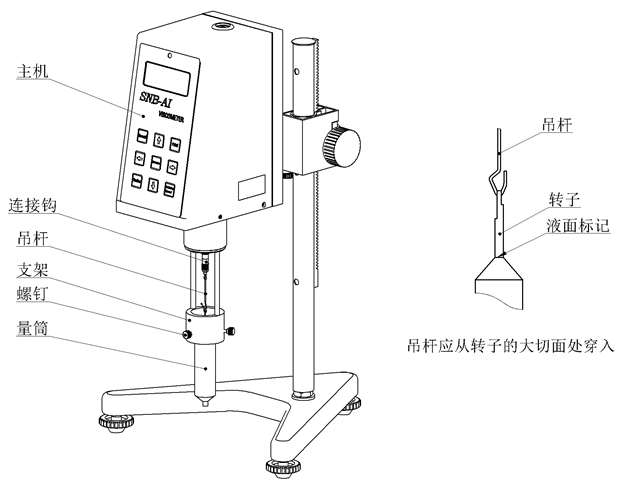
4.5 Take out the required rotors, connecting hooks, suspension rods, brackets, measuring cylinders, etc. from the rotor accessory box, as shown in Figure 2:
4.5.1 First install the bracket on the lower end of the host of the viscometer;
4.5.2 Connect the connecting hook with the boom, and then connect the large opening end of the boom with the rotor. In order to reduce the measurement error, the connection direction of the boom and the rotor should be as shown in Figure 2;
4.5.3 Connect the connecting hook with the rotating shaft of the main engine, first lift the rotating shaft upward with the left hand and pinch it tightly, then pinch the connecting hook with the right hand, (looking down) connect the two clockwise and tighten gently;
4.5.4 Pour 15-30ml of the liquid to be measured into the measuring cylinder, and then put the measuring cylinder into the bracket from bottom to top. When the liquid level reaches the scale surface of the rotor, tighten three screws to fix the measuring cylinder.
4.6 Adjust the leveling feet on the base so that the leveling bulb on the top of the main unit is in the center.
4.7 RTD temperature probe can be connected with the corresponding interface equipped at the same time. This temperature probe measures the ambient temperature of the sample.
4.8 Insert the output end of the special power adapter configured at random into the power jack on the rear side of the host, and insert the AC power plug at the other end into a (110-240V 50-60Hz) power outlet. Only after the above connections are correct can the power supply on the rear side of the host be turned on switch.
- 1Rotational viscometer - principle, classification, application and calibrating
- 2Application of NDJ-8S digital Rotational Viscometer in viscosity measurement of cosmetic raw materials
- 3NDJ-5S digital Rotational Viscometer accurate measurement of natural oil viscosity
- 4Application of HBDV-1H swirl/spin High Temperature Viscometer in Viscosity Determination of Plastic Particles
- 5Rotational viscometer selection guide: How to choose the right viscosity equipment for you?
- 6Principle, type and accuracy control of Rotational Viscometer
- 7Which Viscometer to Choose for Licorice Extract Viscosity Testing? How to Test?
- 8Application of Rotational viscometer in Waterborne Polyurethane Adhesive
- 9Application of Rotational Viscometer in cellulose material


