Determination of paper tearing - Ellemendorf method
This method uses a pendulum-type instrument to measure the internal tearing degree of paper. It is suitable for packaging paper with a tearing degree of more than 1000 mN (102 gf) and low-quantity cardboard with a tearing degree within the range of the instrument. It is not suitable for corrugated paper. cardboard.
1. Definition
(1) Internal tearing degree, the force required to tear pre-cut paper or cardboard to a certain length, expressed in mN (gf).
(2) The tear index is divided by the average inner tear degree by the quantitative value, expressed in mN m²/g.
2. Principle
A stack of specimens with specified pre-cuts, a tearing force is applied by a moving plane pendulum perpendicular to the specimen surface, so that the paper is torn a fixed distance, the work done in tearing the specimen is the loss of potential energy of the pendulum to measure. The average tearing force (the work done divided by the tearing distance is measured by the scale indication or number on the pendulum. The tearing degree of the paper is expressed by the average tearing force and the number of layers of the sample.
3. Instrument
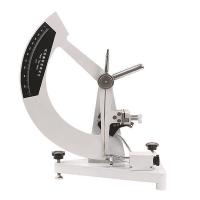
Elemendorfer single tear Tester, as shown in Figure 8-3.
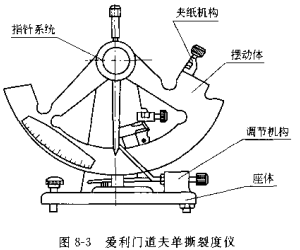
The instrument consists of a base frame and a suitable pendulum. The pendulum is supported on a bearing with little friction and can swing freely around a horizontal axis. The sample is clamped between two clamps, one of which is fixed on the base frame and the other is fixed on the base frame . A surface on which the specimen is clamped shall be at least 25 mm wide and 15 mm deep.
Before the tear test, the pendulum can be placed in the initial position where the two centers are horizontal and fixed with a manual stopper. At this time, the distance between the two clamps is (2.8±0.3) mm, and the two burners are on a straight line. The distance between the horizontal line of the upper edge of the clip surface and the center of the pendulum axis is (104 ± 1) mm, and the horizontal line is 27.5° ± 0.5° from the vertical to the plane in which the pendulum axis lies. The wood method is based on measuring the energy expended by the pendulum to tear the specimen. The measurement method is to use a sleeve with a pointer. The sleeve and the pendulum are installed on the same axis. The relative position of the pointer and the pendulum can be read from the fan-shaped dial of the pendulum. The friction resistance of the sleeve should be kept within the specified range. Inside. The pointer is blocked by an adjustable stop on the base, which can be used to adjust the position of the pointer so that it can read the work done when tearing the specimen. And when the sample is not torn, the scale reading is zero. This regulator approximately compensates for the friction of the pendulum and pointer.
Pre-cut the sample with a knife on the pivot, the length of the incision is 20 mm, and the distance to ensure that the sample is torn is (43 ± 0.5) mm. In order to expand the tearing range, it can be solved by changing the pendulum or adding a weight. But the conversion should be done according to the factor of the pendulum or weight used. The instrument has a scale or sensor digital display, both readings correspond to the degree of tearing of the design plies. The instrument with 16-layer scale uses 8 layers, and can also use 4, 16 or 32 layers, and the instrument with 4-layer scale uses 4 layers. Layers 2 and 8 can also be used; respectively multiply or divide the scale readings by the corresponding conversion coefficients. The resulting tear is expressed in mV.
4. Calibration
(1) Adjustment and maintenance of the instrument
① Check whether the pendulum shaft is bent.
② When placed in the initial position, the two clips are in a straight line, and whether the distance between the clips is (2.8±0.3) mm.
③ Check whether the knife is firmly fixed, whether the blade is sharp and not damaged, the blade should be in the middle of the two clips, and be at right angles to the top of the center.
④ Make sure that the pointer is not damaged and fastened to the sleeve.
⑤ level. Put the instrument on a firm table without vibration, adjust the front and rear levels of the instrument with the level bubble on the base of the instrument, and then press the stop of the pendulum to make the pendulum swing gently. After the pendulum is at rest, observe whether the marks on the upper and bottom plates of the pendulum coincide. If it does not coincide, use the screw on the left side of the base to raise or lower, and adjust until the marks coincide.
(2) Zero point adjustment
After adjusting the level of the instrument, swing it once without clamping the sample, and observe whether the pointer points to zero. If it does not point to zero, move the pointer stopper to adjust it.
(3) Friction of the pendulum
Make a reference mark 25 mm to the right from the edge of the pendulum on the stopper of the pendulum, place the fan-shaped pendulum at the starting position, and move the pointer so that it does not touch the pointer stopper when the pendulum swings. When the stopper of the lower pendulum is pressed to make the pendulum swing freely, the lightest pendulum shall not be less than 20 times; the light pendulum shall not be less than 25 times; the standard pendulum shall not be less than 35 times. When swinging to the left every time, the edge of the swing should be kept within the mark, otherwise the bearing needs to be cleaned and refueled.
(4) Friction of the pointer
Adjust the level of the instrument and the zero point of the pointer, place the pointer at the zero point of the scale, put down the empty pendulum, and the pointer must not be pushed out of the zero point less than 10 units of the lightest pendulum; 6 scale units for light pendulum; 3 scale units for standard pendulum. If the pointer friction is not within this range, clean or adjust the bearing surface and the position of the pointer sleeve thimble. After adjusting the friction of the pointer, the zero point needs to be re-calibrated.
(5) Tear length
Use 80~100 g/m² relatively stiff paper to cut a tear sample, sandwich it between two clips, cut a cut with a knife, remove the sample and measure the remaining part of the cut should be (43.0±0.5) mm, if the length No, adjust the position of the knife.
(6) Calibration of instrument scale
The calibration of the scale of the instrument is carried out with special weights. Install different weights on the screw holes of the fan-shaped pendulum, raise the pendulum to the initial position, and measure the work done by the weights as the pendulum rises.
Calibrate the reading Y of the scale scale by the following formula:
5. Experimental Preparation
① Sampling according to standard method
②Constant temperature and humidity treatment according to the standard method
③ Sample cutting. The size of the cut sample is (75 ± 2) mm long × (63 ± 0.5) mm wide, of which 63 mm is the tearing direction. It is required to cut the samples according to the longitudinal and transverse directions respectively. Do at least 5 valid trials in each direction.
6. Test
① Adjust the level of the instrument, the balance position of the pendulum, the zero point of the pointer, the friction of the pendulum, the friction of the pointer and the tear length.
② Put one half of the sample facing the knife and the other half facing the knife. The edge of the side of the sample should be neat, and the bottom edge should be completely in contact with the bottom. A neat knife edge allows the knife to return to its resting position.
③ Make the pointer contact with the pointer stopper, press down the stopper of the pendulum nimbly with your hands, and when the pendulum returns to the farthest position and is close to the starting position, stop the pendulum lightly so that the pointer is at the level of the operator's eyes , to read the reading indicated by the pointer, or to read the displayed value. When the scale is 0~~1000, the pointer reading is accurate to 5 units; when the scale is 0~100, it is accurate to 0.5 unit.
④ Loosen the clamp, remove the torn sample, return the pendulum and the pointer to the initial position, and prepare for the next measurement. If the end of the tearing line of the sample deviates more than 10 mm from the left and right extension line of the knife edge, when 1 or 2 samples deviate more than 10 mm in 10 tests, it is discarded, and a few more tests are performed. until 10 satisfactory results are obtained. If there are more than two samples deflected more than 10 mm, the results can be retained, and the deflection situation should be noted in the report. If the sample peels off during the tearing process, and the sample is not torn in the normal direction, it shall be handled according to the above-mentioned principle of tearing deflection. If the number of layers of paper sheets used in paper and cardboard is not satisfied, the number of layers can be increased or decreased appropriately, which should be explained in the report.
7. Calculation of results


- 1Paper tearing determination - Alimendorf method and instrument operation guide
- 2Tear Tester of paper strength
- 3Test method for tensile strength of fabrics
- 4What is tear strength? How to test fabric tear strength?
- 5Brech-Imset Double Tear Tester and Edge Tear Tester Test Method
- 6Test method and principle of LW tearing Tester
- 7Elmandorf single tearing meter test method
- 8What is tearing degree? What are the factors that affect tearing degree?
- 9Paper tear Tester operating instructions


