How to Use the Gurley Method to Determine the Air Permeability of Paper and Board
1 definition
Air permeability refers to the average air flow through the unit area of the sample per unit time under the action of unit pressure difference. Expressed in microns per Pascal second [l ml(m” Pa s)=1 pm: ( Pa- s)].
2 principle
The inner circle floating in the outer seal oil. Rely on its own quality to drop steadily to compress the air in the cylinder and chase it through the sample, so as to measure the time required for a certain volume of air to pass through the sample to obtain the air permeability. Obviously. The greater the resistance of air passing through the sample, the greater the penetration. The longer it takes to fix the air volume, the less air permeability it will have. Conversely, the greater the air permeability.
3 instruments
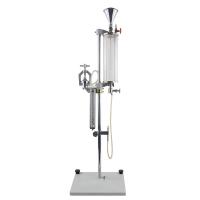
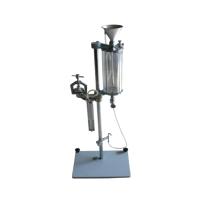
3.1 Gurley Tester
It consists of the following parts, and the schematic diagram is as follows.
(1) The test part consists of an outer circle and an inner circle. The height of the outer circle is 254 mm, and the inner diameter is 82.6 mm. There is a certain amount of sealing oil in the outer cylinder. At 38°C, the density is about 0.86 g/ml, and the dynamic viscosity is 10~13 mm²/s.
(equivalent to 60~70s Saybolt), and the flash point of the oil is not less than 135°C]. The height of the inner circle is 254 mm, the outer diameter is 76.2 mm, the inner diameter is 74.1 mm, and its mass is (567 ± 0.5) g. The scale of 50 ml unit is engraved on the inner slip, and the total capacity is 350 ml.
(2) The clamping device consists of upper and lower clamping rings and pads. The clamp ring is used to clamp the sample, and there is a hole in the middle, which communicates with the cylinder, and the outer diameter is 28.66 mm (the area is about 6.45 cm²). The gasket under the upper clamp ring is made of a thin, flexible, oil and oxidation resistant material with a smooth surface. The thickness of the liner is 0.70~1.00 mm, the inner diameter is (28.6±0.1) mm (area 6.42 cm), and the outer diameter is (34.9 ± 0.1) mm. The diameter of the liner matches the plate groove on the splint exactly. In order to protect the liner and align it during use, the liner should be tightly fitted into the board groove. This plate groove is concentric with the circular hole of its opposite clamping plate. The inner diameter of the plate groove is (28.41 ± 0.04) mm, and the depth is (0.45 ± 0.05) mm. In order to facilitate the insertion and tightness of the gasket, the outer diameter of the plate groove is taken as (35.2 ± 0.1) mm. There are four circular holes on the lower clamp ring, and it is placed on the pedestal of the instrument during the test.
3.2 Auxiliary equipment
Stopwatch or electric chronograph, accurate to 0.2s.
4 Instrument Calibration
Calibration of instrument tightness. Clamp a thin and smooth airtight metal or rubber sheet between the clamp rings, and test it according to the air permeability test method. If the gas leakage does not exceed 50 ml within 5 hours, it means that the sealing performance of the instrument meets the requirements. Otherwise, repeat the above inspection with a piece of soft rubber instead of the hard surface material. If no air leak is found at the splint, find another air leak and seal the leak with neoprene or other adhesives.
5 Experiment preparation
① Carry out sampling according to the standard method.
② Carry out humidity treatment according to the standard method.
③ Cut out samples of 50×50 mm, not less than 10 pieces.
④ Test under standard humidity conditions.
6 Experimental steps
①Adjust the instrument horizontally, make the circle easy to be vertical, and pour oil into the outer circle to a depth of about 120 mm, so as to reach the ring mark on the inner wall of the cylinder.
② Lift the inner circle and let its upper flange be supported by the bracket.
③ Place a 50mm×50mm sample between the clamp rings and clamp it tightly.
④Remove the bracket and put down the inner circle until it is suspended. When the inner cylinder moves down smoothly, start timing from zero, measure the first two 50 ml intervals (that is, the interval from 0 to 100 ml), and the time required for passing the edge of the outer cylinder in seconds, accurate to 0.2 s.
⑤ For paper or cardboard that is difficult to breathe, the reading can be taken at the first 50 ml interval. For loose or porous paper, larger air volumes can be counted. If the smooth movement of the inner cylinder cannot be achieved before the zero point, the timing can be started from the 50 ml scale.
NOTE: Vibration of the instrument should be avoided as this will increase the filtration rate of the air.
⑥ During the experiment, 5 cards should be face up and 5 cards should be face up.
7 test results
Calculate the air permeability corresponding to each measured time according to the following formula. Take two significant figures:
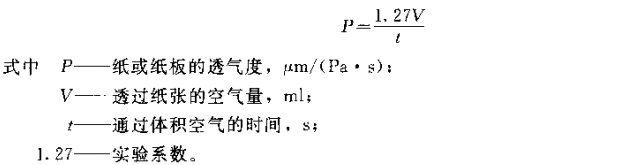
Note: 1. The above formulas are calculated based on the average pressure difference of 1.23 kPa and the test area of 6.42cm².
2. Because the relationship between P and t is nonlinear, the average value of P cannot be calculated by the average value of t.
If it is necessary to calculate the standard deviation and coefficient of variation, the Р value should be calculated one by one according to the above formula and then calculated.
If the average air resistance t (s/100 ml) through the paper sheet has obvious differences in two directions and needs to be expressed in the report, 10 tests should be carried out in each direction, and the results should be reported separately. result.
-
![PNSHAR PN-ZQX1000 paper Porosity Tester]()
-
![YANTE YT-TQD1000 paper Porosity Tester]() YANTE YT-TQD1000 paper Porosity Tester$ 1100.00
YANTE YT-TQD1000 paper Porosity Tester$ 1100.00