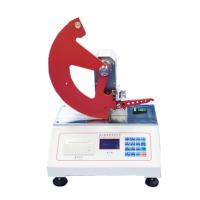
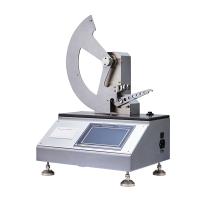
Paper tear Tester operating instructions
Use steps and precautions
4.1 Unpacking and installation
4.1.1 Remove the upper cover of the testing machine packing box, and take out the accompanying technical documents and accessories.
4.1.2 Remove the surrounding box panels and take out the testing machine.
4.1.3 Remove the packaging and binding materials of each part, wipe off the oil and dust, and place the testing machine on a flat and stable workbench.
4.2 Test machine
4.2.1 Turn on the power, turn on the power switch, and preheat for 30 minutes.
4.2.2 Check the functions of each operation button according to the introduction in Article 3.2 of this manual. If there is no abnormality, it can be delivered for use.
Note: Before testing every day, please warm up for 10 minutes; it is strongly recommended to connect the protective ground wire to the earth; if data loss occurs in the product, please turn off the power immediately and restart it.
4.3 Parameter setting
4.3.1 Startup
Turn on the power, turn on the power switch, the product enters the system, automatic self-test, press the "test" key or "1 key" to enter the test interface.
4.3.2 Gear setting
Press the [Gear] key on the panel to enter the gear parameter setting, select the required gear through the up and down keys on the panel, and then press the [Test] key to save the input and exit, or press the [Return] key to give up the operation and exit. ((A file does not hang weights, B file hangs B weights, and C file is a spare file)
4.3.3 Quantitative settings
Press the [Quant] key on the panel to enter the quantitative parameter setting, set the gram weight of the single sample to be tested through the 0~9 number keys on the panel, and then press the [Test] key to save the input and exit, or press the [Back] key to give up the operation and exit.
4.3.4 Layers setting
Press the [Layers] key on the panel to enter the parameter setting of the number of layers, set the number of layers of the tested sample through the number keys 0~9 on the panel, and then press the [Test] key to save the input and exit, or press the [Return] key to give up the operation and exit.
4.3.5 Direction setting
Press the [direction] key on the panel to enter the direction parameter setting, select "horizontal" or "vertical" through the up and down keys on the panel, and then press the [test] key to save the input and exit, or press the [return] key to give up the operation and exit.
4.3.6 Data deletion
Press the [Delete] key on the panel to enter data deletion, and set the number of groups to be deleted through the number keys 0~9 on the panel (the system can only save 20 groups of data, please do not enter more than 20 data when deleting, otherwise the deletion will be invalid) or Input "00" to delete all the data, then press [TEST] key to save the input and exit, or press [RETURN] key to give up the operation and exit.
4.3.7 Date setting
Press the [Date] key on the panel to enter the date and time parameter setting, select the set interval through the "Test" key on the panel, set the correct time and date to be modified through the 0~9 numbers on the panel, and press "Test" Press key to confirm to save input and exit, or press 【Test】key to give up operation and exit.
4.3.8 Settings
Press the [Setting] key on the panel to enter some parameter settings, the password is "11111", move the cursor to select the set option by pressing the up and down keys on the panel, press [Test] to enter the setting, and press the "Test" key to confirm and save the input after setting and exit, or press the [Back] key to give up the operation and exit.
Note: In addition to [unit selection], which needs to be converted according to the test needs, the data of other options are different according to the batch number of the factory instrument, and it is forbidden to change. The manufacturer has calibrated the data before leaving the factory, so there is no need to set it again, so as not to cause inaccurate instrument data. Correct, the above data are for reference only, not standard values.
4.3.9 Sample test
Push the pendulum back to the initial position, press the [Stop] button to lock the pendulum; load the sample, and tighten the two clamps (the standard sample size is 63*50mm); press the tool handle to cut out the tear; press Press the [Test] button, when the test interface is displayed, the instrument will automatically release the pendulum to tear the sample in 1 second; when the sample measurement is completed, the instrument window will display the values of tear degree F, tear index X, and angle Angle; repeat the above measurement steps , can measure other samples in the same group, and can store up to 20 measurement data. The value of the test angle should be kept at (100°~135°), if it is not at this value, it can be achieved by increasing the number of layers of the sample.
4.3.10 Data view
In the pre-work interface, press the [View] key to view and inquire the data measured before, continue to press the [View] key or [Test] key to view other data and exit. Press the [Print] key on the test interface to print the current test results (the results can be automatically counted as "maximum value, minimum value, average value, and standard deviation, coefficient of variation, etc. will be displayed after a few seconds).
F: indicates the force value; X: indicates the tear index
Xmax: maximum tear index;
Xmin: Minimum tear index;
Xavg: average tear index
FS: tear strength
Instrument Calibration
5.1 Torque Calibration Note: The torque data is the factory data, please do not modify it at will! !
5.2 Friction angle calibration
After selecting the corresponding gear through [Gear], (for example, A gear), press the [Calibration] key, enter the password 11111 to enter the calibration interface, enter the zero angle calibration interface, operate according to the prompts, and press the "Test" key to confirm. Push the pendulum back to the initial position, (press the [Stop] key to lock the state of the single pendulum.) Press the "Test" key without clamping the sample, and the screen will display, "Release the test arm" , release the pendulum automatically in 1 second, measure the swing angle, press the [test] key to save the data. (The same gear can be calibrated multiple times until the satisfactory value is obtained, which is the corresponding gear. Press the test button without clamping the sample and release the pendulum. The closer the result is to 0, the better.)
Note: The friction angle calibration is the horizontal position correction when the instrument moves to different places! ! (The outside spirit level is roughly level, and the instrument does not know it, so it is necessary to calibrate the horizontal position. The reference angle of A file: 136.5~138 degrees, and 138~139.5 degrees for B file, and the calibration angle of A file and B file cannot >= 140°) 5.3 Weight verification (Function set by the manufacturer, used to adjust the instrument, if you need to adjust, please contact the manufacturer first.)
In the [Setting] interface, select [Weight Verification] to enter the weight verification interface, install the standard block, enter the weight of the standard block and press the [Test] key to enter; push the pendulum back to the initial position, and lock the pendulum , without clamping the sample, press the [Test] key, press the [Release] key to release the pendulum, and compare the measured value F and theoretical value F' of energy consumption. (The test result does not exceed 1% of the displayed value)
Instrument placement and precautions
The testing machine should be placed on a solid platform, placed horizontally, stably without swinging
When installing and testing for the first time, please adjust the instrument to four-point contact with the working platform through the four adjusting nuts at the bottom of the instrument;
Adjust the foot screw to center the horizontal bubble;
It is recommended to leave a certain space on the right side and the rear when placing it, so as to facilitate the lead-out of wires;
There is no vibration, no dust, no corrosive medium and no strong electromagnetic field interference source around;
After the power switch is turned off, the interval between turning on the power again should be more than 10 seconds to avoid abnormal phenomena;
If there is any abnormality during the test, please shut down immediately and ask the electrical engineer of the equipment department to deal with it or contact us.
maintenance
The operator should be familiar with the instruction manual, strictly abide by the operating procedures, and do the following maintenance work:
1. Always keep the testing machine clean, and cover it to prevent dust when it is not used for a long time.
2. When the testing machine breaks down, please ask professionals to check and eliminate it, and do not run it with a disease.
3. A small amount of lubricating oil should be added to the transmission screw part of the testing machine from time to time.
4. Adhere to periodic verification and maintain the excellent technical condition of the testing machine. The verification cycle is generally one year.

- 1Paper tearing determination - Alimendorf method and instrument operation guide
- 2Tear Tester of paper strength
- 3Test method for tensile strength of fabrics
- 4What is tear strength? How to test fabric tear strength?
- 5Brech-Imset Double Tear Tester and Edge Tear Tester Test Method
- 6Test method and principle of LW tearing Tester
- 7Elmandorf single tearing meter test method
- 8What is tearing degree? What are the factors that affect tearing degree?
- 9What are the common mechanical performance indicators of paper?


