Measuring the smoothness of paper during printing by water trace method
The air leakage method, the optical contact method, and the needle drawing method can only measure the original smoothness of the paper before printing, and cannot reflect the smoothness of the paper during the embossing process. The Netherlands Institute of Printing Technology (IGT) proposed the Method for measuring the smoothness of paper during printing on a printability Tester.
(1 ) Test principle
The water mark method uses the IGT printability Tester to test the roughness of the paper. The test principle of the IGT printability Tester is to simulate the circular printing state of paper, and carry out embossing under certain printing speed, printing pressure and pad conditions, so that the geometric state of the paper surface is consistent with the actual circular printing state. Closely, the test results characterize the average roughness of the paper during embossing, and the volume of the cavity per unit area can also be used to calibrate the printing smoothness. Due to the elastic-plastic characteristics of the paper itself, the deformation of the convex part under the printing pressure changes with the printing pressure and size. Therefore, the measured smoothness of the same paper is different under different printing pressures. As shown in Figure 2-12, the looser the paper, the more significant the difference. This shows that the watermark method used to measure the smoothness of paper during printing is close to the actual state of printing.
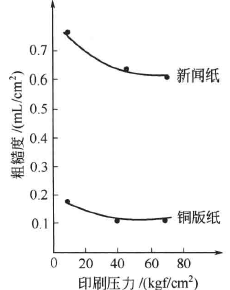
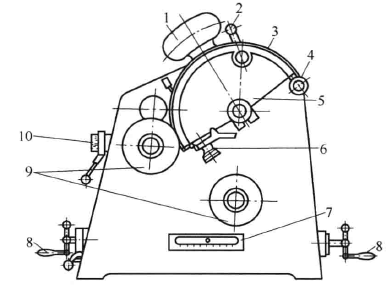
Figure 2-12 Printing pressure and paper printing smoothness Figure 2-13 Principle of printing suitability Tester
1-weight hammer; 2-detent; 3-pad; 4-tension rod; 5-sector plate; 6-pad clip; 7-scale scale; 8-handle; 9-printing plate; 10-knob
(2) IGT printability Tester
Structure and working principle Figure 2-13 is the principle of IGT printing suitability Tester, which is equivalent to a small printing machine, simulating the printing state of circular pressing. The printing plate is similar to the plate cylinder and can be removed from the shaft to allow even inking on the attachment device (ie ink distributor). The fan-shaped disk is equivalent to the impression cylinder, and the printed sample is clamped with a clip and wound on the fan-shaped disk, and an appropriate pad can be arranged between the fan-shaped disk and the printed sample. The printing pressure between the printing disc and the sector disc is adjusted by rotating the handle and read on the scale. The fan-shaped disk is coaxially connected with the heavy hammer, and the method of dropping the heavy hammer is used to accelerate the rotation of the fan-shaped disk. Therefore, in the process of printing a paper pattern, the printing speed is increasing, and its instantaneous printing speed can be checked from the speed table. If you turn the weight by hand, you can also achieve uniform rotation. A1C2-5E type IGT printing suitability Tester has improved the adjustment of printing speed. It can be used for both accelerated motion and constant speed motion, and has an instrument to display the printing speed value.
② Calibration procedure
a. Proofread the printing pressure, the error between the reading of the dynamometer and the reading on the indicator of the pressurizing device of the instrument should not exceed 5%. If the error is too large, the pressure spring should be adjusted to change the gap between the printing disc and the sector disc.
b. Proofreading printing speed ﹑ correction with stroboscopic speedometer. If the measured maximum speed does not match the speed specified by the instrument, it should be corrected, namely:

(3) Test method
The specific steps of using the water trace method to test the roughness of paper are to cut two strip paper samples, and install the same paper surface (that is, the side to be tested for smoothness) on the clamps of the testing machine facing each other. The surface of a lead disc wound on a 2 cm wide and mounted on the small axis of the printed disc. The other is wound on a fan-shaped disk covered with a blanket. Before starting the testing machine, drop 3mL of distilled water between the two paper samples with a precise quantitative dropper. After embossing, the water droplets will spread on the surface of the tested paper, filling the unevenness of the paper surface, forming an oval water mark, and the area of the water mark is measured by a planimeter. Since the time interval between water addition and embossing is very short, the water has no time to penetrate into the paper, so the average volume of the cavities per unit area of the paper surface can be calculated from the measured water mark area, and the unit is mL/cm2. For high-smooth paper, the water mark that may be formed is too large, and 1.5mL of distilled water can be used for testing. For particularly rough paper, the amount of water can be increased appropriately. In order to ensure that the water does not soak into the inside of the paper at all during the short period from dripping to embossing, the tested paper sample can be coated with wax before embossing, and then drip embossing after the wax dries. According to literature reports, experiments were carried out at different printing speeds, and the area of water marks did not change much. Therefore, it can be considered that there is little or no moisture infiltration into the interior of the paper before embossing. As for the amount of water immersed in the paper after the water mark is formed, it does not affect the measurement value of the water mark area.
-
![YINUO YN-ZSY-4 offset plate inks spot color Proofer inks color display instrument, offset printing four-color offset plate printing two-color optional]()
-
![PUYUN PY-E626 offset plate inks spot color Proofer (four colors)]()
-
![JINPUTE JPT-8 Ink Proofer inks color scheme to get the manuscript ready printing plate width 80mm]()
-
![CHINA BLD-PH10 Smoothness Meter]() CHINA BLD-PH10 Smoothness Meter$ 1695.00
CHINA BLD-PH10 Smoothness Meter$ 1695.00 -
![CHINA single printing gravure plate Proofer (servo) NBC-120 dot printing gravure plate Proofer electric model]()
-
![YINUO YN-ZSY-1 gravure printing spot color proofer gravure plate Water-based ink measurement]()


- 1Influence of smoothness on paper printing and its solution
- 2What is the smoothness of paper?
- 3What is pulsed jet printing and what are the advantages and disadvantages?
- 4What is inkjet printing?
- 5What are the printing substrates and printing inks?
- 6How are printing plates made?
- 7What is screen printing?
- 8How to test the surface roughness of paper by needle tracing method?
- 9Gurley triad test paper test paper smoothness
