Test method and principle of LW tearing Tester
(1) LW Tear Tester
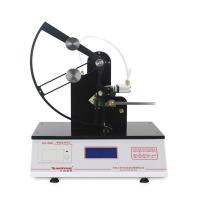
The LW tear Tester manufactured by Sweden L&.W Company is equipped with a sample cutter device and pendulums of three specifications. The pendulum factors are 2, 4, and 8, respectively, as shown in Figure 2-57. During the test, one side of the sample is clamped on the pendulum sample holder, and the other side is placed on the fixed clip and clamped. When the pendulum fell, the specimen was torn. In order to ensure a good test accuracy, the test result should fall within the range of 20%~40% of the full scale of the dial. If necessary, several samples can be stacked before testing. Before the tear test, the sample was cut a notch, if it is found that the tear direction deviates from the notch direction by more than 6.3mm during the test, the test result should be discarded.
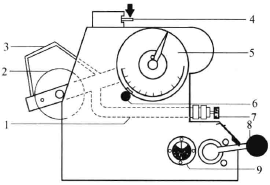
Figure 2-57LW Tear Tester
1- pendulum; 2- pendulum; 3- pendulum clamp; 4- release lever; 5- dial; 6- adjustment handle; 7- clamping device; 8- cutter handle; 9- adjustment window
The tearing degree of the sample is:
Te=KT
In the formula Te - tearing degree, mN;
T——the average value of the upper scale of the pendulum read during the experiment; mN;
K—— pendulum factor, which are 2, 4, and 8 respectively.
In order to eliminate the influence of paper or cardboard weight on the tear degree, the tear degree can be expressed by the tear degree index, namely:
F=Te/G
In the formula, F——tear index, mN m²/g;
G——quantitative quantity of sample, g/m²
In addition, the tear factor 100Te/G can be converted into a tear index when the weight is 100g/m².
(2) Test method
①Sample collection and processing ﹑Sampling according to GB 450, cut 8 pieces of samples with a length of (62±0.2) mm and a width of (50±2) mm along the longitudinal and transverse directions of the paper. According to the requirements of GB 10739, carry out temperature and humidity pretreatment on the samples.
②Choose a suitable pendulum so that the measured value falls within the range of 20% to 40% of the full scale of the dial.
③Adjust the instrument (see ⑨ for details).
④ Clamp the sample in the sample holder.
⑤ To adjust the instrument to zero, turn the pointer knob counterclockwise to the limiter.
⑥Press down the cutter handle, cut the sample and lift the cutter handle to reset it.
⑦Press down the pendulum release lever to make the pendulum drop and tear the sample apart. During the swing back process, immediately grasp the pendulum clamp and lift it to the locked position.
⑧ Read the measured value and record the pendulum factor.
⑨When the sample is not clamped, press ⑤ and ⑦ to adjust the instrument, and the measurement result should be zero at this time.
The test results are expressed as the tear degree and tear index by the arithmetic mean value of all measured values, taking three significant figures.
-
![JINGWEN JW111J Mechanical tear Tester according to GB455.1]()
-
![Yongxin ZSE-1000 paper Tear Tester 8000mN]()
-
![Yongxin ZSE-1000 Light swing paper Tear Tester 500mN]()
-
![Yongxin ZSE-1000 Standard paper Tear Tester 1000mN]()
-
![JINGWEN JW-111J Tear Tester paper Tester]()
-
![YINUO YN-SLY16 Microcomputer Tear Degree Tester 0-1000mN/63 * 50mm]()
-
![Puyun PY-H610 Tear Degree Tester]() Puyun PY-H610 Tear Degree Tester$ 2076.00
Puyun PY-H610 Tear Degree Tester$ 2076.00 -
![SUMSPRING SLD-1000Z Tear Tester, Elmendorf Method]()
-
![SUMSPRING SLD-1000 paper Tear Tester]()


- 1Paper tearing determination - Alimendorf method and instrument operation guide
- 2Tear Tester of paper strength
- 3Test method for tensile strength of fabrics
- 4What is tear strength? How to test fabric tear strength?
- 5Brech-Imset Double Tear Tester and Edge Tear Tester Test Method
- 6Elmandorf single tearing meter test method
- 7What is tearing degree? What are the factors that affect tearing degree?
- 8Paper tear Tester operating instructions
- 9What are the common mechanical performance indicators of paper?
