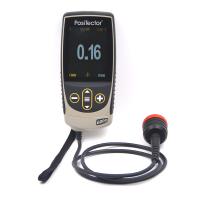
PHYNIX Surfix Easy x I-FN HR dual-use Film Thickness Gauge 3000 μm
SE
PHYNIX Easy x I-FN HR Coating Thickness GaugeSPEC
PHYNIX Easy x I-FN HR Coating Thickness GaugeDetails
PHYNIX Easy x I-FN HR Coating Thickness GaugePacking list
- SKU
- NB027716
- Measurement principle
- Magnetic Induction + eddy Current
- Measurement range
- 10~3000μm
- margin of error
- ±2μm/2%
- Resolution
- 0.1μm
- Minimum measurement surface
- 10x10mm
- Minimum radius of curvature
- Convex: 5mm; Concave "50mm
- thinnest substrate
- 0.5mm(F);0.05mm(N)
- probe
- built-in
- Probe material
- Carbide cutter head
- Calibrated mode
- Factory zero calibrated
- Unit display
- μm
- statistical function
- Measurement times, MAX Maximum, MIN Minimum, Average, Standard deviation
- Power Supply
- 2 AAA batteries
- Standards
- DIN、ISO、ASTM、BS
- Display screen
- Backlight, 4 alphanumeric, height 8mm
- Operating temperature
- 0℃~+50℃
- Protection level
- IP52
- supporting software
- Yes.
- Machine Weight
- 90G (including battery)
- Machine size
- 110*50*25mm
- Probe contact temperature
- -15~60℃

Introduction
The PHYNIX Surfix Easy x I-FN HR dual-purpose paint Film Thickness Gauge is a dual-function coating Thickness Gauge that can measure thickness up to 3000 microns. It is a portable Thickness Gauge with a built-in probe.
The universal coating Thickness Gauges of the Surfix®easy X series are suitable for daily operation as well as demanding laboratory measurements. The Surfix®easy
One-touch calibration function can be used to perform difficult measurement tasks. Using this calibration feature (also called "zeroing"), you can improve measurement accuracy. Built-in online statistics quickly display mean and standard deviation as well as maximum and minimum measurements.
Surfix®easy X is available as Surfix®easy XI with integrated probe and Surfix®easy XE with external, securely connected probe. Both models are available as combination device FN for measuring coating thickness on iron/steel and non-ferrous metals, or as model F for measuring coating thickness on iron/steel only. Two validated thickness measurement methods are used: the magnetic method and the eddy current method (DIN EN ISO 2178 and 2360). Both provide the highest precision even in the case of thin coatings, whether on steel or non-ferrous metals. The FN type uses two methods. When you place the probe on the measurement object, the selection is completed automatically.

Application areas
All probes of the Surfix®easy X series are designed with V-grooves, allowing stable vertical positioning on horizontal, cylindrical or curved surfaces. Applicable to the following areas:
In the paint store
For paint coatings and powder coating technology
For use in car evaluations and car workshops
In steel construction, automobile manufacturing and shipbuilding industries
In the receiving area
during production
Final inspection and quality assurance
In the laboratory
Product advantages
Calibration-free measurement: just turn on and measure
Backlit display is easy to read even in dark environments
"Zero" (single point calibration) enables precise measurements on flat, rough and curved surfaces
Measurement of steel/non-ferrous metals with automatic identification of base materials
Online statistics (number, average, standard deviation, minimum value, maximum value)
Large landing area to ensure safe positioning
Acoustic signal while recording readings
Switchabel unit µm / mils
Manufacturer's test certificate
2 years warranty
Parameter comparison of PHYNIX coating Thickness Gauge series
 |  |  |  |  | |
| Surfix Pro X | Surfix SX | Surfix EX | Pocket-Surfix X | Surfix easy X HR | |
| model | Split, replaceable probe | Split, replaceable probe | External fixed probe | Built-in probe | Built-in or external, fixed probe |
| Measuring range iron base | 30mm | 30mm | 1.5mm | 1.5mm | 3mm |
| Measuring range non-iron based | 3mm | 3mm | 1.5mm | 1.5mm | 3mm |
| Accuracy | ±(0.7μm+1% of reading) | ±(0.7μm+1% of reading) | ±(1μm+1% of reading) | ±(1μm+1% of reading) | 2μm or 2% reading |
| Hard metal probe | â | â | â | â | â |
| Factory calibration | â | â | â | â | â |
| Calibration method | Two-diaphragm calibration, single-diaphragm calibration, zero calibration, CTC | Single diaphragm calibration, zero calibration | Single diaphragm calibration, zero calibration | Single diaphragm calibration, zero calibration | zero calibration |
| Diaphragm calibration | â | â | â | â | - |
| Calibration storage | â | - | - | - | - |
| statistics | â | â | â | â | â |
| zero compensation | â | â | â | â | - |
| Boundary value | â | â | â | â | - |
| data storage | Up to 100,000 readings | Up to 2000 readings | Up to 2000 readings | Up to 80 readings | - |
| data transmission | Bluetooth/USB | USB | USB | USB | - |
| menu | â | â | â | â | - |
| Backlight display | â | â | â | â | â |
| continuous measurement | â | - | - | - | - |
| Solvent resistant probe | â | â | â | â | â |
| maximum surface temperature | 300℃ | 300℃ | 300℃ | 60℃ | 60℃ |
| Optional probe | â | â | - | - | - |
| Includes PC software | â | â | â | â | - |
- 1Measurement principle of commonly used coating Thickness Gauge
- 2Principle, Application and Type Selection of Electronic Coating Thickness Gauge
- 1GB/T 44757-2024《Anodizing coating on titanium and titanium alloys》
- 2QJ 990.3A-2011《Inspection methods of coating.Part 3:Measurement of coating thickness》
- 3NF EN ISO 2808-2007《Paints and varnishes - Determination of film thickness.》
- 4JJG 818-2018《Magnetic and Eddy Current M easuring I nstrument for Coating Thickness》
- 5GB/T 1727-2021《General methods for preparation of coating films》
- 6HG/T 20720-2020《Construction and acceptance specification of waterborne anti-corrosion coatings for steel structures in industrial buildings》
- 7HG/T 5367.1-2018《Coatings for rail transit vehicles - Part 1: Waterborne coatings》
- 8ASTM B244-2021《Standard Test Method for Measurement of Thickness of Anodic Coatings on Aluminum and of Other Nonconductive Coatings on Nonmagnetic Basis Metals with Eddy-Current Instruments》
- 9ASTM B499-2021《Standard Test Method for Measurement of Coating Thicknesses by the Magnetic Method: Nonmagnetic Coatings on Magnetic Basis Metals》
- 10 B530-2014《》
 Easy x I-FN HR

