

-
 QFH Cross Hatch Cutter 1/2/3 mm Tooth QFH Cross Hatch Cutter 6 Tooth$ 188.00SE
 -
 QFH Cross Hatch Cutter 1/2/3 mm Tooth QFH Cross Hatch Cutter 11 Tooth$ 179.00SE
 -
 QFH-A cross-cut adhesion Tester YONGLIDA standard 3 swirl/spin cutter heads$ 178.00SE
 -
 TQC SP3000 Adhesion Tester Cross-cut Guide Gauge/Baige Plate 6-in-1 Multifunctional Adhesion Tester$ 346.00SE


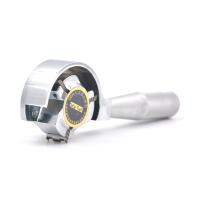
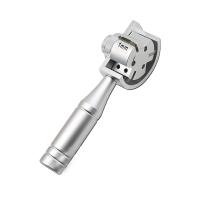
BaiEn BN704 Cross Hatch CutterSPEC
BaiEn BN704 Cross Hatch CutterDetails
BaiEn BN704 Cross Hatch CutterPacking list
- SKU
- NB006217
- Tooth spacing
- 1mm、2mm、3mm
- Application standard
- ISO2409-1974

1 purpose
The paint film scratcher is designed and manufactured according to the ISO2409-1974 standard. It is mainly suitable for the determination of adhesion of organic coatings by the crosshatch method. It is not only suitable for laboratories, but also can be used at construction sites under various conditions.
2. Principle and Application
This instrument uses tools of a certain specification to cut and penetrate the coating into a grid pattern. The completed pattern is classified into six levels to evaluate the resistance of the coating to separation from the substrate.
The scratcher has three types of multi-blade cutting knives with spacing (1mm 2mm 3mm), which can be selected according to different test conditions. The multi-blade cutting knives with 1mm spacing are suitable for test pieces with coating thickness <60um; the multi-blade cutting knives with 2mm spacing are suitable for The knife is suitable for test pieces with a coating thickness of 60-120um. The blade cutting knife with a spacing of 3mm is designed for special purposes. The test piece should be made of steel, tinplate, aluminum or glass as the base material.
Three technical indicators
1. The spacing between multi-edged cutting knives is: 1mm 2mm 3mm
2. The straightness of the tooth tip of the multi-edged cutting knife is: â¯0.006mm â¯0.006mm â¯0.012mm
3. Multi-edged cutting knife working tooth tip width: â¯0.10mm
Four test tools
1. Soft brush (bring your own)
2.3x magnifying glass (provided with the instrument)
3. Adhesive tape (bring your own)
Four operations and usage methods
1. Test pieces need to be prepared in accordance with ISO R1514 and ISO 2808.
2. Place the test piece on a flat plate with sufficient hardness.
3. Hold the handle of the scratcher and make the multi-edged cutting knife perpendicular to the plane of the test piece.
4. Cut with uniform pressure, smooth and non-vibrating technique and a cutting speed of 20-50mm/S.
5. Rotate the test piece 90 degrees and repeat the above operation on the cut to form a grid pattern.
6. Use a soft brush to gently brush the test piece backward 5 times and forward 5 times along the two diagonals of the grid pattern.
7. The test should be completed at least on three different positions of the test piece. If the test results at the three positions are different, the test should be repeated on more than three positions and all results should be recorded at the same time.
Five things to note
1. All cuts should penetrate the coating, but not too deep into the substrate.
2. If the coating is too thick and hard to penetrate the substrate, the test will be invalid, but it should be stated in the test report.
3. In special circumstances or when there are special requirements, the adhesive tape method must be used for measurement. The tape is generally a 25mm wide translucent tape, and the backing material is polyester film or acetate fiber. Paste the tape on the entire grid, and then Tear off at the minimum angle, and the result can be obtained by the ratio of the paint film surface to the peeling area.
4. The test should be conducted at a temperature of 23 ±2℃ and a Relative Humidity of 50 ±5%.
Six results assessment
Grading | illustrate |
0 | The cut edges are completely smooth: not a single square comes off |
1 | There are a few flakes of coating separation at the intersection of the cuts, and the cross-hatch area is obviously affected by no more than 5%. |
2 | The coating peeling off along the cutting edge or at the intersection of the cuts is significantly greater than 5%, but the impact is obviously not greater than 15% |
3 | The coating is partially and completely broken into large fragments along the cutting edge or it is partially and completely peeled off at different parts of the grid, significantly greater than 15%, but the cross-hatch area is significantly affected by no more than 35% |
4 | Large fragments of the coating peel off along the cutting edge or some or all of the squares are peeled off, significantly greater than 35%, but the cross-hatch area is obviously not affected by more than 65% |
5 | Even according to section 4, the degree of peeling cannot be identified. |
Note: A magnifying glass can be used for visual inspection
8. Maintenance and storage
After the test is completed, the instrument should be wiped clean, placed in the instrument box, and placed in a dry place.
Nine random accessories
A 3x magnifying glass and an instrument screwdriver.
- 1Cross-Cut Tester Selection Points to Note
- 2What is the test method for coating adhesion?
- 3Adhesion of Mechanical Properties Test of Powder Coatings
- 1JJF 2163-2024《Calibration Specification for Paint Film Scribers》
- 2HG/T 5299-2018《Optical polyethylene terephthalate(PET) transparent hardening film for indium tin oxide(ITO)》
- 3QJ 990.14-1986《Coating inspection method coating adhesion inspection method》
- 4GB/T 9286-1998《Paints and varnishes cross-cut test》