Reader's Guide
This manual is compiled based on manufacturer's data. Due to equipment batch changes, the content may not fully match every physical unit. Please refer to the actual operation and on-device labels.
Copyright belongs to the manufacturer. For internal reference of purchasers only. If safety parameters in the manual differ from the physical unit, please suspend operation and consult our engineer for confirmation.
Disclaimer: This manual is for reference only. In case of any discrepancy, the physical unit shall prevail. Our company assumes no liability for any consequences arising from operations based on this manual.
PUSHEN Pushen GZY-II Linear Drying time Recorder Instruction Manual
1. Purpose
The GZY-II type paint film drying time tester is mainly used to test the drying and curing times of coatings and paints.
2. Testing principles
This equipment gradually dries and cures the coating and paint over time. The needle traces across the coating layer, and by observing the scratches, the drying and curing times of the paint and paint are measured.
3. Design Standards
The design of this device complies with the standard requirements of ASTM-5895 Experimental Method A.
4. Main structure
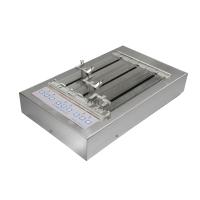
The GZY-II Paint Film Drying Time Tester uses a high-torque stepper motor, enabling precise positioning and timing control. Six scribe clips are installed on the slide frame, and the movement of the slide drives the scribe needles to move across the glass sheet coated with a new wet film. After the stroke ends, the stitch will automatically stop running, and the buzzer will sound with a "beep, beep" sound. By lifting upward, the pressure plate at the lower rear side of the slide frame can be manually moved to reset the slide. The front end of the instrument is equipped with a scale that facilitates the conversion of movement distance and travel time. The instrument offers several different movement speed levels to choose from.
5. Main Technical Parameters
Power supply voltage: AC220V/50Hz
Glass sheet size: 3×25×333mm
Total travel time: 1/6, 2/12, 3/24 hours
Total travel distance: 300mm
Scribe clip: Can hold blank ≤φ2 ball or pointed needles
Dimensions: 505×305×205mm (Length×Width×Height)
Instrument weight: 10kg
6. Operating Steps
1. Preparations before the test
The test should be conducted under constant temperature and humidity conditions.
The instrument should be placed on a sturdy and flat surface away from strong magnetic fields, electric fields, and strong electromagnetic pulse interference.
2. Operating Method
Turn on the power and turn on the power switch at the rear of the instrument.
If the slide frame is not in the left starting position, you can lift the pressing plate at the lower rear of the slide frame and manually move the slide to reset it.
Attach a suitable needle (ball or point) to the scribe clip so that the needle bar remains perpendicular to the glass plate.
Loosen the tightening screws on the bracket, remove the glass plate, and prepare a wet film on the glass sheet (the wet film must meet relevant standards or the requirements agreed upon by both parties).
Install the glass sheet back onto the bracket and tighten the set screw at one end.
Lower the scribe clip so the needle contacts the new coated layer.
Select the appropriate speed gear and press the corresponding button, and the slide will slowly move to the right. If you want to change your selection, you must first press the stop button before you can reselect. After the specified time, the instrument will automatically stop and sound a chime.
Evaluate the results at each drying stage corresponding to the observation trajectory. The drying time can be determined by converting the scale on its edge.
7. Result determination
Observe the marks left by the stitch on the coating; typical test results are shown in the figure below.

The first stage is the so-called pear-shaped visual impression, which corresponds to the time required for solvent evaporation.
The second stage is continuous breaking, which corresponds to the sol-gel transition phase.
The third stage is the interruption of the track, which corresponds to the drying time of the surface.
The fourth stage is when the needle no longer penetrates the film, which corresponds to the final drying time.
8. Notes
After using the instrument for a period of time, lubricate the lead screws and slide rods inside the instrument appropriately from the openings on both sides.
- 1PUSHEN PS 2465 HNQ Film Backtack tester Instruction Manual
- 2PUSHEN JM-VI/JM-IV double platform abrasion instrument instruction manual
- 3PUSHEN Pushen JTX-II architectural coatings Scrub Resistance Tester Instruction Manual
- 4PUSHEN KSM-2 Open Sand Mill Instruction Manual
- 5PUSHEN NM-I Wear Tester Instruction Manual
- 6PUSHEN PS 2461 wooden camera obscura instruction manual
- 7PUSHEN PS 2460/1/2 Visual Color Assessment Cabinet Instructions
- 8PUSHEN PS 2463 Checkerboard Instruction Manual
- 9PUSHEN PS2701 TCJ-II resilience impact test instrument instruction manual
- 10PUSHEN QBJ Automatic Cupping Instrument Instruction Manual